
AbleSet
Cues
AbleSet allows you to automatically announce songs and sections using computer-generated or custom pre-recorded voices. You can customize what you'd like to hear in the settings.
To get started, load the "AbleSet Cues" plugin into one of your tracks in your project. You should find it in Plug-Ins > AbleSet in Live's browser.
If it's not listed there, open Live's "Plug-Ins" preferences and make sure that "Use VST3 Plug-In System Folders" is enabled.
On Windows, enable "Use VST3 Plug-In Custom Folder" and set the folder to "%LOCALAPPDATA%\Programs\Common\VST3".
Then, click the "Rescan Plug-Ins" Button at the top of the window.
This plugin receives cues from AbleSet and plays them on the track it's placed on.
Settings
Auto-Speak Song Titles
When this is enabled, AbleSet will automatically announce songs when you jump to them while playback is stopped. Enable "Include Song Descriptions" if you'd like the song's description to be included in the announcement.
Auto-Speak Song Stop Descriptions
This announces the current song's stop description once the end of the song is reached and playback has stopped.
Auto-Speak Section Titles
When this is enabled, AbleSet will automatically announce sections when you jump to them while playback is stopped. Enable "Include Section Descriptions" if you'd like the section's description to be included in the announcement.
Count-In Sections During Playback
This enables a count-in of sections during playback, like "Chorus, 2, 3, 4". It uses either the Measure track or the song's current time signature to find out how to count the next section in.
This feature respects queued sections and automatic section transitions, so it will always announce the section that is played next.
Count-In Loops During Playback
This enables a count-in of loops during playback, e.g. "Loop, 2, 3, 4". When this is disabled, nothing will be counted in when the current section is looped.
Include Beat Numbers in Count-Ins
When this setting is disabled, only the next section name will be spoken, e.g. "Chorus" instead of "Chorus, 2, 3, 4".
Finish Speaking Section Names During Count-Ins
This makes AbleSet always speak the entire section name, even if it's longer than one beat, e.g. "Interlude, 3, 4" instead of "Interl-, 2, 3, 4".
Speak Count-Ins Backwards
This reverses the count-in numbers, e.g. "Bridge, 3, 2, 1" instead of "Bridge, 2, 3, 4".
2-Bar Count-In
This extends the count-in to two bars, e.g. "Chorus, 2, 1, 2, 3, 4". If the current section is too short for a 2-bar count-in, AbleSet will fall back to a 1-bar count-in.
Announce the Section Name on the 2nd Bar
This moves the section name in a 2-bar count-in to the 2nd bar, e.g. "1, 2, Bridge, 2, 3, 4".
Per-Section Count-In Customization
You can customize the count-in per section by adding attributes to the section locator or clip. To disable the count-in for a section, add [c:0]. To use a one-bar count-in, add [c:1] and for a two-bar count-in, add [c:2].
If you'd like to specify which beat the section name should be announced on, you can also add it to the attribute after the number of bars, separated by a dot: [c:2.3].
You can also enable or disable the count-in beat numbers per section. For example, to enable the count-in numbers for a given section, add [c:beats] or [c:b], and to disable it, add [c:nobeats] or [c:nb].
To enable loop announcements, use [c:loop] or [c:l], and to disable it, use [c:noloop] or [c:nl].
To use a half-time count-in, use [c:halftime] or [c:ht]. This
speaks only every 2nd beat, e.g. 1 _ 2 _ 3 _ 4 instead of 1 2 3 4 5 6 7 8.
If you'd prefer the count-in to be stretched to double the length,
use [c:halfspeed] or [c:hs].
Use the [c:bw] or [c:backwards] attribute if you'd like the count-in to run backwards (e.g. "4, 3, 2, 1"). To override this and force the count-in to run forwards, use [c:fw] or [c:forwards].
Use the [c:f] or [c:finish] attribute if you'd like the count-in to always finish saying the section name (e.g. "Interlude, 3, 4"), even if it's longer than one beat. Use [c:nf] or [c:nofinish] to do the opposite.
You can combine these attributes to keep them all in one pair of brackets, separated by colons, e.g. [c:1.2:nl:hs].
To apply the same customization to all sections of a song, add these attributes to the song locator. Each of the customizations can still be overridden per section.
Available Voices
You can choose from a list of different voices that can be used to generate cues. These might differ depending on the operating system you're using.
Piper TTS (macOS, Windows)
These voices are generated using the Piper engine and are focused on speed and efficiency. They might not sound as good as the others, but work offline.
The Piper engine comes with one voice (Jenny) by default to keep the app size small, but you can download additional voices from here and place them in the "speech-models" folder of your AbleSet's resources folder.
On macOS, this folder is located at "~/Library/Application Support/ableset/speech-models", on Windows it's located at "%APPDATA%\ableset\speech-models".
Each voice should consist of one .onnx and one .onnx.json file. For a good
British English male voice, I'd recommend giving
Alan a try.
Mac TTS (macOS)
This uses your Mac's default reading voice and can take a bit longer to generate phrases, but works offline as well. I'd recommend using one of the Siri voices for the best clarity. To change the voice, open your System Settings, navigate to Accessibility > Read & Speak and click the little i icon next to "System Voice":
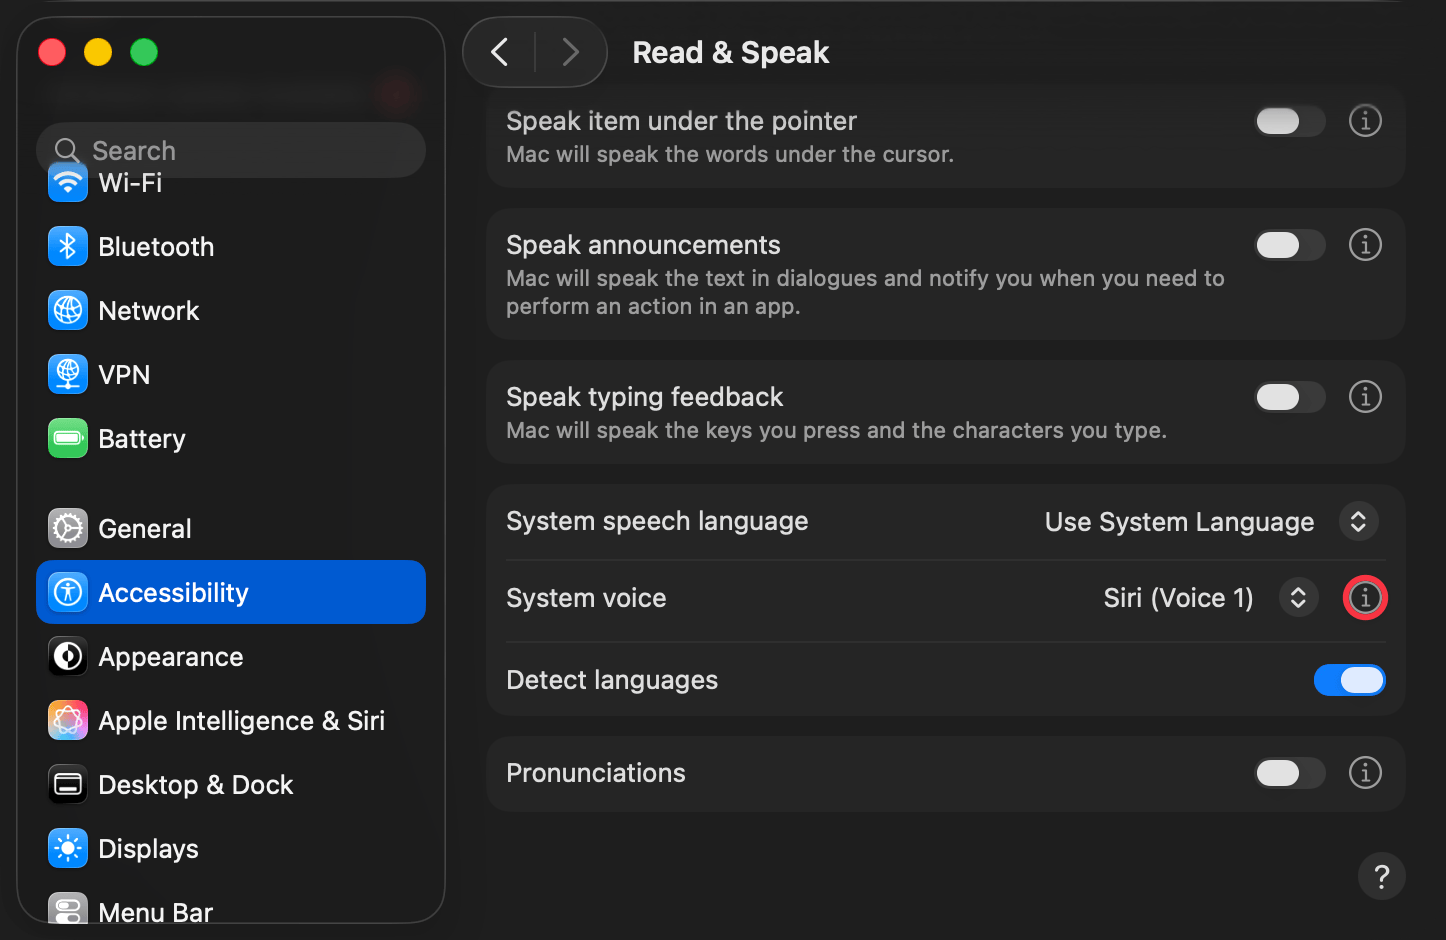
After changing the default voice, delete the "mac-default" folder located in the "Cues" folder of your project's AbleSet folder and restart AbleSet so it can generate the voices again.
Online TTS (macOS, Windows)
These voices are generated using ElevenLabs' text-to-speech service and sound the most natural, but they require an internet connection to be generated, and generating them can take a bit longer compared to the other voice services.
Custom Voices
If you'd like to supply your own audio files, you can do so by creating a "Custom" folder in the "Cues" folder of your project's AbleSet folder. Audio files need to be mono WAV files, and they should be named according to the phrase they represent.
If an audio file in this folder matches a phrase that is supposed to be spoken, AbleSet uses this file instead of the computer-generated one. It will still use the computer-generated phrase if no matching audio file could be found in the "Custom" folder.
Enable the "Fall Back to Section Titles Without a Number" setting to make AbleSet speak "Verse" instead of "Verse 1" if "Verse 1" isn't available as a custom audio file.
Multiple Custom Voices
To create multiple custom voices that you can easily switch between, create folders that start with "Custom", like "Custom Leo" and place your WAV files in them. AbleSet will then allow you to switch between these custom voices in the settings.
If a phrase isn't found in the selected custom voice folder, AbleSet will look for it in the default "Custom" folder before falling back to a generated version using the TTS voice you selected.
Timing Adjustments
Depending on the voice you're using, the timing of count-ins might be a bit off,
so the words land slightly after the beat. AbleSet automatically tries to shift
audio files so the first transient lands exactly on the beat, but if that
doesn't work, you can manually adjust individual phrases by adding the time
shift in milliseconds to the file name (e.g. One [70ms].wav).
This works for custom and generated voices.
Chords in Descriptions
When AbleSet detects a chord symbol in the description of a song or section, it spells out the chord, so "E#m" is announced as "E Sharp Minor", for example. If your description contains more than just a chord, wrap the chord in square brackets, e.g. "Guitar Start in [Em]".
This page was last modified on 2026-07-14