
AbleSet
AbleSet's Locator Notation
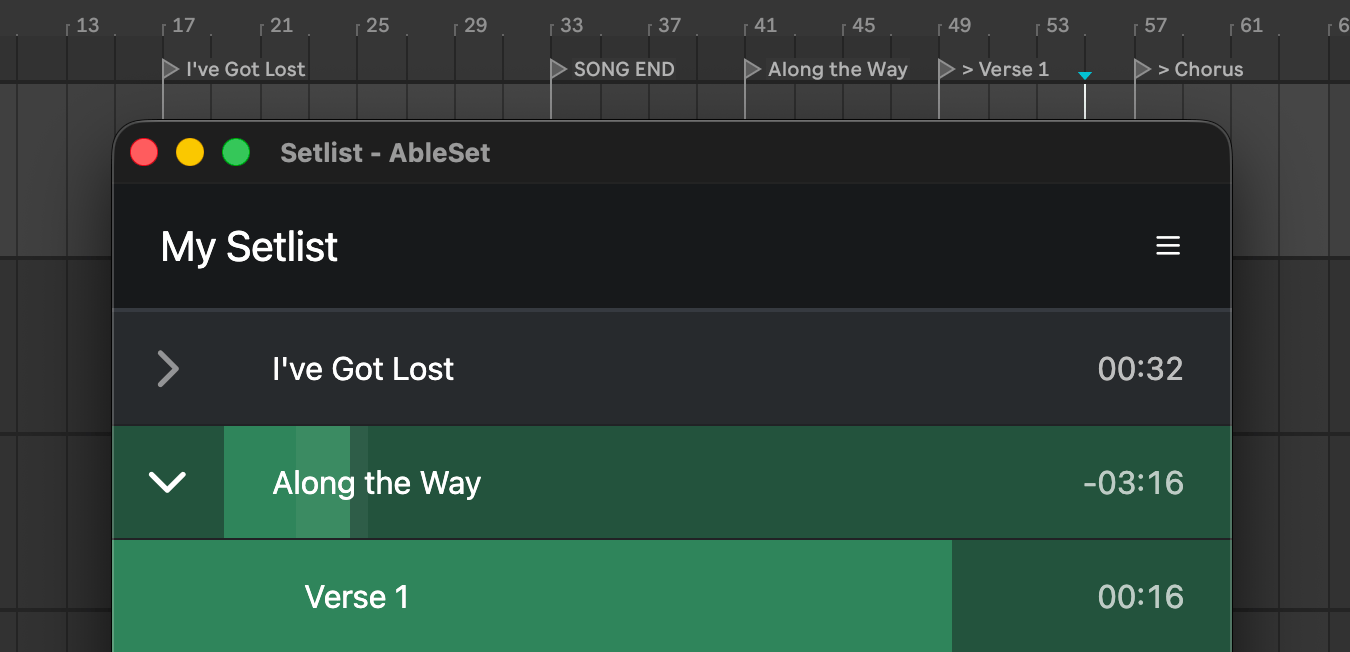
AbleSet uses Ableton's locators to determine where songs start and end. The simplest form of a locator contains just the song title and is located at the song's beginning: Never Gonna Give You Up. Using this locator will lead to that title appearing as a song in AbleSet.
To ensure that playback runs smoothly, you should always place locators on a beat, if possible on a downbeat. If you place the locator between two beats, Ableton's quantization will not always work as expected.
To give AbleSet more information on locators, you can use this locator notation:
Section Locators
A section locator starts with a > followed by the name – for example > Verse 2. You can use it to divide a song into multiple sections. These can then be triggered from AbleSet.
If you want a section to be quickly accessible within performance view, you can prefix it with >> – for example >> Chorus.
Sections can also be defined using MIDI clips on a Sections track starting with Live 11. This causes less visual clutter in your arrangement view. You can learn more about it here.
Locator Descriptions
Everything written in curly brackets is interpreted as a description. You can use this feature to add information like the song's key, tempo, and length. Example: Follow Night {Tuning: C, Capo 1}
You can also add descriptions to section locators. These descriptions can be overridden in the setlist editor for any given song.
Song End Locators
To mark the end of a song, you can place a locator named SONG END where your song ends. When this locator is reached, AbleSet will directly jump to the next song in the setlist if there is one and continue playing.
If you'd like AbleSet to stop playing at the end of a song, you can either enable the "Stop After Song" toggle in the setlist editor, or use a STOP instead. I'd recommend using SONG END locators and adding stops in the setlist editor for maximum flexibility.
You can also add a Stop Description to the song by adding a description to the SONG END locator. This description will appear as a separate entry after the song in the setlist. I'd recommend doing this in the setlist editor for more flexibility, though.
Stop Locators
There are two ways to get AbleSet to automatically stop playback after a song. If you place a locator named STOP or AUTOSTOP in your set, AbleSet will automatically stop playback there.
If you place all songs directly next to each other, you can add a dot to the beginning of the song locator that follows the song after which you want playback to stop (for example: . Follow Night). AbleSet will stop playback when it reaches this locator.
Both ways only work with normal locators, not with section locators, but can be combined as desired. So one song can be stopped by a STOP locator while the next song can be stopped by a dot locator. Depending on how you want to structure your live set, it might make more sense to use one or the other.
Normally, AbleSet will either jump to the next song's locator or stay at the stop locator upon reaching it depending on the "Autojump to the Next Song" setting, but you can override this behavior by adding either a +JUMP or +STAY flag to the stop locator – for example STOP +JUMP tells AbleSet to automatically jump to the next song's locator when the stop locator is reached.
Pause Locators
Using pause locators, you can tell AbleSet to pause playback at a certain section. To do that, you can add a +PAUSE flag to the locator – for example > Chorus +PAUSE.
Loop Locators
If you want to loop a section of your song, you can do so by adding +LOOP to the end of the locator where you want the loop to start. AbleSet will then loop from this locator until the next locator until you disable the loop.
If you'd like AbleSet to always finish a loop before jumping to the next locator, you can use +LOOPFULL instead of +LOOP.
If you're using a Sections track to define your song sections, and there's no locator at the end of a looped section, both +LOOPFULL and +LOOP will behave in the same way, always just disabling the loop bracket and waiting for the current section to end.
To add a pre-defined maximum number of loops, you can append a number to the loop flag. For example, +LOOP:4, will automatically disable the loop bracket after the third loop so the section plays four times in total.
Tags
You can add tags to your songs by appending them to the locator, e.g. Follow Night #rock #crossings. These tags are displayed in the performance view and you can search for them when you're building your setlist.
When you're in the setlist editor, you can add all songs with a given tag to your setlist at once. To do this, click the "+" button on the bottom right, search for your tag, and click on "Add all songs with #tag".
Song & Section Durations
If you want to set the duration of a song manually, you can do so by adding it to the end of the locator in square brackets. For example, Follow Night [3:20] will set the song's duration to 3:20 minutes.
You can also override the duration of a section in a song using the same syntax. This affects the song's total duration as well.
Non-Song Locators
Your setlist might contain parts that aren't songs, like interludes or utility areas that just change presets on connected MIDI devices. To exclude them from the number of remaining songs and the song numbering in the setlist, add a [nosong] attribute to the starting locator, e.g. Interlude [nosong].
These non-songs are still counted toward the total setlist time. If you don't want that, you can override the duration in the locator as well, e.g. Preset Changes [nosong] [0:00].
Colors
To color-code locators, you can add a color name to the locator in square brackets – e.g. Galvanize [blue].
By default, section locators use the same color as the song they're assigned to, but you can override the color by adding a color name to the section locator – e.g. > Verse [red].
The following colors are supported:
- Gray
- Red
- Orange
- Amber
- Yellow
- Lime
- Green
- Emerald
- Teal
- Cyan
- Sky
- Blue
- Indigo
- Violet
- Purple
- Fuchsia
- Pink
- Rose
Automatic Jumps / Transitions
To tell AbleSet what section it should jump to after a section, you can use the >>> transition notation. For example, to jump to the first verse after the intro of your song, you can name your intro locator Intro >>> Verse 1 given that there's a section called "Verse 1".
The target section needs to be defined with a locator or, if you're using section clips, have a locator at the same position as the section clip defining the section.
If you'd like the song to end after a given section, you can also use >>> SONG END. This skips all sections after that section and jumps to the next song if there is one.
Here's a quick video that shows the feature in action: Automatic Jumps
Skipping Sections
To skip a section, add the +SKIP flag to it and make sure that the section following it has a locator so AbleSet can jump to it. If you're skipping multiple sections in a row, only the section after the last skipped section needs to have a locator.
When you skip one or more sections at the beginning of a song, jumping to that song will place the playhead at the beginning of the first unskipped section.
The +END Flag
Your songs might have some sections that don't always need to be played but still should be available in case you need to jump to them.
In that case, add these sections to the end of your song and, to mark the beginning of this area of sections, add a +END flag to the first of these sections:

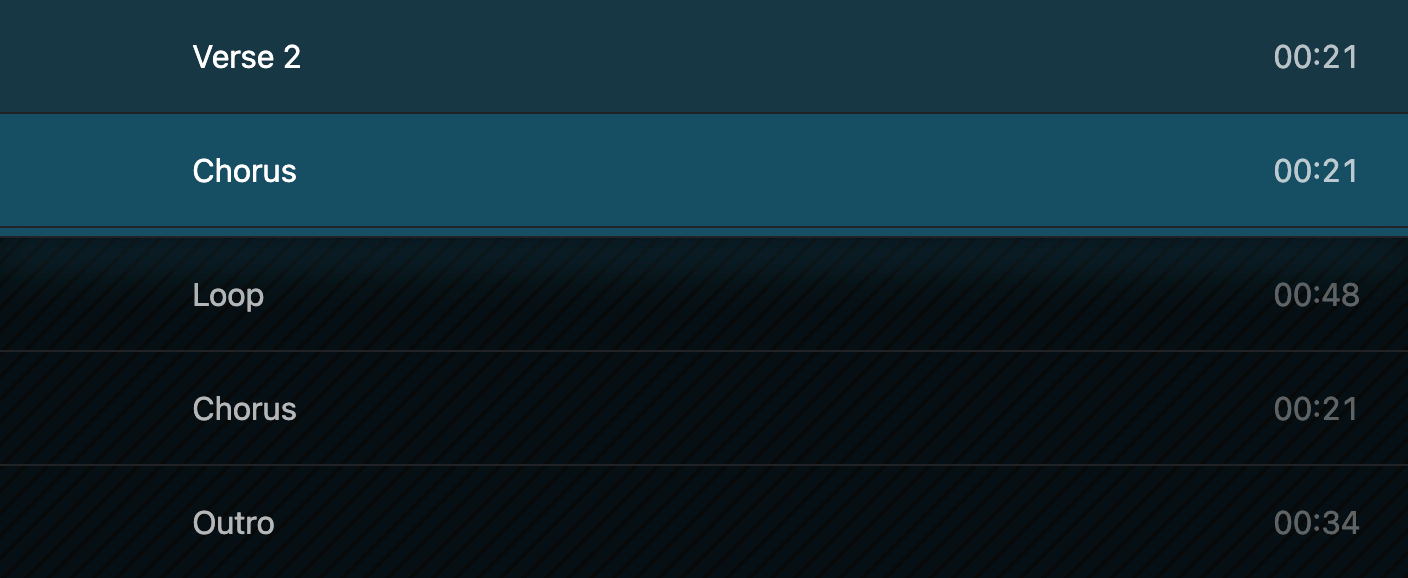
AbleSet will mark that and all following sections as skipped and won't consider their duration when calculating the song's duration. The progress bar will also end at that section, but you can still jump to the sections that come after it.
This is what it looks like in the setlist:
Class Names
If you'd like to style certain songs using Custom CSS,
you can give them custom class names. For example, Why We Are [.bold]
would add the bold class to every element representing this song on the web app.
Ignored Locators
If you want AbleSet to ignore a locator, just prefix it with a *. This might be interesting for making notes in your live session: * Check automation
AbleSet also ignores Clyphx locators, like [STOP] SETSTOP; MIDI NOTE 3 1 127; so they don't clutter up your setlist.
This page was last modified on 2026-02-08