
AbleSet
AbleSet Docs
Last updated: 2026-09-17
This page contains the entirety of AbleSet's documentation in one place.
Feel free to save it as a PDF or print it for offline reference.
Introduction to AbleSet
Welcome to AbleSet!
Getting started using the app is simple. AbleSet lives as a little icon in your menu bar. Click on it to open the main window.
To open the AbleSet interface on your computer, click "Open AbleSet" in the menu bar window. Your browser will open with the local address of your AbleSet. If you want to open AbleSet on your phone or tablet, make sure they are on the same network as your computer and open the same address in their browser.
You can always see the address of AbleSet in its menu bar window:
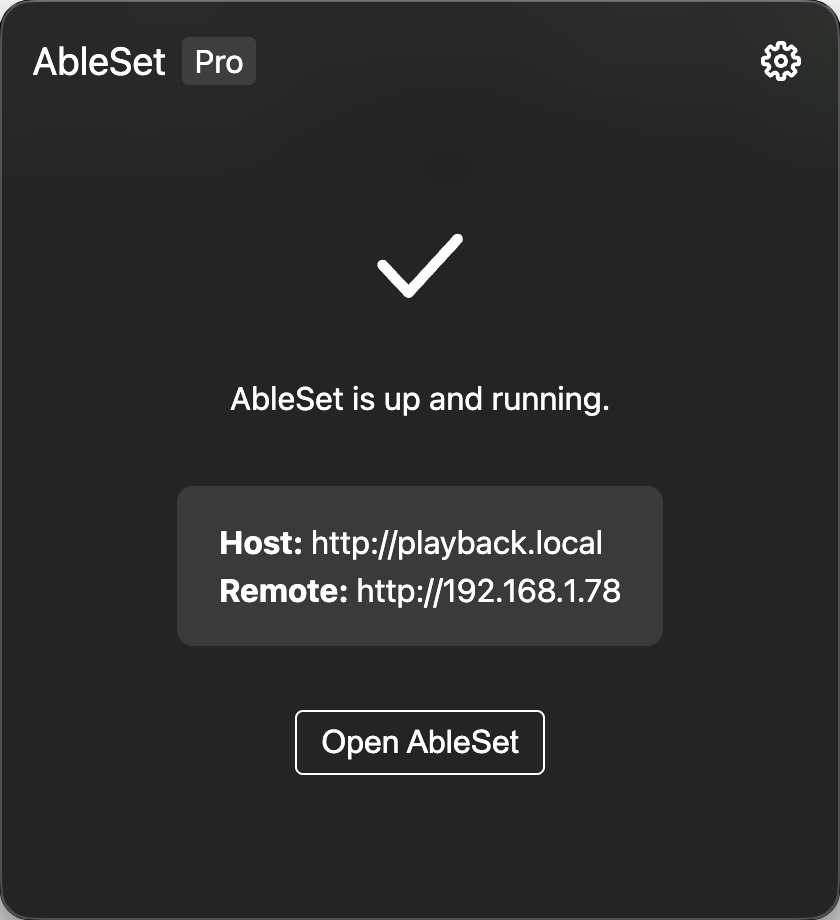
AbleSet uses Ableton's locators to convert your session into a setlist. The easiest way to set up a setlist is to place a locator at the beginning of each track and give it the song's name. If you want to know more about what you can do with locators in AbleSet, check out the Locator Notation documentation.
If you have any questions, please feel free to contact me via email or using the chat on the bottom right of this page. You can also check out the forum at forum.ableset.app.
Frequently Asked Questions
Compatibility
What version of Live is AbleSet compatible with?
AbleSet works with all editions of Live 10, 11, and 12, though some features like section clips and lyrics tracks require Live 11 or 12. If you want to use the Max for Live controller, you either need Live Suite or the Max upgrade for Live Standard.
What version of macOS can AbleSet run on?
I've tested and officially support AbleSet on macOS Monterey (12) and higher.
What version of Windows can AbleSet run on?
AbleSet can run on Windows 10 and 11.
What version of iOS or iPadOS is AbleSet compatible with?
AbleSet is officially compatible with iOS 15 and newer, but you might be able to use it on versions as old as iOS 12. If your iPhone or iPad supports iOS 13, it can also be updated to iOS 15. You can find a list of all supported iPads and iPhones on Wikipedia.
Some features, like the Canvas, will likely not work on versions below iOS 15.
What version of Android is AbleSet compatible with?
I've tested AbleSet on Android 7 and higher, but you might be able to run it on older versions of Android as well.
License
How many computers can a license be activated on?
AbleSet licenses can be activated on a different number of computers depending on their edition:
- AbleSet Intro: 1 activation
- AbleSet Standard: 2 activations
- AbleSet Pro: 3 activations
If you've upgraded from AbleSet 1, your license can still be activated on up to four computers.
To see the status of your licenses and how many computers they can be activated on, go to your account page.
How can I deactivate my license on a computer?
If you still have access to your computer, open AbleSet, then click the settings icon in AbleSet's status window and select "Deactivate Machine". This will reset AbleSet into the demo mode on that computer and open up a slot for activating your license on another computer.
Can I activate my license without an internet connection?
Yes, to activate AbleSet offline, click the "Offline Activation" button in the activation window. Scan the displayed QR code or copy the link to a device that has an internet connection and enter your license key there.
You'll receive an activation code that you can either download as a file or copy to your clipboard to transfer it to your offline computer. Drag or paste the key into the activation key field to activate your license.
How long is a license valid?
AbleSet licenses don't expire and come with one year of free updates. If you want to update to a version that was released more than a year after you bought your license, you can renew it from your account page.
How much does it cost to renew my license?
This depends on which version and edition of AbleSet you bought. If you bought AbleSet 1 or 2, renewing your license costs $75. If you bought AbleSet 3, these are the renewal costs:
- AbleSet 3 Intro: $65
- AbleSet 3 Standard: $89
- AbleSet 3 Pro: $129
How much does it cost to upgrade to another edition?
Upgrades cost the difference between the price of your current edition and the edition you want to upgrade to. So, if you bought AbleSet Standard and want to upgrade to AbleSet Pro, the total cost would be the same as if you bought AbleSet Pro in the first place.
Here's a list of upgrade prices:
- Intro to Standard: $50
- Intro to Pro: $140
- Standard to Pro: $90
Will my license get renewed when I upgrade it?
Yes, your license will be renewed for another year of free updates when you upgrade it.
Why does a license only come with one year of free updates?
I've thought about the licensing scheme for AbleSet for a long time. I don't like subscription models where you lose access to the software you're paying for as soon as you stop paying, but working on new features takes a lot of work, so I decided to use this hybrid model instead.
If you're not interested in the new updates that get released more than one year after you bought your license, you don't have to renew it and can continue using the version you own for as long as you like. If you like the new features, you can renew your license at any point in time to receive another year of updates.
What are the limitations of AbleSet's free trial?
The free trial of AbleSet lets you test all features for as long as you want, with the only limitation being that you have to restart the app every 15 minutes for it to continue working.
Where can I get an invoice or a receipt for my license?
The payment confirmation email you received when purchasing AbleSet contains a link to your receipt. The linked page also allows you to generate an invoice.
Network
Does AbleSet have to be connected to the internet to work?
No, since AbleSet runs its own web server on your computer, you can use it without an internet connection. Just make sure all your devices are on the same network and you're good to go.
How can I create a network on stage?
There are multiple ways to create a network on stage. Check out this guide for more information on this topic.
What port does AbleSet run on?
AbleSet runs on port 80 by default. Since this is the default port for websites, you don't have to enter it in your browser to access the web app. If AbleSet can't start on port 80, e.g. when it's already in use by another program, it will look for a free port starting with port 3000 and display that port in the status window.
Redundant Setup / AbleNet
Does AbleNet have the same 1024 bar limitation Live's sync has?
AbleNet doesn't have any limitation regarding the length of the set.
Troubleshooting
AbleSet is stuck on "Connecting to Ableton..."
This is a sign that AbleSet can't establish a connection to its Ableton and can have multiple causes. Try those steps to fix it:
- Is Live running and is the AbleSet plugin selected in the MIDI preferences?
- If you don't see the AbleSet plugin, it might not be installed. Go to AbleSet's settings menu, click on "Add AbleSet Plugin to Ableton", and then follow the assistant to install and configure the plugin.
- Do you see any error messages in the status bar of Live?
I see "Cannot bind to ('127.0.0.1', 39041), port in use. Trying again..." in Live's status bar
This can happen if another program is already using the port Live uses to communicate with AbleSet, or if the port wasn't closed properly by the operating system before.
To fix this, please try restarting your computer. This resets all open ports and should allow Live to connect to AbleSet again.
Ableton Live doesn't jump to the next song or section in time
While Live is playing, AbleSet jumps to a song or section by activating its locator a short time before the jump is supposed to happen which respects Live's global quantization. You can simulate this by clicking on that locator in the arrangement view yourself while Live is playing.
If clicking on the same locator yourself also shows the same behavior, that's a good sign that the locator isn't placed on the quantization grid. You can fix this either by moving the locator onto the quantization grid or by decreasing the global quantization – 1/2 and 1/4 should work well.
I'm getting a "Playhead is Lagging" error notification
AbleSet's plugin runs on the same thread as Live's user interface. If you're working in a large project and it's zoomed out all the way, the plugin isn't able to send the playhead position to AbleSet at a regular interval which can cause all kinds of issues, like jumps to other songs not happening in time, loop brackets not being enabled, etc.
The easiest workaround is to zoom in your timeline so only one or two songs are visible at a time. This means Live doesn't have to render as many elements which frees up resources for AbleSet's plugin.
Alternatively, if you have access to Max for Live, you can add the AbleSet Controller to your project. This device runs independently of Live's user interface and can send the playhead position to AbleSet at a higher frequency.
I can't connect to AbleSet from my Android device
To connect to AbleSet from your Android phone, please make sure that it's on the same network as your computer and then enter the Remote or Host address shown in AbleSet's status window into your browser on Android.
If this doesn't help, sometimes disabling mobile data might do the trick as that forces Android to look for the IP address on your local network instead of trying to access it over the internet.
How can I report a bug?
You can send bug reports to support@ableset.app. To help me understand and reproduce the bug on my end, you can include the following information:
- A description of the bug and steps that led to it
- AbleSet's log package (Settings -> Create Log Package) including the project file
- Pictures or videos of the bug
AbleSet's Locator Notation
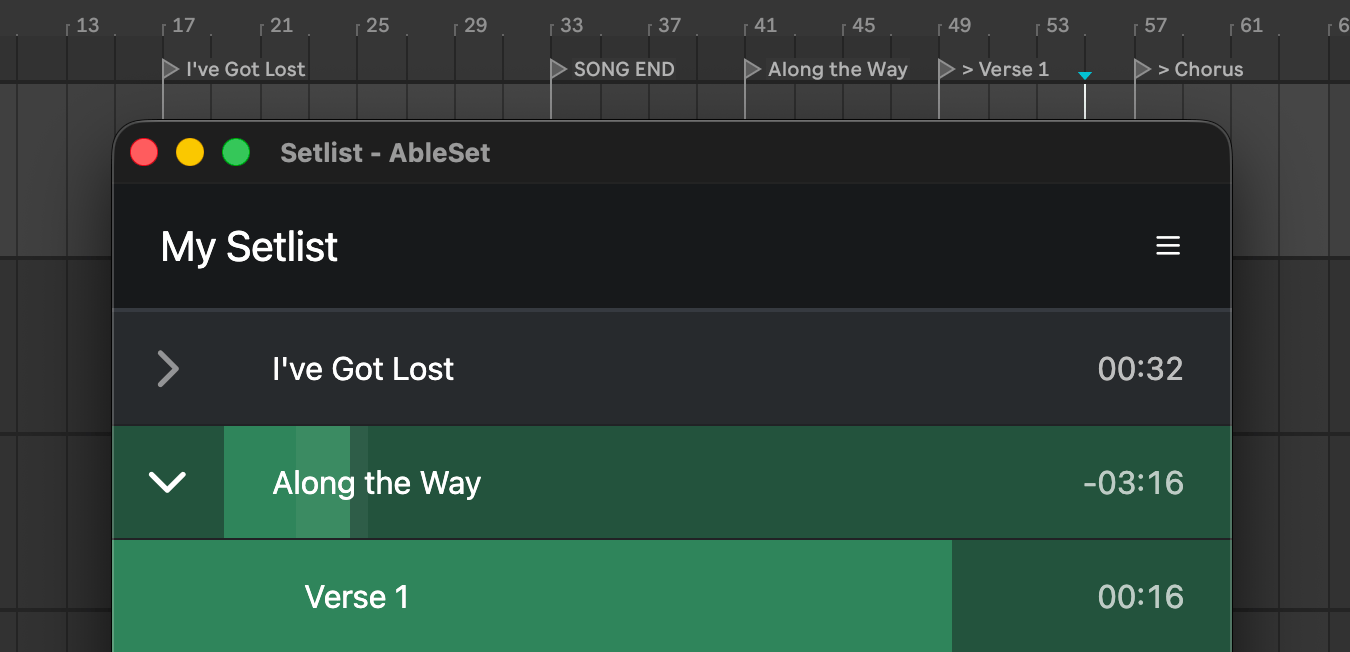
AbleSet uses Ableton's locators to determine where songs start and end. The simplest form of a locator contains just the song title and is located at the song's beginning: Never Gonna Give You Up. Using this locator will lead to that title appearing as a song in AbleSet.
To ensure that playback runs smoothly, you should always place locators on a beat, if possible on a downbeat. If you place the locator between two beats, Ableton's quantization will not always work as expected.
To give AbleSet more information on locators, you can use this locator notation:
Section Locators
A section locator starts with a > followed by the name – for example > Verse 2. You can use it to divide a song into multiple sections. These can then be triggered from AbleSet.
If you want a section to be quickly accessible within performance view, you can prefix it with >> – for example >> Chorus.
Sections can also be defined using MIDI clips on a Sections track starting with Live 11. This causes less visual clutter in your arrangement view. You can learn more about it here.
Locator Descriptions
Everything written in curly brackets is interpreted as a description. You can use this feature to add information like the song's key, tempo, and length. Example: Follow Night {Tuning: C, Capo 1}
You can also add descriptions to section locators. These descriptions can be overridden in the setlist editor for any given song.
Song End Locators
To mark the end of a song, you can place a locator named SONG END where your song ends. When this locator is reached, AbleSet will directly jump to the next song in the setlist if there is one and continue playing.
If you'd like AbleSet to stop playing at the end of a song, you can either enable the "Stop After Song" toggle in the setlist editor, or use a STOP instead. I'd recommend using SONG END locators and adding stops in the setlist editor for maximum flexibility.
You can also add a Stop Description to the song by adding a description to the SONG END locator. This description will appear as a separate entry after the song in the setlist. I'd recommend doing this in the setlist editor for more flexibility, though.
Stop Locators
There are two ways to get AbleSet to automatically stop playback after a song. If you place a locator named STOP or AUTOSTOP in your set, AbleSet will automatically stop playback there.
If you place all songs directly next to each other, you can add a dot to the beginning of the song locator that follows the song after which you want playback to stop (for example: . Follow Night). AbleSet will stop playback when it reaches this locator.
Both ways only work with normal locators, not with section locators, but can be combined as desired. So one song can be stopped by a STOP locator while the next song can be stopped by a dot locator. Depending on how you want to structure your live set, it might make more sense to use one or the other.
Normally, AbleSet will either jump to the next song's locator or stay at the stop locator upon reaching it depending on the "Autojump to the Next Song" setting, but you can override this behavior by adding either a +JUMP or +STAY flag to the stop locator – for example STOP +JUMP tells AbleSet to automatically jump to the next song's locator when the stop locator is reached.
Pause Locators
Using pause locators, you can tell AbleSet to pause playback at a certain section. To do that, you can add a +PAUSE flag to the locator – for example > Chorus +PAUSE.
Loop Locators
If you want to loop a section of your song, you can do so by adding +LOOP to the end of the locator where you want the loop to start. AbleSet will then loop from this locator until the next locator until you disable the loop.
If you'd like AbleSet to always finish a loop before jumping to the next locator, you can use +LOOPFULL instead of +LOOP.
If you're using a Sections track to define your song sections, and there's no locator at the end of a looped section, both +LOOPFULL and +LOOP will behave in the same way, always just disabling the loop bracket and waiting for the current section to end.
To add a pre-defined maximum number of loops, you can append a number to the loop flag. For example, +LOOP:4, will automatically disable the loop bracket after the third loop so the section plays four times in total.
Tags
You can add tags to your songs by appending them to the locator, e.g. Follow Night #rock #crossings. These tags are displayed in the performance view and you can search for them when you're building your setlist.
When you're in the setlist editor, you can add all songs with a given tag to your setlist at once. To do this, click the "+" button on the bottom right, search for your tag, and click on "Add all songs with #tag".
Song & Section Durations
If you want to set the duration of a song manually, you can do so by adding it to the end of the locator in square brackets. For example, Follow Night [3:20] will set the song's duration to 3:20 minutes.
You can also override the duration of a section in a song using the same syntax. This affects the song's total duration as well.
Non-Song Locators
Your setlist might contain parts that aren't songs, like interludes or utility areas that just change presets on connected MIDI devices. To exclude them from the number of remaining songs and the song numbering in the setlist, add a [nosong] attribute to the starting locator, e.g. Interlude [nosong].
These non-songs are still counted toward the total setlist time. If you don't want that, you can override the duration in the locator as well, e.g. Preset Changes [nosong] [0:00].
Colors
To color-code locators, you can add a color name to the locator in square brackets – e.g. Galvanize [blue].
By default, section locators use the same color as the song they're assigned to, but you can override the color by adding a color name to the section locator – e.g. > Verse [red].
The following colors are supported:
- Gray
- Red
- Orange
- Amber
- Yellow
- Lime
- Green
- Emerald
- Teal
- Cyan
- Sky
- Blue
- Indigo
- Violet
- Purple
- Fuchsia
- Pink
- Rose
Automatic Jumps / Transitions
To tell AbleSet what section it should jump to after a section, you can use the >>> transition notation. For example, to jump to the first verse after the intro of your song, you can name your intro locator Intro >>> Verse 1 given that there's a section called "Verse 1".
The target section needs to be defined with a locator or, if you're using section clips, have a locator at the same position as the section clip defining the section.
If you'd like the song to end after a given section, you can also use >>> SONG END. This skips all sections after that section and jumps to the next song if there is one.
Here's a quick video that shows the feature in action: Automatic Jumps
Skipping Sections
To skip a section, add the +SKIP flag to it and make sure that the section following it has a locator so AbleSet can jump to it. If you're skipping multiple sections in a row, only the section after the last skipped section needs to have a locator.
When you skip one or more sections at the beginning of a song, jumping to that song will place the playhead at the beginning of the first unskipped section.
The +END Flag
Your songs might have some sections that don't always need to be played but still should be available in case you need to jump to them.
In that case, add these sections to the end of your song and, to mark the beginning of this area of sections, add a +END flag to the first of these sections:

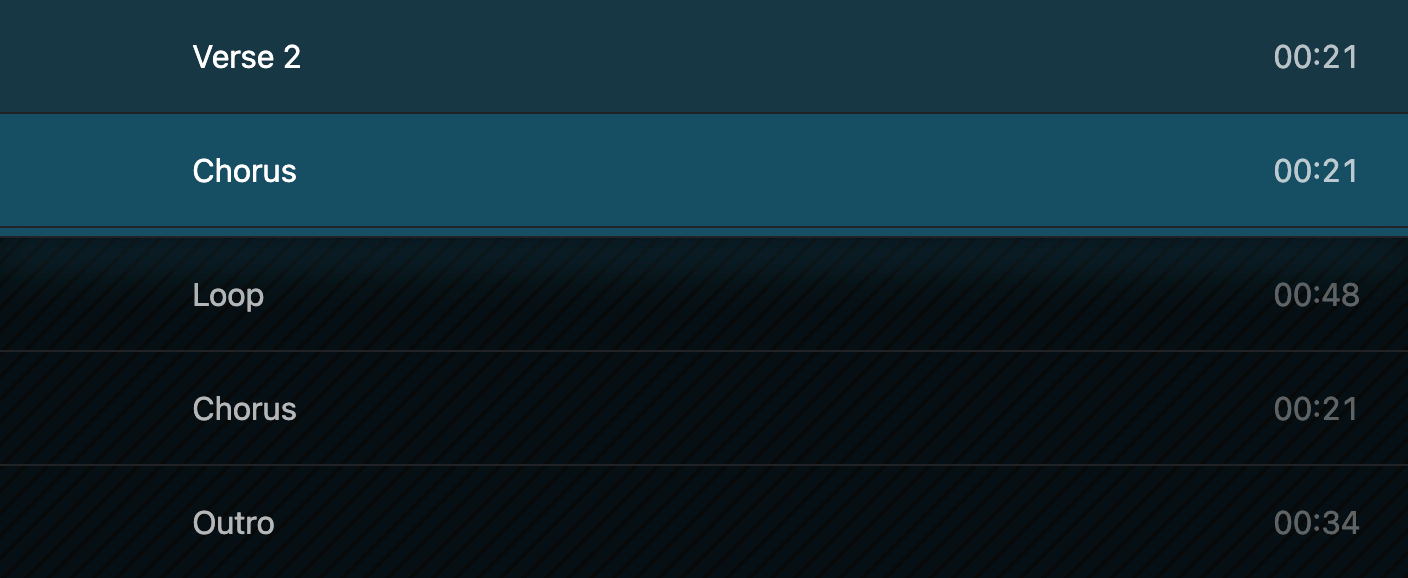
AbleSet will mark that and all following sections as skipped and won't consider their duration when calculating the song's duration. The progress bar will also end at that section, but you can still jump to the sections that come after it.
This is what it looks like in the setlist:
Class Names
If you'd like to style certain songs using Custom CSS,
you can give them custom class names. For example, Why We Are [.bold]
would add the bold class to every element representing this song on the web app.
Ignored Locators
If you want AbleSet to ignore a locator, just prefix it with a *. This might be interesting for making notes in your live session: * Check automation
AbleSet also ignores Clyphx locators, like [STOP] SETSTOP; MIDI NOTE 3 1 127; so they don't clutter up your setlist.
The Sections Track
You can use a MIDI track to define song sections. This cleans up the session since you have to use fewer locators.
This feature requires Live 11 or higher to work properly.
To get started, create a MIDI track called "Sections" and add empty MIDI clips to it where the song sections are. It might look a bit like this:

AbleSet will recognize these clips as section markers and add them to your song. The clip duration doesn't matter – each section ends where the next one begins.
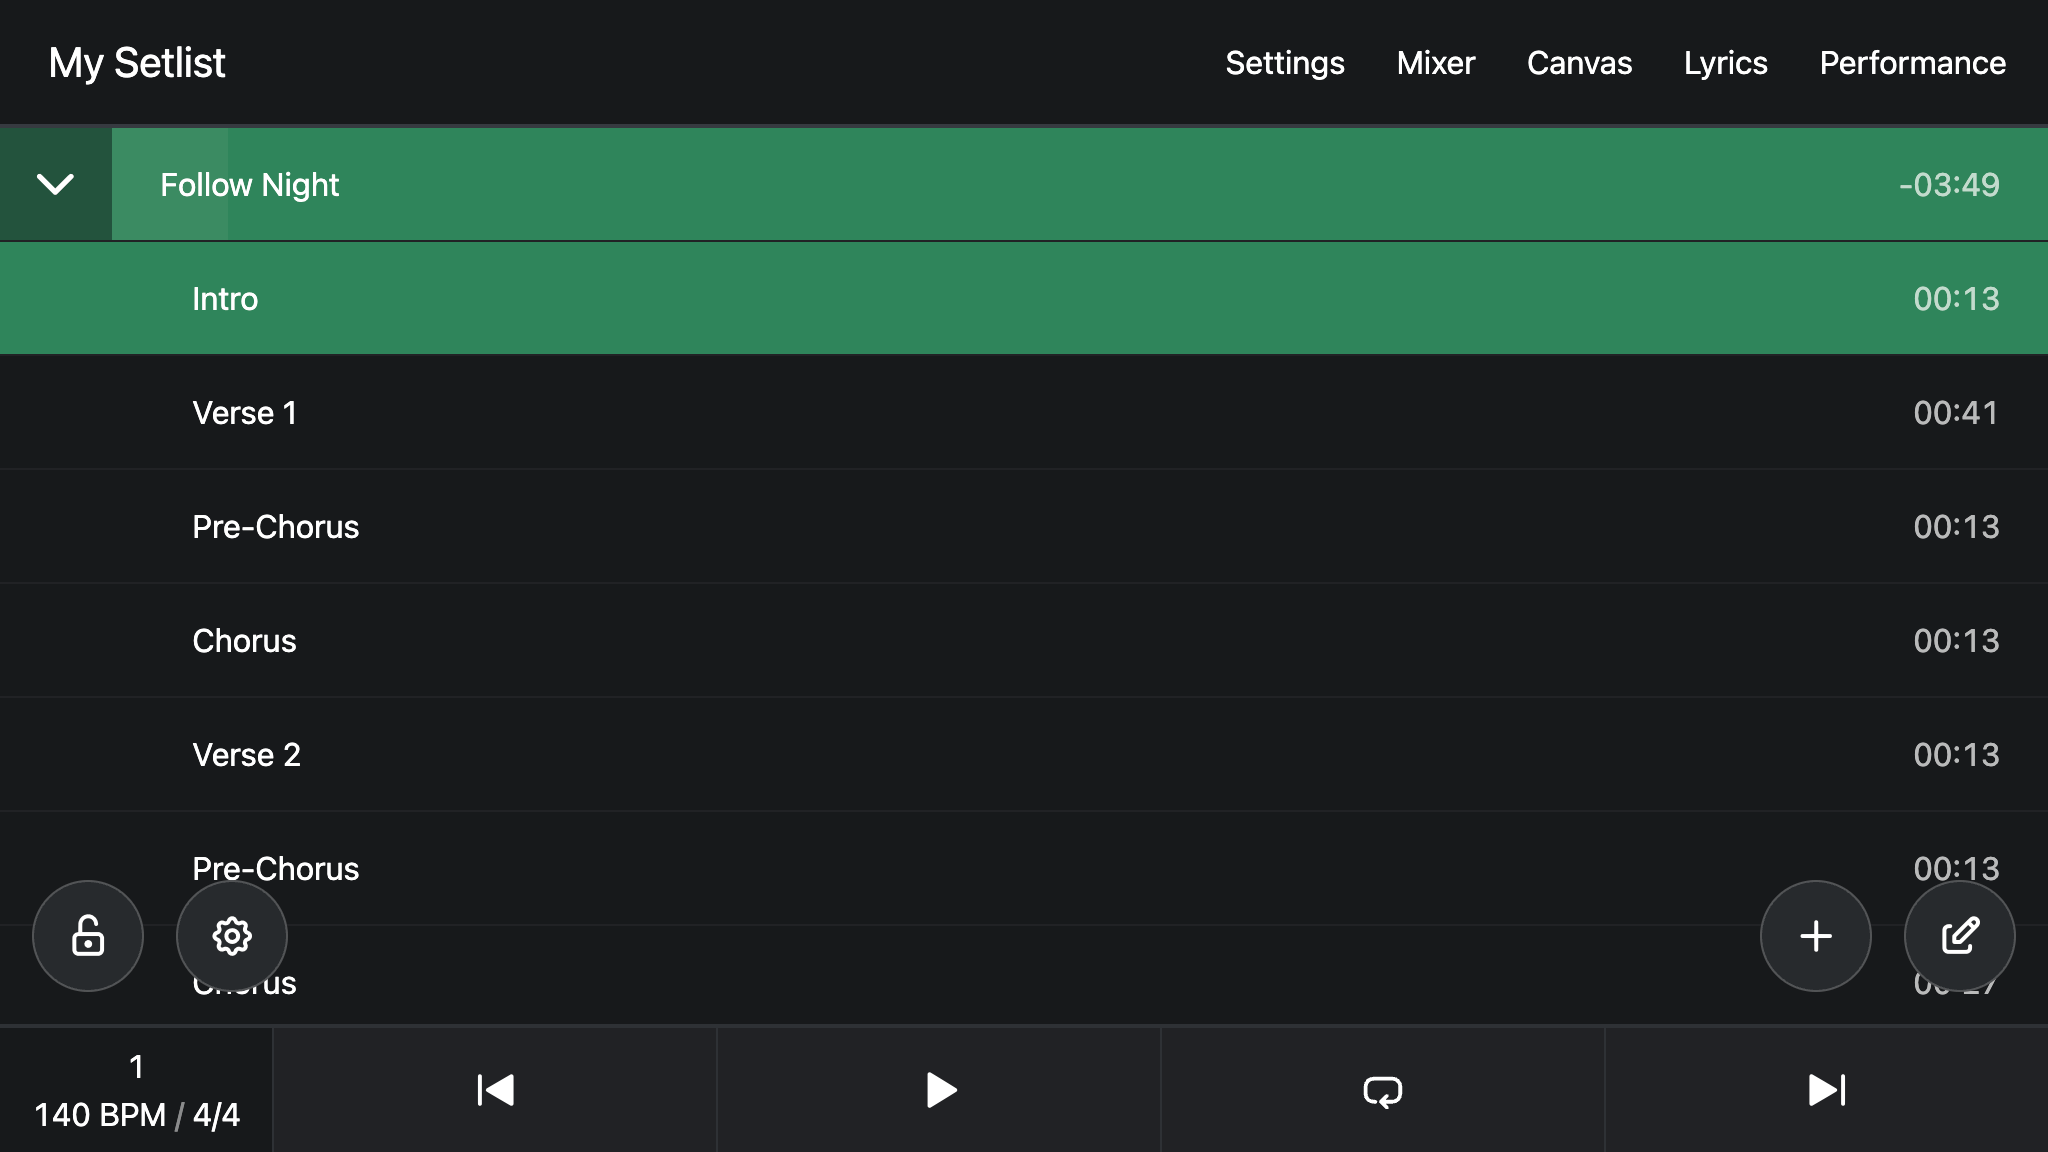
Alternatively, you can give the track any other name and include a +SECTIONS
flag. You can also use the locator notation syntax to
add comments and set a color for a section.
If you like, you can combine the use of section locator and clips in your songs. If there's a locator and a section clip at the same time, AbleSet will prioritize the information stored in the locator.
Due to some limitations with Ableton Live's API, sections defined by clips can only be jumped to when Live isn't currently playing. If you need that functionality, you can place locators named > at the same position as the section clip you'd like to be able to jump to.
As a workaround, AbleSet offers the ability to automatically place locators at each section clip. To access it, open the settings page, scroll down to the "Tools" section, and then click "Place Locators on Section Clips" to start this process. To reverse it, click "Remove Automatically Placed Locators".
The locators will use Live's default naming, which is just an increasing number. You can rename the locators to > for consistency, or >> if you'd like to mark the section as a quick jump section. You can also rename the locators to the section name, just remember to add a > at the beginning, e.g. > Chorus.
Even with these limitations, section clips are a great way for defining sections that you want to jump to during rehearsals – combined with the count-in function, this is a great way to practice certain sections of a song.
Using Clip Colors For Sections
If you add either the +CLIPCOLORS or +CC flag to the section track name, AbleSet will use the color of your clips for the sections. Each column of Live's color picker corresponds to one color in AbleSet:
The Setlist Editor
To edit the order of songs and make other changes to your setlist, open the setlist editor by clicking the edit button at the bottom right of the setlist.
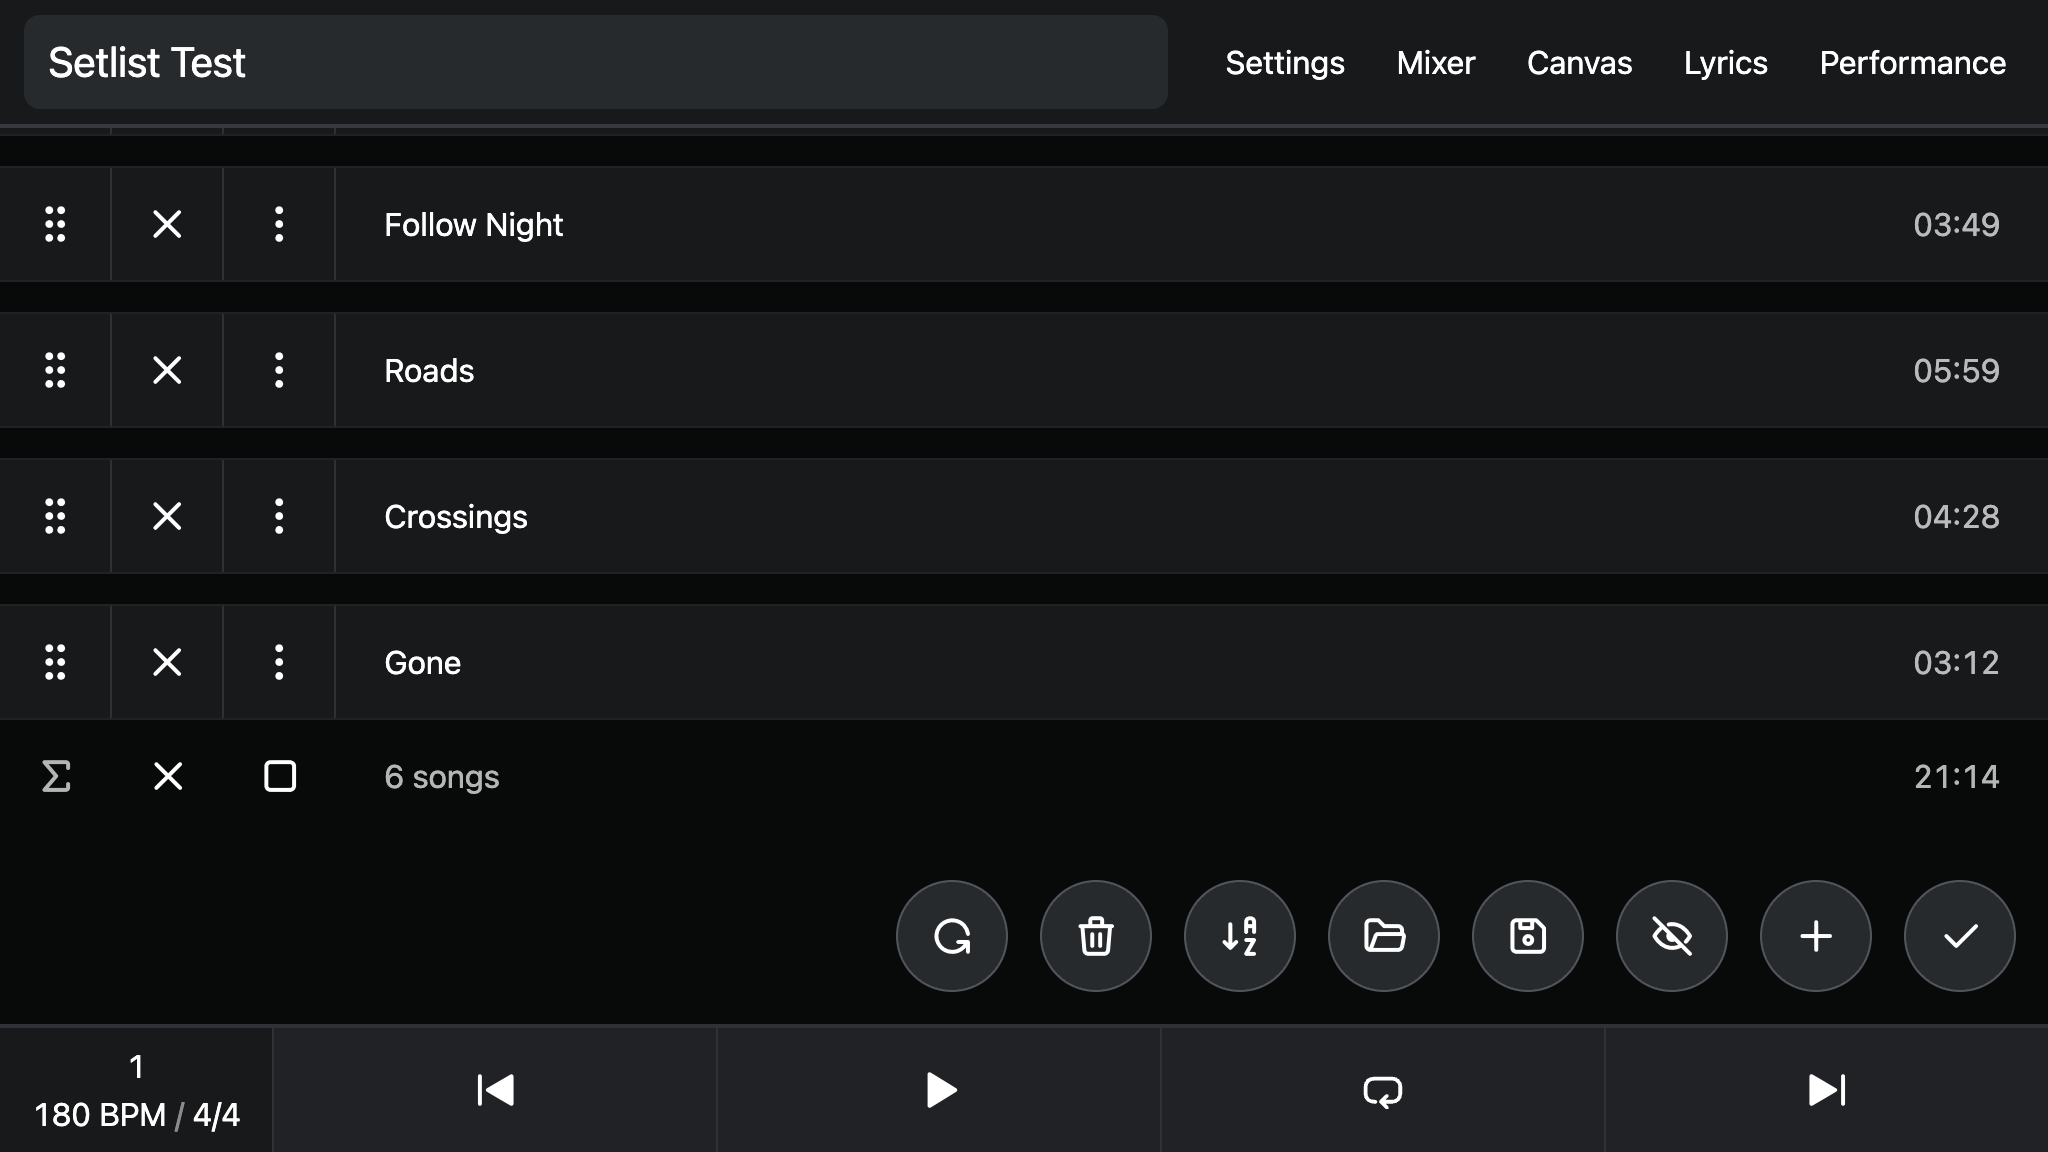
The setlist editor allows you to drag songs around by their handles on the left
to change their order, or remove songs by clicking the x button next to the
song's title. On smaller devices, the x button is hidden to save space and you
can remove songs by swiping them to the left.
Removed songs are just greyed-out by default, but you can hide them by clicking the eye button at the bottom right or by pressing ⇧ H. This view is closer to what you'll see after you exit the setlist editor.
If you'd like to remove all songs, click the x button below the last song.
This gives you a clean slate to start building your setlist. Click it again
to add all songs to your setlist. To the right of that button, you'll also
see the setlist's total duration.
When you're done editing your setlist, press the check button on the bottom right to save your changes and exit the editor. The current setlist is stored as part of your Ableton Live project, so make sure to save it as well when you close it.
Adding Songs
To add new songs to your setlist, click the + button at the bottom right or
press ⌘ K. This opens a search bar that lets you find songs and add them to
the end of your setlist.
You can either search for songs by their name, their description, or their tags. Searching by tags also allows you to add all songs with the same tag at once.
The search function is fairly flexible, so you can also search for songs by their initials or by parts of their title.
Song Details
To edit a song's details, click the three-dot button next to the song title or right-click the song. This opens a popover with a list of options you can modify:
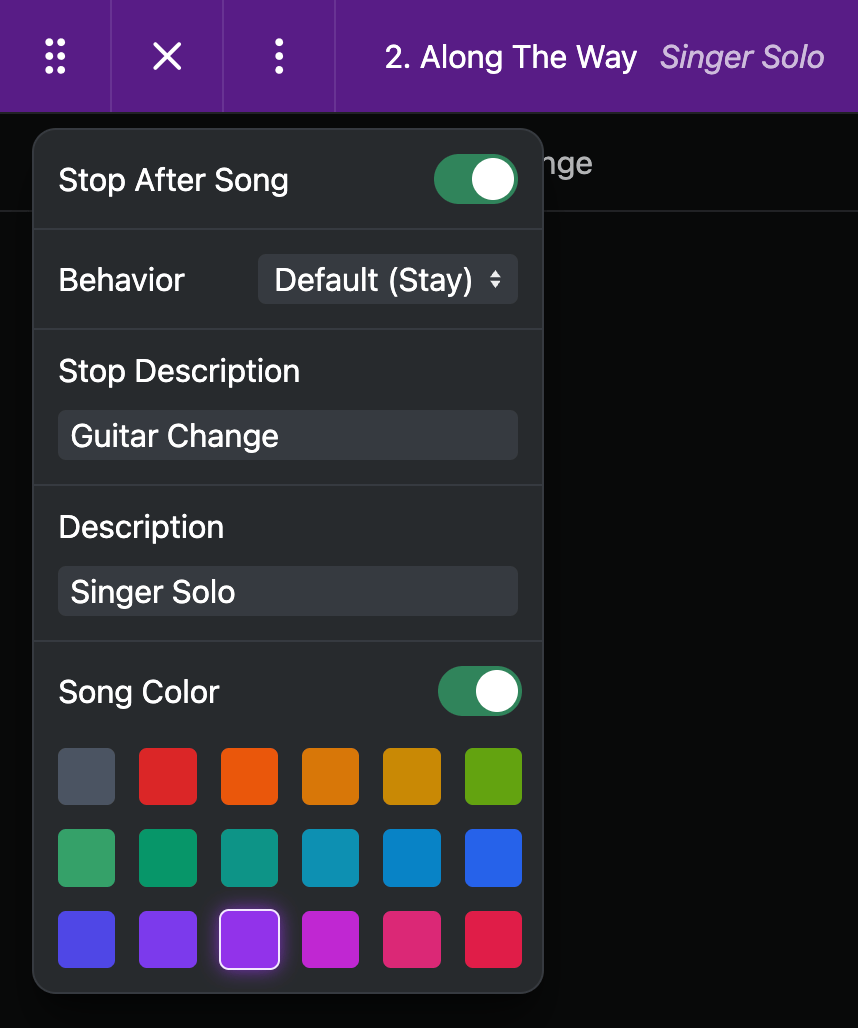
These options override the details you set up in your project's locators and are stored with your setlist.
Saving and Loading Setlists
To save a setlist, click the Save button at the bottom of the editor or press ⇧ S. This opens an overlay that lets you choose a name and save it.
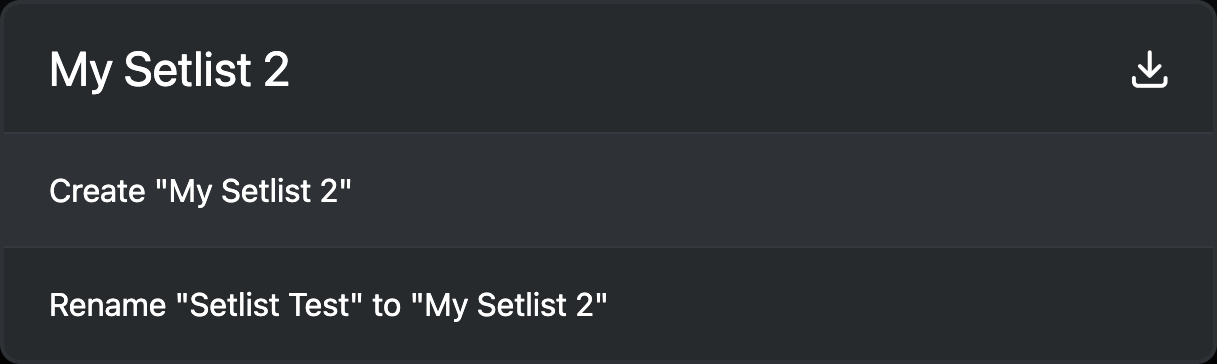
The download button at the right of the dialog lets you download the current setlist as a JSON file. This is a legacy feature and not really needed anymore since AbleSet already takes care of file management.
Saved setlists are stored as files in your Ableton Live project folder.
To load a setlist, click the Open button to the left of the save button or press ⇧ O. This shows you a list of all previously saved setlists and allows you to search for the one you'd like to open.
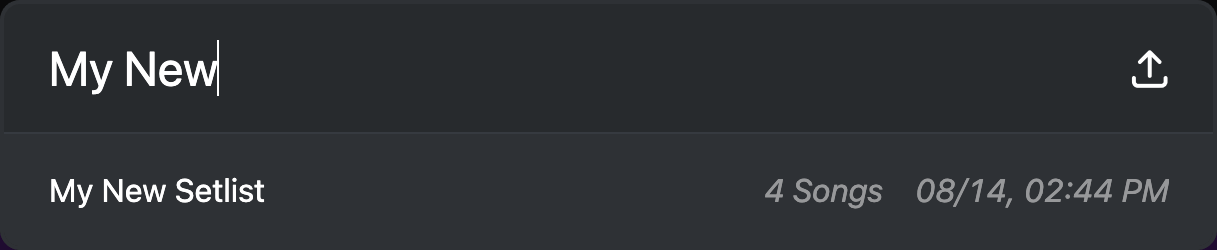
Please note that opening a setlist overrides the current setlist, so make sure you've save your changes before if you don't want to lose them.
The upload button on the right lets you import a setlist from a file.
Copying and Pasting Setlists
If you'd like to send the current setlist to someone else, press ⌘ C to copy it to your clipboard. This will copy all song titles, one song per line.
This works the other way around, too. To import a setlist from somewhere else, press ⌘ V. The song titles don't have to match the ones in your project exactly, AbleSet automatically finds songs based on the closest match.
If you're on mobile or don't have access to a keyboard, you can also open the Load Setlist dialog and paste your setlist into the search field to import it.
If you're using song or stop descriptions, these are copied to your clipboard as well, so a copied setlist might look like this:
I've Got Lost
Along The Way {Ab}
-- Announce Album release --
Roads {Shaker Intro}
Interlude
This works the other way around as well, so when you paste a setlist from your
clipboard, text in curly braces ({}) next to a song title is added as a song
description and text surrounded by two dashes on its own line is added as a stop
description for the song above it.
Importing Setlist Files
To import a setlist, click the Open button on the bottom right, and then click the upload icon to open a file picker. In addition to AbleSet's own file format, the importer supports Strange Electronic's SETLIST file format, so you can easily import those setlists as well.
You can also import text files containing a list of songs.
In addition to using the upload button, you can also drag these files directly into the setlist editor to import them.
Printing Setlists
To print your setlist, open the print dialog by pressing ⌘ P or selecting "Print" in your browser's menu bar. You can then either print the setlist directly or save it as a PDF:
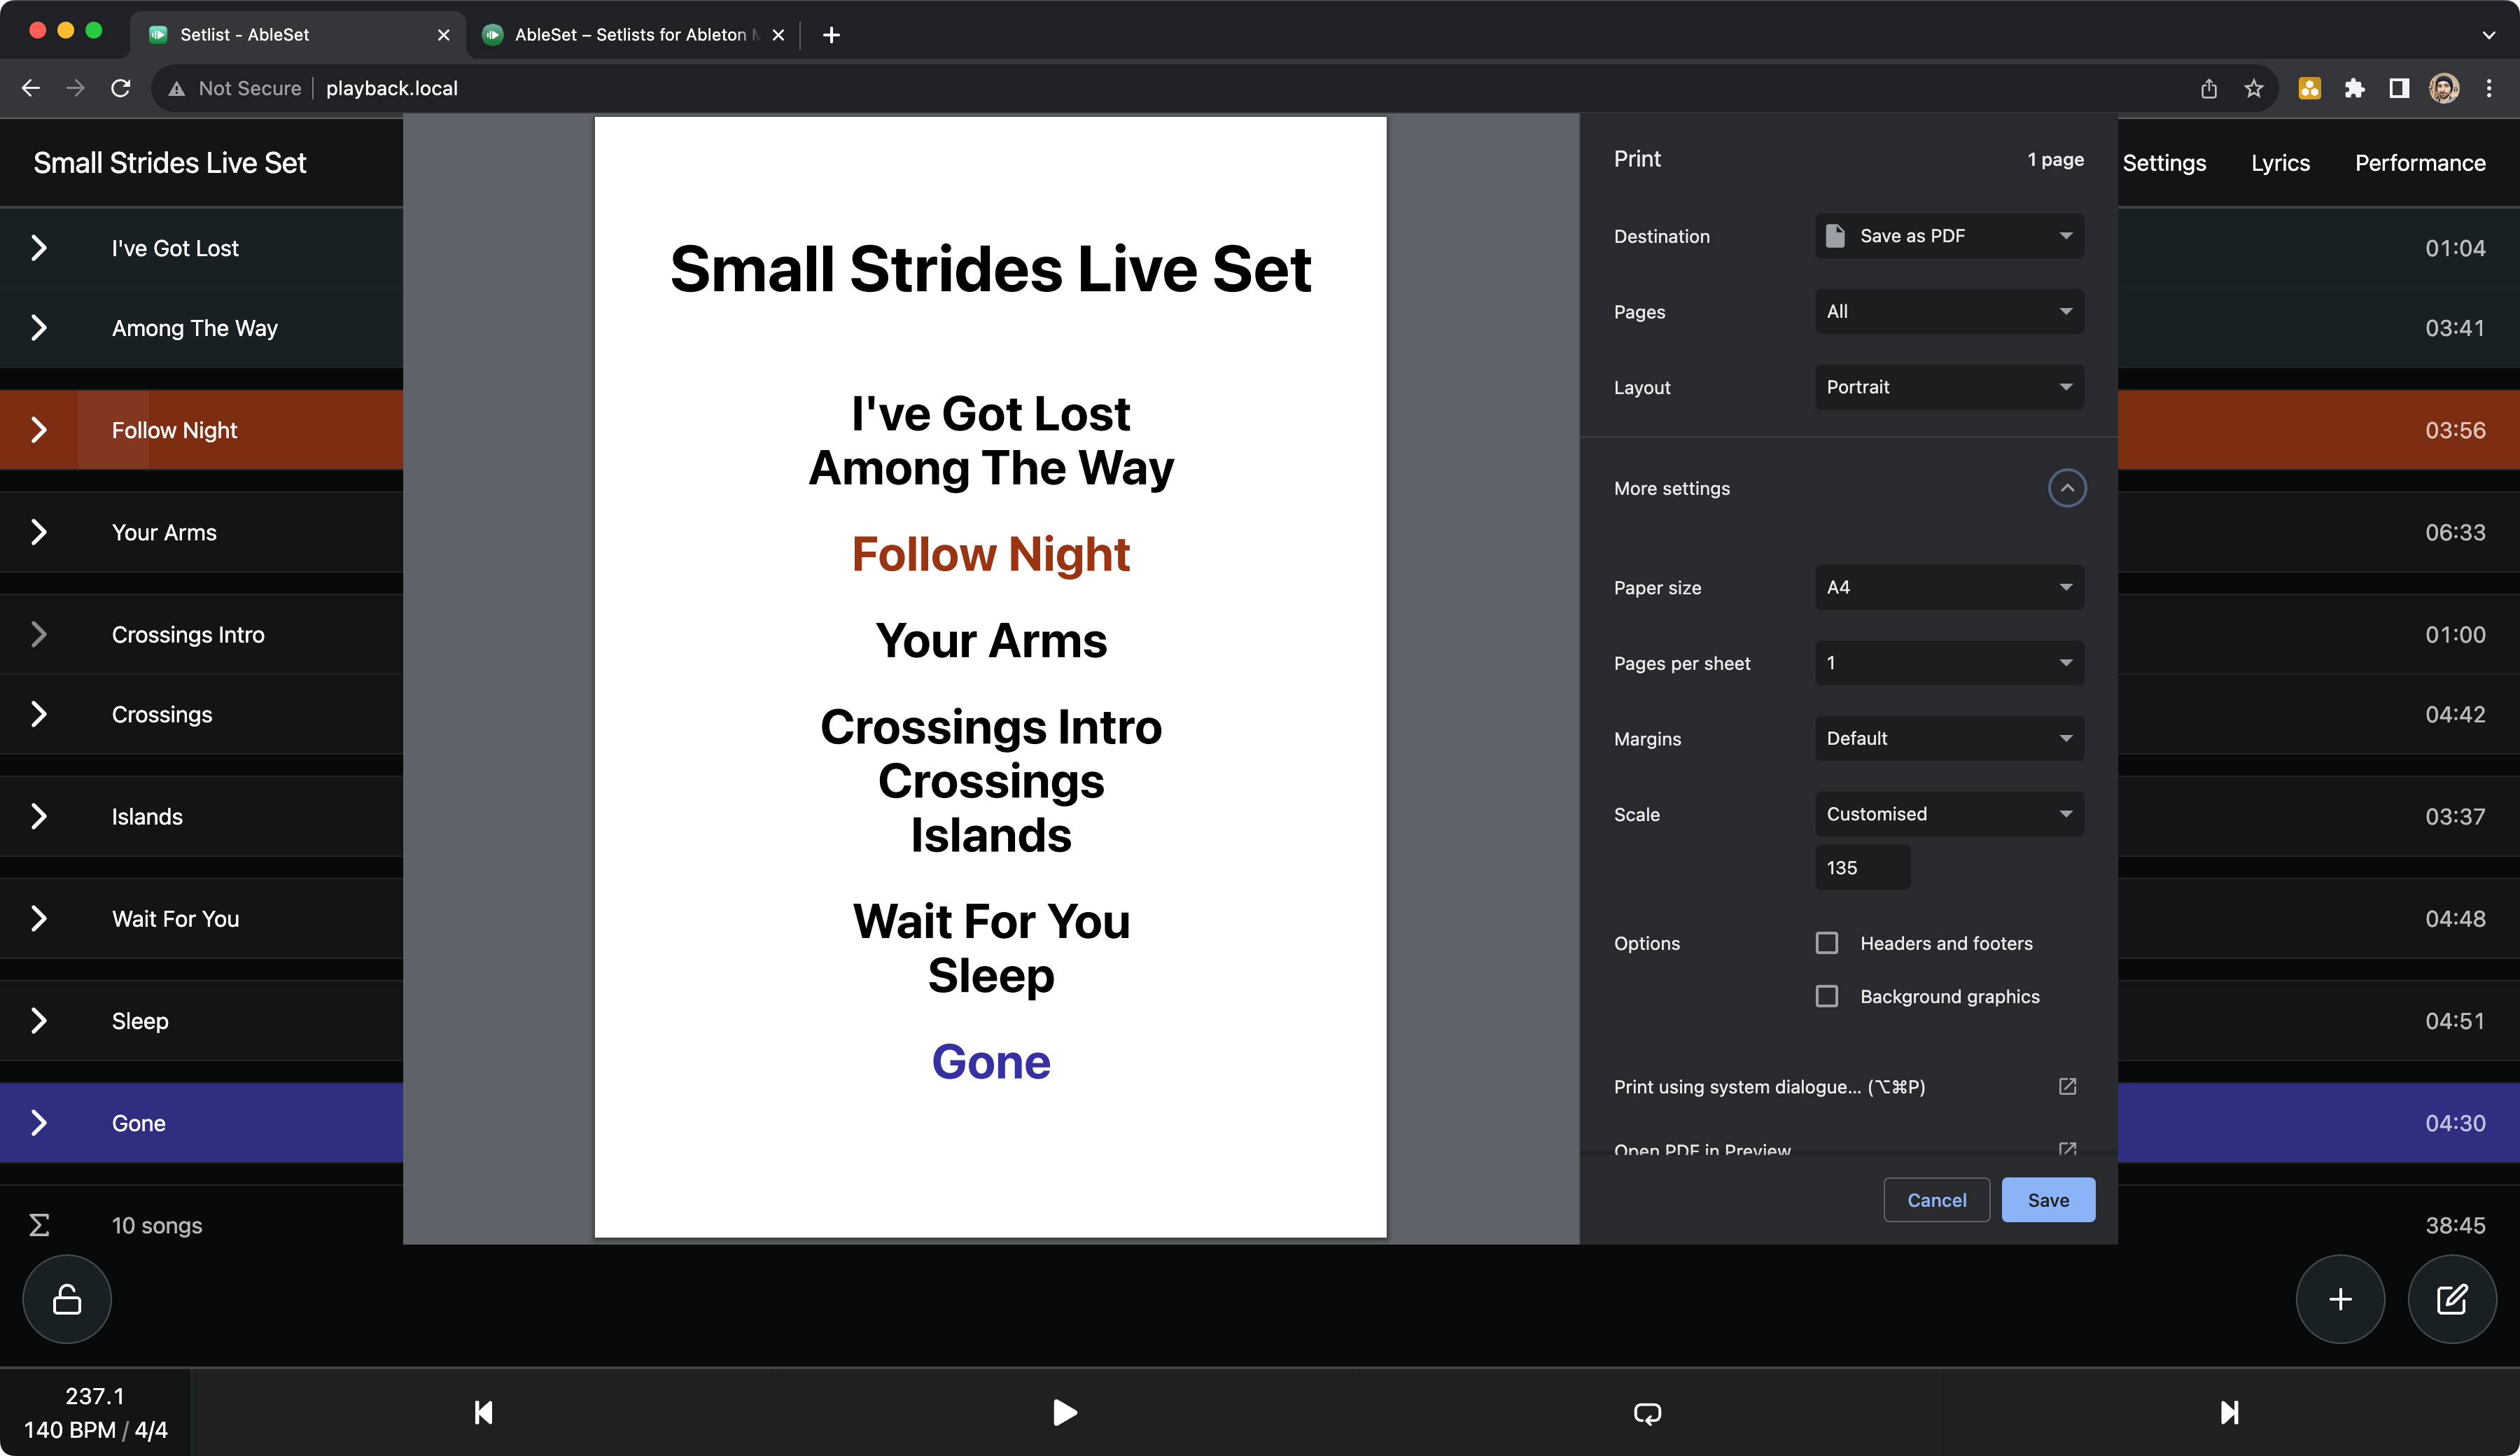
Song colors are included in the printed setlist.
I'd recommend using Chrome, Edge, or Opera to print your setlists as those give you more options to customize the size and page layout of the printed setlist, but Safari should generally work as well.
MIDI Mapping
If you prefer controlling your setlist via MIDI instead of a phone or tablet, you can either use AbleSet's built-in MIDI mapping or AbleSet's Max for Live device.
MIDI Mapping Settings
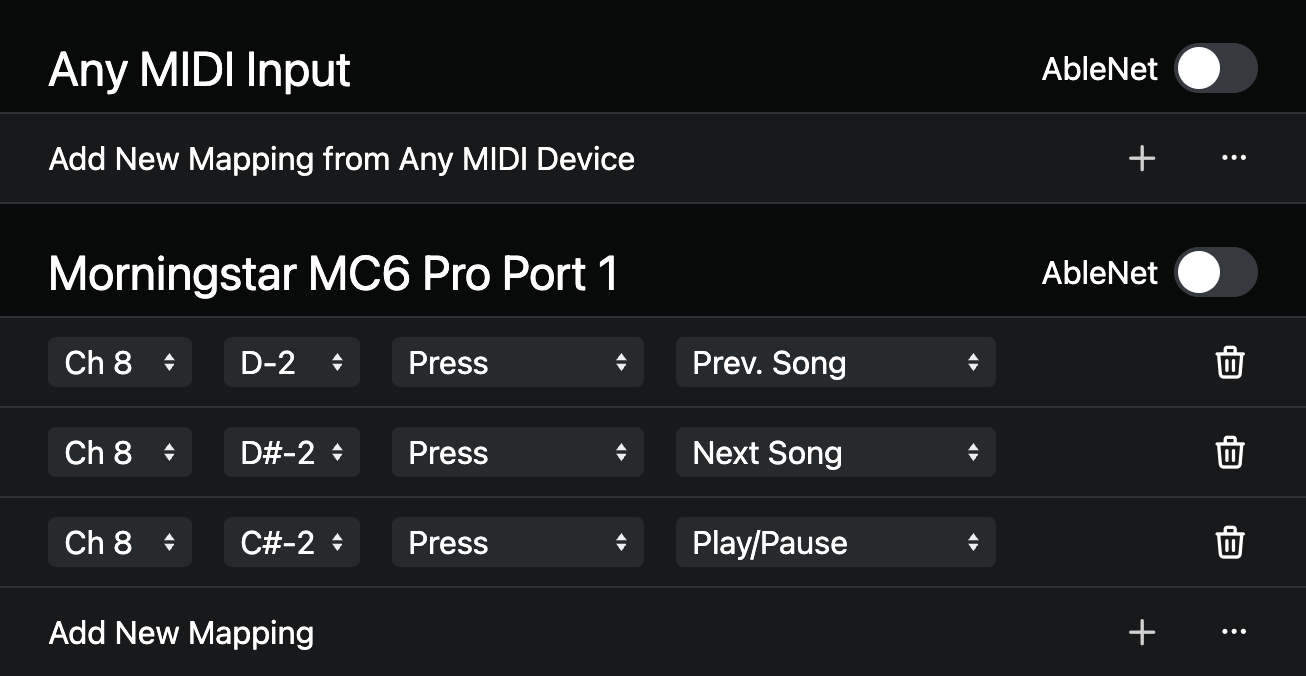
To start mapping incoming MIDI to functions in AbleSet, go to the settings page and click on "Edit MIDI Mapping" in the "MIDI Mapping, OSC & Scripting" section. This will open a page showing a list of all connected MIDI devices, like in the image above.
To map a MIDI button to an AbleSet function, click "Add New Mapping" under the device you'd like to map, then press the desired button, turn the knob, or move the slider. AbleSet captures the incoming MIDI and adds a new mapping that you can customize by selecting the function to map it to.
Currently, MIDI notes, PC, and CC values can be mapped to functions in AbleSet.
If you don't have your MIDI controller available to learn MIDI mappings, you can click the three dots on the right of the "Add New Mapping" button to manually add mappings.
A Note About Using MIDI Mapping on Windows
On Windows, only one application can access a given MIDI input at a time. This means that when you map a MIDI device in AbleSet, Ableton Live can't access it anymore, and the other way around.
To avoid interference issues, please ensure that MIDI devices you map in AbleSet are completely disabled in Live's MIDI settings.
The Go Button
This function is a combination of actions based on the current state of your set. If you only have one button on your MIDI controller, try mapping it to this for the following functions:
- When stopped at the end of a song, it jumps to the next song
- When stopped inside of the song, it starts playback
- When playing in a loop, it escapes the loop
- When playing while a song or section is queued, it instantly jumps to it
The AbleNet Toggle
Each MIDI input has its own AbleNet toggle that determines whether MIDI commands should be forwarded to other AbleSet instances on the network.
- No redundant setup: Leave this toggle turned off.
- Redundant setup where all computers receive MIDI: Leave this toggle turned off to prevent commands from being executed twice.
- Redundant setup where only one computer receives MIDI: Turn this toggle on so commands are executed on all computers.
Custom OSC
If you'd like to customize your button mappings further, you can map them
to the "Custom OSC" function. This allows you to enter any list of OSC commands
for AbleSet to run, delimited by a semicolon. For example, to stop playback and
jump to the next song, you'd enter /global/stop; /setlist/jumpBySongs 1. A
list of all supported OSC commands is available here.
If you'd like AbleSet to wait before sending the next command, you can add a
//sleep statement. For example, to sleep 2.5 seconds between stopping and
jumping to the next song: /global/stop; //sleep 2500; /setlist/jumpBySongs 1.
You can find a list of all control flow statements here.
OSC commands can also be sent to external servers. This allows you, for example,
to control digital mixers or light desks. To send a command to an external OSC
server, simply add its IP address and port to the beginning of the command, for
example: 192.168.1.25:10023/ch/01/mix ON. You can combine those commands with
AbleSet commands. For example: /global/play; 192.168.1.25:10023/ch/01/mix ON.
Custom Script
With AbleSet Pro, you can map incoming MIDI to scripts. These scripts have access to MIDI data and OSC values and can send MIDI themselves.
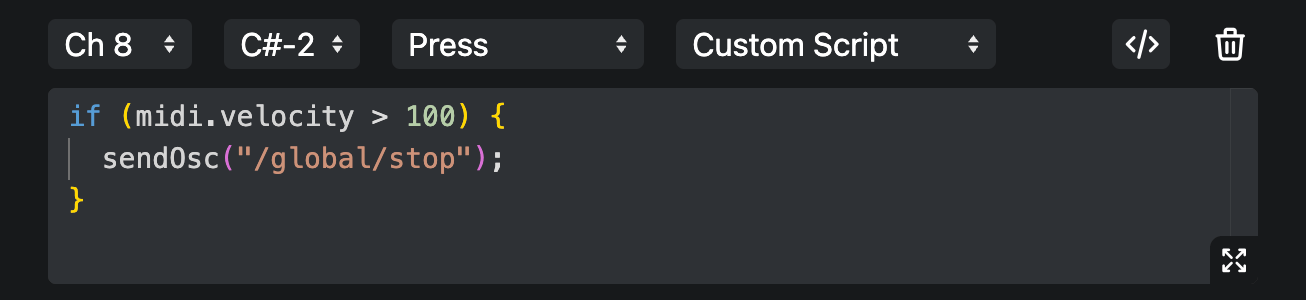
There are two ways to add a script mapping. The first works similarly to the "Custom OSC" mapping. Add a Note, CC, or PC mapping and set the command to "Custom Script". This script will be called every time the mapping is triggered.
If you'd like your script to run every time AbleSet receives any MIDI from an input, click the three dots on the right of the "Add New Mapping" button and select "Script".
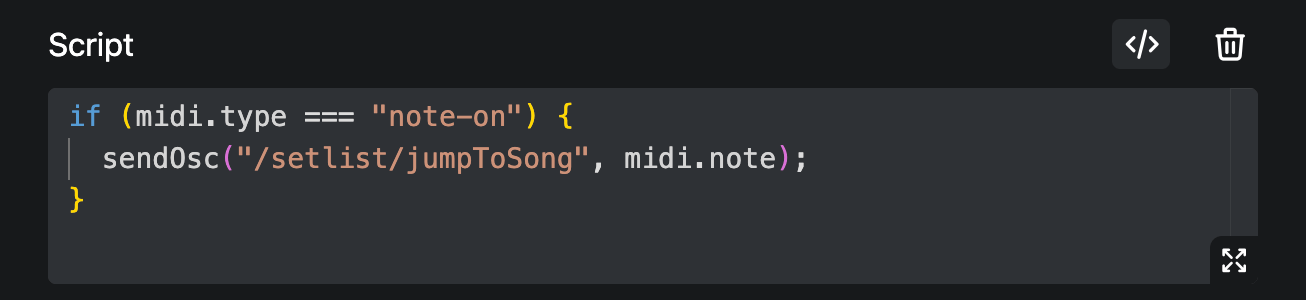
To access the incoming MIDI data, use the midi object. This object contains
the raw MIDI bytes along with parsed information if the data is detected as a
Note, CC, or PC. Use the script editor's autocomplete function or log the midi
object to get an overview of available properties.
The midi object might look like this for a "Note On" event:
{
  type: "note-on",
  channel: 8,
  raw: [151, 2, 127],
  note: 2,
  velocity: 127,
  input: "Morningstar MC6 Pro Port 1"
}
Max for Live Device
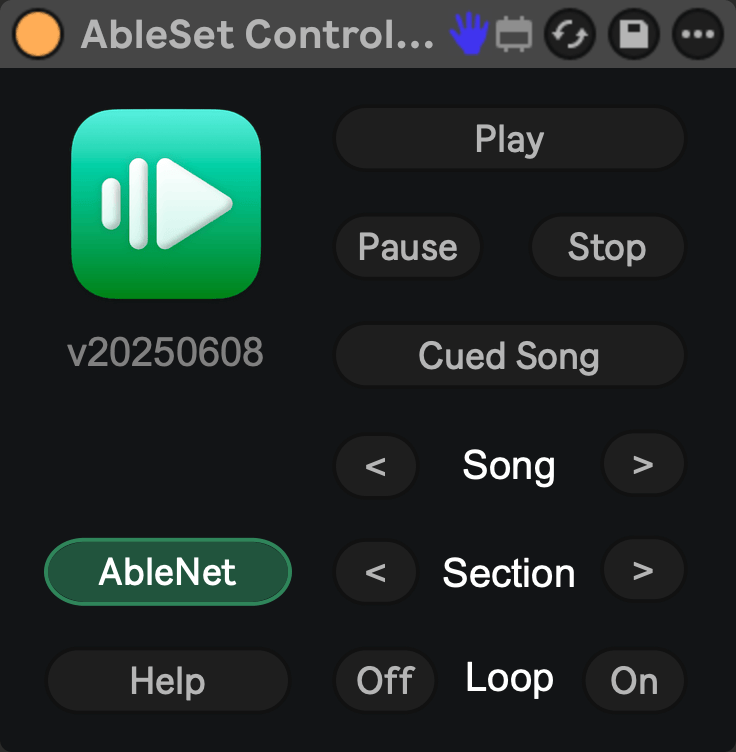
This device isn't needed anymore, but if you prefer to use Ableton Live's MIDI mapping feature to control AbleSet, you can add it to your project.
You can find the controller by going to AbleSet's settings and clicking "Get AbleSet Controller". If you're using AbleSet 1, you can download the legacy controller device here.
To use this device, just drag it on any audio or MIDI track in your Ableton session. The controller will connect to AbleSet automatically. You can then map any of the functions to your MIDI controller as you're used to.
The Play, Pause, Next Song, and Prev. Song buttons are self-explanatory, but the Cued Song button has special safety behavior. It only plays a song when:
- Playback has been stopped by a STOP (or .) locator, in which case it plays the next song, or
- Playback is stopped and the playhead is on a song's start locator, in which case it plays the current song.
This prevents accidental skips to the next song while the current song is still playing. In the most minimal setup, you only need to map this button to your MIDI controller.
In addition to the control functions, the controller sends more detailed playhead information to AbleSet that improves the position display.
Connecting to AbleSet From Other Devices
AbleSet hosts its own server which you can access from any other device's browser as long as it is on the same network as your computer. This doesn't require an internet connection, so you can set up your own local network on stage.
There are a few different ways to create a network, and some might suit your setup more than others.
Connect an iPhone or iPad to your Mac
If you don't use AbleNet and just want to connect to AbleSet from an iPhone or iPad with a wired connection and without any extra dongles, this is the easiest way.
First, connect your iPhone or iPad to your Mac via USB. If you're using macOS Monterey or older, open your Sharing preferences and go to "Internet Sharing" in the sidebar:
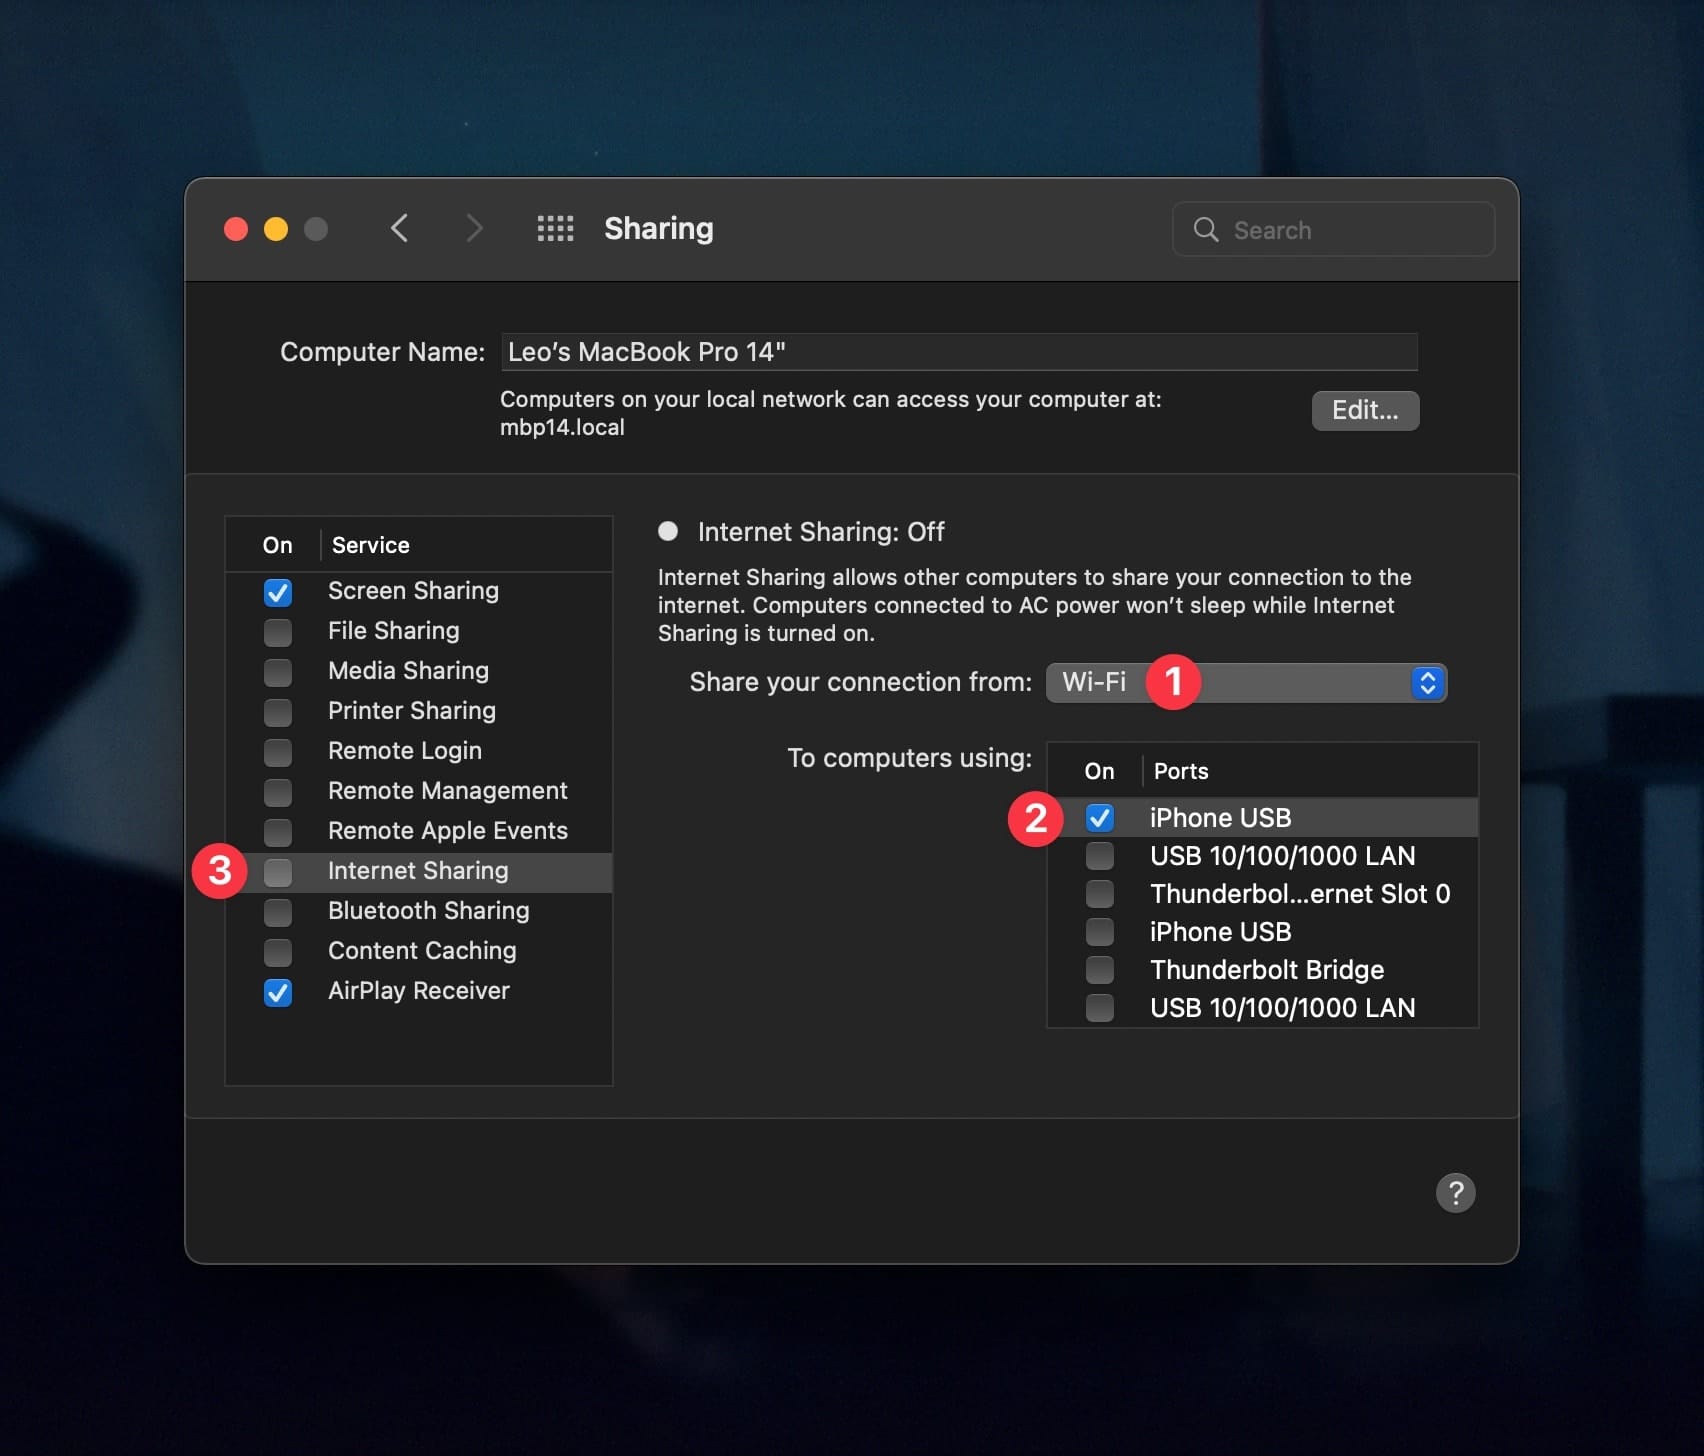
- Make sure that "Share your connection from" is set to Wi-Fi. Your WiFi doesn't need to be connected to any network for this to work, but for some reason choosing Wi-Fi here works best.
- In the list of "To computers using", check your iPhone's or iPad's connection – it should be called "iPhone USB" or "iPad USB".
- Then check the checkbox next to "Internet Sharing" to turn sharing on.
You can now connect to AbleSet using the .local domain or the remote IP address that is shown in AbleSet's menu bar window.
If you're using macOS Ventura or newer, you'll find these settings by clicking on "General" in the sidebar, then clicking on "Sharing" and then clicking on the little info icon next to "Internet Sharing". You should see a dialog that looks like this:
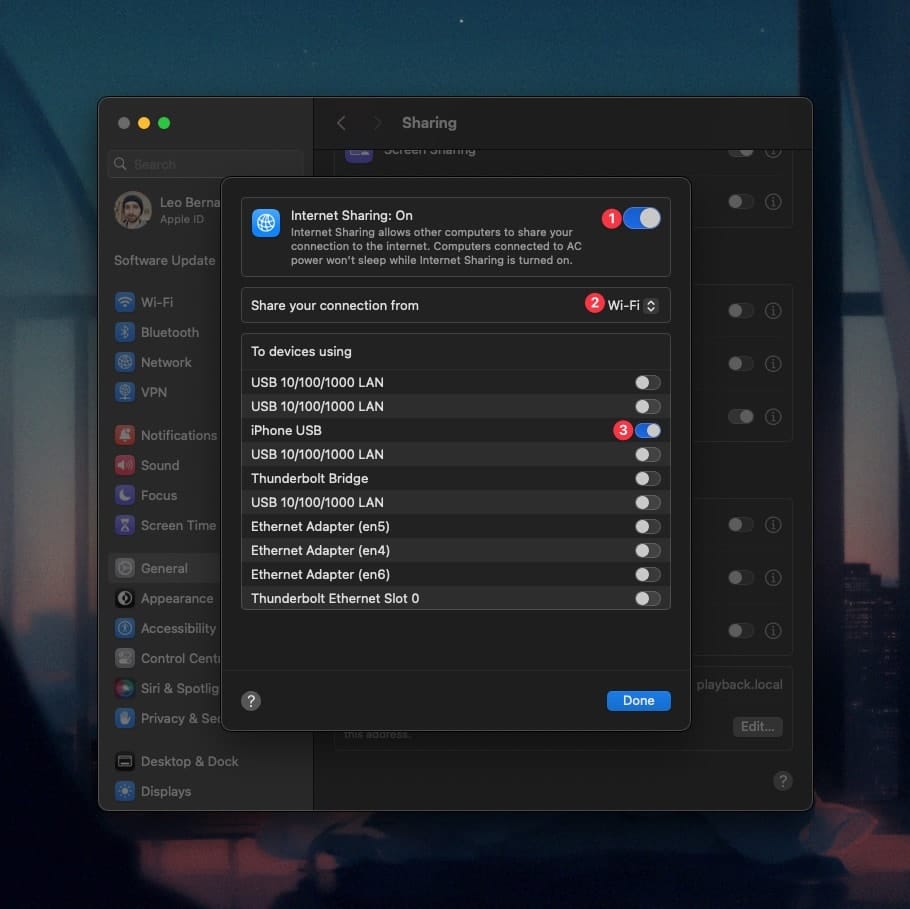
- Click on the toggle at the top to enable the sharing settings, confirm the warning message if necessary.
- Set "Share your connection from" to "Wi-Fi". Your WiFi doesn't need to be connected to any network for this to work, but for some reason choosing Wi-Fi here works best.
- In the list of "To devices using", check your iPhone's or iPad's connection – it should be called "iPhone USB" or "iPad USB".
- Click "Done" to close the dialog.
Create a Network Using a Router
If you want to connect to AbleSet from multiple devices, you can use a router. This is one of the most common setups for on-stage networks and any simple router with or without Wi-Fi can be used for this.
Follow your router's instruction manual to set it up and then connect both your computer and the devices you want to use to connect to AbleSet to it. Most routers will automatically assign IP addresses so you don't need to worry about that.
Once all devices are connected, you can access AbleSet using either the .local domain or the remote IP address shown in the app's menu bar window.
Although it is possible to connect to AbleSet using Wi-Fi, I'd recommend using a wired Ethernet connection on stage since there will likely be lots of wireless interference from microphones, IEM systems, and other devices.
There are Lightning/USB-C to Ethernet dongles available if you want to connect a phone or tablet to your network with a wired connection.
Create a Network Using a Switch
This is similar to setting up a network using a router, except that switches often don't assign IP addresses to your devices automatically. You can manually assign IP addresses to your devices by going to the device's network settings and setting the "Configure IPv4" option to "Manually", or similar depending the device you use.
When choosing an IP address, make sure that the first three parts match on all
devices. For example, you could use the IP address 192.168.1.100 for your
first device, 192.168.1.101 for the second, and so on.
Make sure that the subnet mask is set to 255.255.255.0 on all devices.
Connect Two Devices Directly Using Ethernet
Instead of using a switch, you can also connect two devices directly using Ethernet. This is useful if you only have two devices and don't want to use a router or switch.
If you connect two Apple devices – iPhone/iPad/Mac – directly using Ethernet, they should automatically assign IP addresses. If this doesn't happen or you're not using Apple devices, you can set your devices' IP addresses manually using the steps described in the previous section.
AbleSet Connect
AbleSet Connect is an iOS/iPadOS app that allows you to connect to AbleSet from your iPad or iPhone. You can download it here.
To use it, make sure that your device is on the same network as your computer. The app automatically searches for and connects to AbleSet on your network.
This app also extends the web app with native features, like keeping the screen on for as long as the app is in foreground, reporting the current battery state and screen brightness to see on the Devices page, and allowing you to change the brightness remotely.
Native MIDI Forwarding
By default, AbleSet Connect makes all MIDI devices connected to your iPad or iPhone available to AbleSet, so you can MIDI-map and send MIDI to them via OSC or Scripting.
When AbleSet Connect detects multiple hosts on the network, like in an AbleNet setup, it will make its connected MIDI devices available to all hosts.
To disable this native MIDI forwarding, go to Settings -> MIDI Forwarding and disable "Native MIDI Forwarding".
RTP MIDI Forwarding
AbleSet Connect can also make connected MIDI devices available via RTP MIDI, which allows you to send MIDI to any computer or device on your network supporting this protocol.
To get started, go to Settings -> MIDI Forwarding and enable "RTP MIDI Forwarding". You'll then see a list of available sessions. Enable the ones you'd like your iPad or iPhone to connect to, and AbleSet will establish a connection.
By default, AbleSet Connect forwards all MIDI inputs from your device to connected RTP MIDI sessions and MIDI from connected sessions to all MIDI outputs. You can disable MIDI inputs and outputs below the list of sessions.
While RTP MIDI works over Wi-Fi, I'd recommend using an Ethernet connection for the best latency, especially if you want to use it for more than just MIDI mapping.
Creating an RTP MIDI Session on macOS
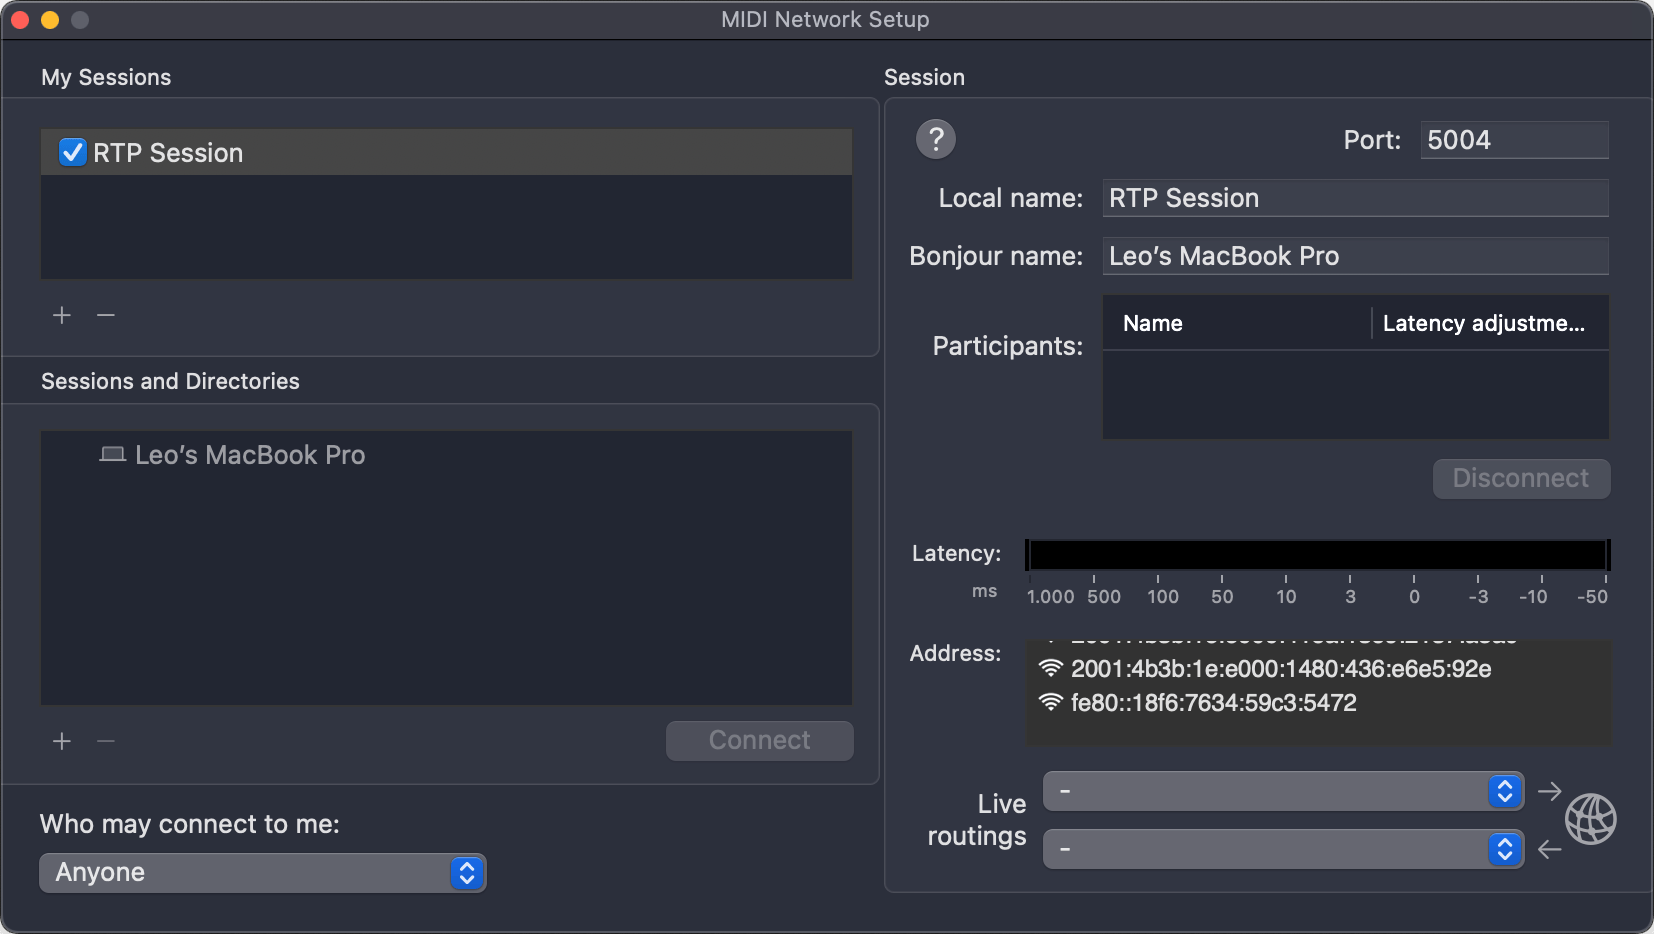
To create an RTP MIDI Session, open Audio MIDI Setup, and click Window -> Show MIDI Studio, then click the globe icon on the top right to open the MIDI Network Setup window.
Create a new Session by clicking the "+" button under "My Sessions", then give it a local name and a Bonjour name which is what other devices on the network will see. In this example, I'll set the local name to "RTP Session" and keep the Bonjour name as-is. Then click the checkbox next to the session name to enable it.
To allow AbleSet to connect to your session, make sure that "Who may connect to me" is set to "Anyone".
You should now see the session in AbleSet Connect. To connect to it, enable the toggle next to its name:
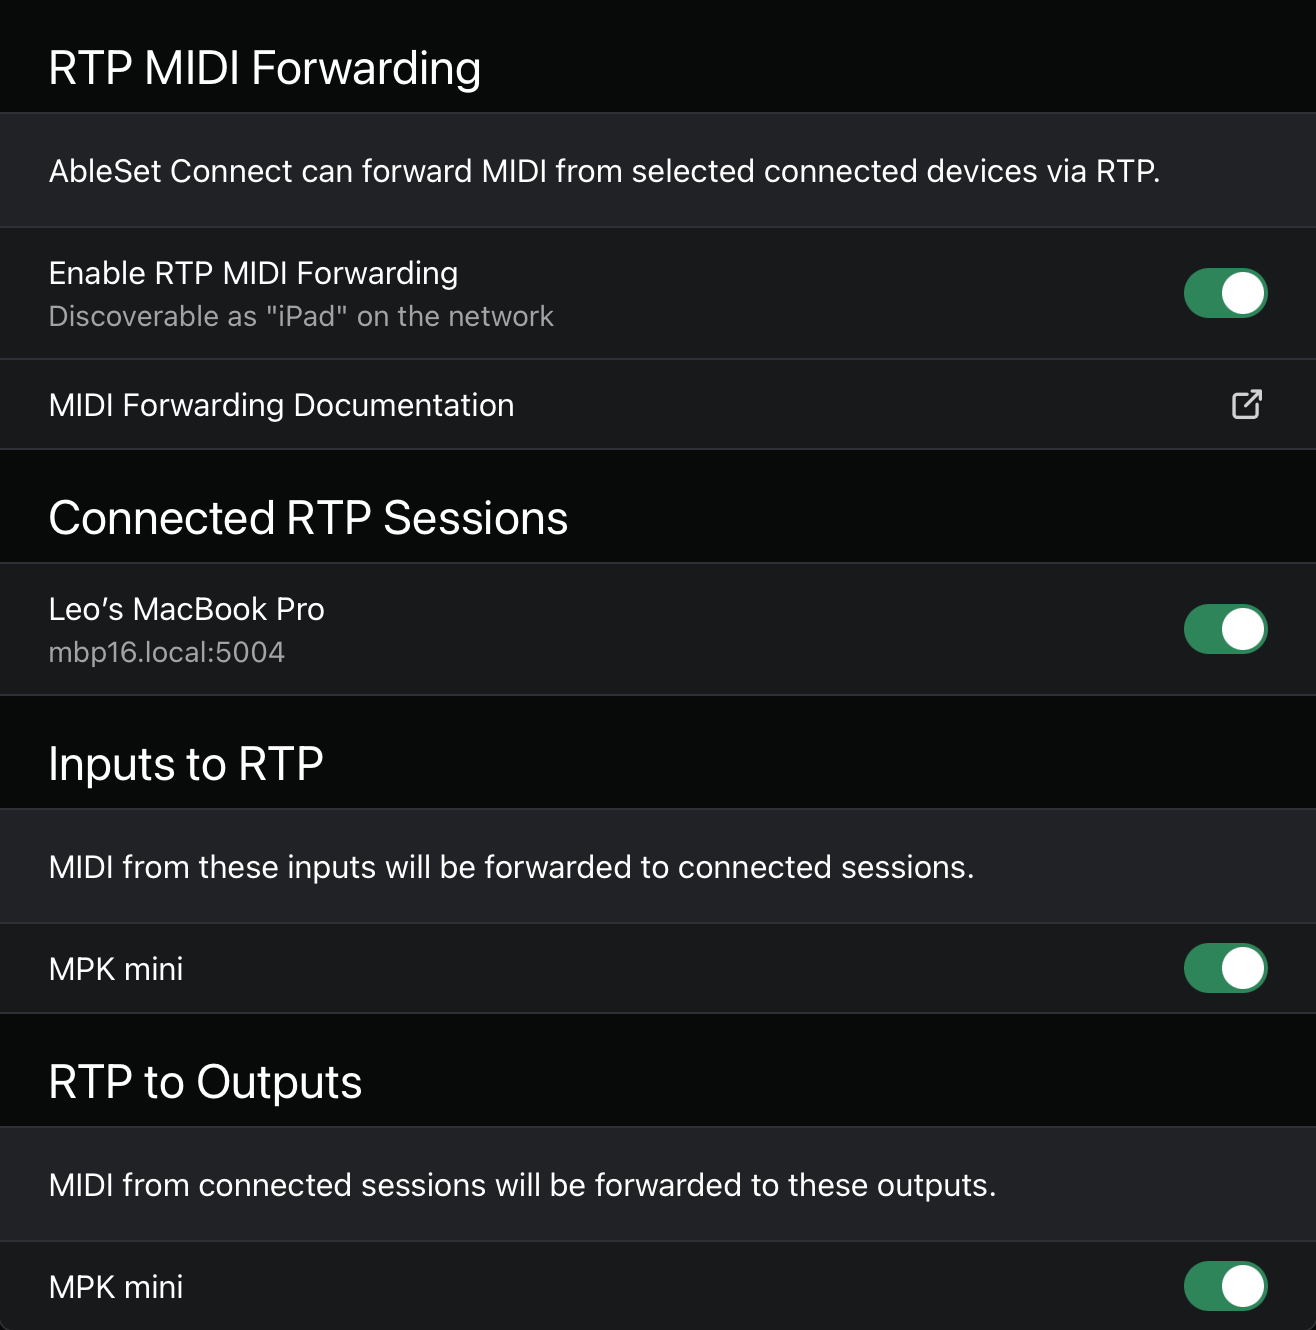
The device should now appear in your session's list of participants and you can now receive and send MIDI between your Mac and iPad or iPhone.
RTP MIDI Troubleshooting and Caveats
- If your iPhone or iPad doesn't appear on your network and won't connect to your MIDI session, you might have to restart it. This seems to be a bug with iOS.
- Creating RTP MIDI Sessions on macOS Tahoe doesn't seem to work reliably at this time.
Haptics
If you're using AbleSet Connect on an iPhone, certain events will trigger haptics to give elements a more physical feel. This includes Buttons and Sliders in Canvases, notifications, and cue lights. You can enable this feature using the "Enable Haptics" setting.
Deploying via MDM
If you're deploying AbleSet Connect via MDM, you can pre-set some settings using a custom plist file. How to set this up depends on the product you're using to manage your Apple devices.
The following settings are available:
| Name | Type | Example |
|---|---|---|
| preferredHost | string | playback.local |
| showStatusBar | boolean | true |
| enableHaptics | boolean | true |
| swipeToNavigate | boolean | true |
Settings defined via MDM are locked and can't be changed from within the app.
AbleNet: Redundant Playback Setups
AbleNet allows you to control two or more computers in a redundant playback setup. AbleNet is decentralized, so any computer in the setup can crash or lose connection – as long as one computer is still online, AbleSet will continue working.
I've created a short video that explains the basic steps:
Open YouTube VideoIn short, to setup AbleNet, open the same Ableton session and enable AbleNet in the settings menu of AbleSet on all computers. The computers will automatically connect to each other and can now be controlled simultaneously with AbleSet.
You can open AbleSet in the browser or on your mobile device using either computer's IP address. When the computer you're currently connected to goes offline, AbleSet will automatically redirect you to the next available computer.
To connect two computers to the same output channels, you could use any of the compatible redundant audio interfaces. These allow you to connect two or more computers and automatically switch to the backup computer when it detects that the main one isn't working anymore.
Automatic Drift Correction
Sometimes, your instances of Live might not start playback exactly at the same time, either because of network or disk latency. AbleNet offers an Automatic Drift Correction that takes care of nudging your computers back into sync.
To do this, AbleSet uses Live's Phase Nudge buttons to slightly slow down or speed up playback until all computers are in sync. You'll see the buttons flash while this happens:
In most cases, you don't need this, and if you do, you only want to enable this setting on your backup computer so that it can sync to your main computer and your main computer doesn't speed up or slow down playback, even if just slightly, to get in sync with the backup one.
For Automatic Drift Correction to work correctly, all audio clips have to be warped so they can follow the slight tempo changes caused by the Phase Nudge adjustments. Unwarped audio clips will continue playing at normal speed and get out of sync with Live's metronome.
I'd recommend using the Texture or Beats warp mode for audio clips as they both don't alter the audio output at all while playing at normal speed.
Custom IP Addresses
AbleNet uses Apple's Bonjour protocol to automatically detect other instances of AbleSet on the network. This will work in most cases, but if it doesn't, you can manually specify a list of IP addresses that AbleSet should connect to.
To do that, go to AbleSet's Settings page and scroll down to the AbleNet section. In a setup with two computers, you can enter the IP address of the other computer respectively in the "Connect to Custom IPs" field:
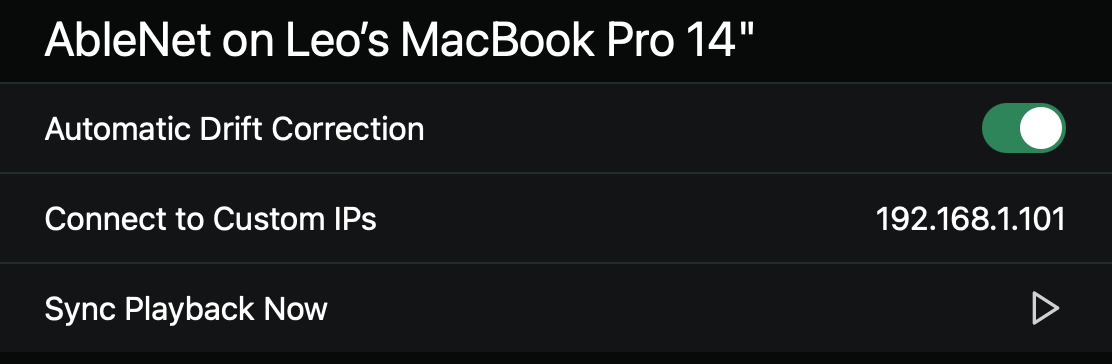
Giving your computers static IP addresses simplifies this setup since you don't have to update this setting every time your computers get automatically assigned a new one. You can read more about this on the Network documentation.
If AbleSet is running on a custom port, you can add it to the IP address, e.g. 192.168.198.20:3005.
Sync Playback Now
In case one of your computers or Ableton crashes, you can use the "Sync Playback Now" option to synchronize its playhead position with the one of your other computer and start playback so that both sessions are playing in sync again. This usually takes just a few seconds.
Tips for Using AbleNet
- Ideally, you should connect all computers via Ethernet. That way, they're not susceptible to wireless interference which could cause latency issues.
- Make sure that you're loading the exact same set on all computers. Otherwise, the computers might behave differently when jumping between songs.
Redundant Audio Interfaces
AbleSet supports a variety of redundant audio interfaces from different manufacturers:
- iConnectivity: PlayAUDIO12, PlayAUDIO1U, and PlayAUDIO2U
- DirectOut: EXBOX.MD, PRODIGY (MC, MP, MX), MAVEN.A
- DAD: Core256, AX64, AX Center
These interfaces are automatically detected when they're connected to your computer via USB (iConnectivity) or the network (DirectOut/DAD) and will appear in AbleSet so you can view their state and control them.
You can also control connected audio interfaces via OSC. See here for a list of supported commands.
Redundant Audio Interfaces With AbleNet
When using redundant audio interfaces with AbleNet, you can specify which computer is connected to which port or "scene" on your audio interface. This gives the of AbleSet a distinct look so you can easily see if you're currently viewing the main or backup computer.


With this assignment set up, you can also tell AbleSet to automatically switch the browser over to the computer that is currently active on your redundant interface. This allows you to always see the state of the computer that is actually sending audio to your PA system.
To do this, enable the "Follow Current Audio Interface Scene" option in your AbleNet settings:
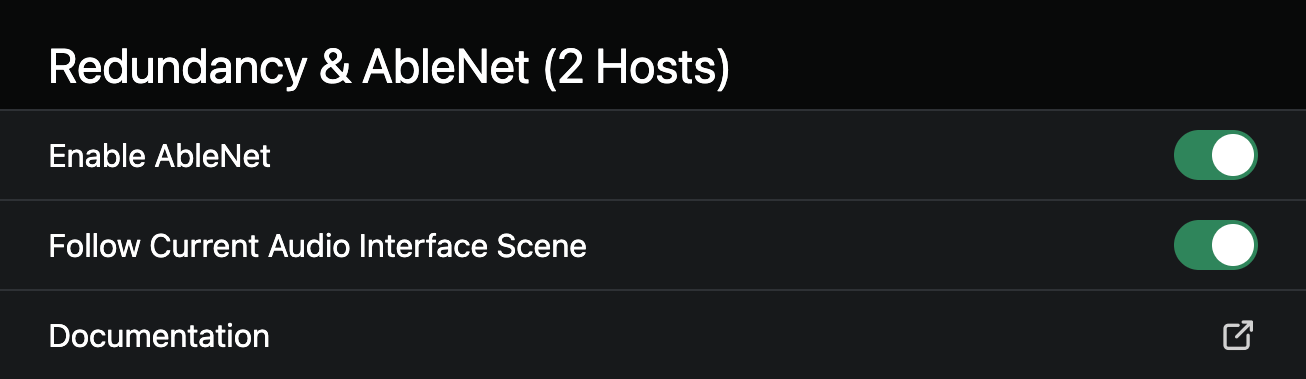
This option can be set on a per-device basis, so if you want your iPad to switch between your computers automatically but want AbleSet on your computers to always show the state of the machine it's running on, you can enable the option on your iPad and disable it on your computers.
The +FOLLOWSCENE Flag
Once you've set up the assignment of your computers to your audio interface
scenes, you can use the +FOLLOWSCENE or +FS flag on track names to only
unmute them on the computer that is currently selected on your audio interface.
This could be useful if you only want the selected computer to send MIDI to a connected mioXM or mioXL interface to avoid your devices receiving duplicate MIDI messages, for example.
You don't necessarily need AbleNet to be enabled for this feature to work.
Hiding Audio Interfaces
You might not always want to see all connected audio interfaces in AbleSet. To hide specific ones, open AbleSet's settings page and scroll to the "Audio Interfaces" section and click the toggle next to the audio interfaces you'd like to hide.
Interface Tips
iConnectivity
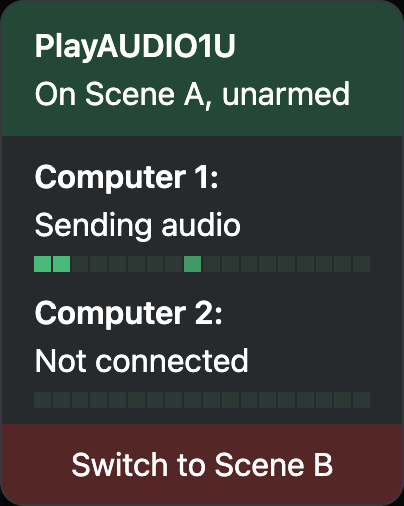
AbleSet communicates with iConnectivity audio interfaces via MIDI using the USB connection. This happens automatically as soon as it is connected.
When connecting two or more iConnectivity interfaces to your computer, please make sure to give them distinct names in Auracle and then re-connect them. Otherwise, AbleSet might have trouble correctly communicating with all interfaces.
DirectOut
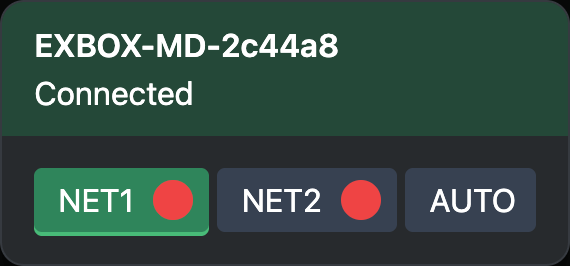
AbleSet communicates with DirectOut interfaces via Ethernet. They are automatically detected as soon as they're on the same network as your computer running AbleSet.
DAD
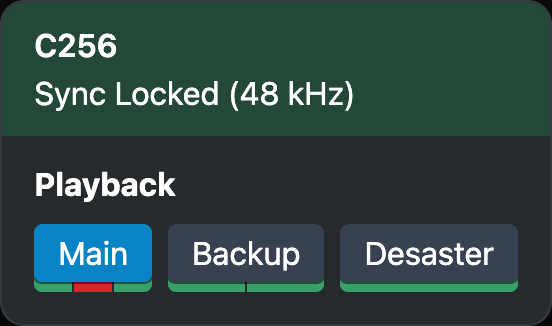
DAD interfaces are automatically discovered on the network. Currently, AbleSet doesn't support communicating with them using Thunderbolt.
Below each preset you see the status of all monitored inputs. Hover over it to see which input each bar represents.
Clicking on a preset locks its selection, which turns the background blue. Clicking the preset again removes the lock and the device switches back to the automatically selected preset.
By default, AbleSet shows all enabled presets from your DAD devices, but you can
hide presets by adding +HIDE to their name, e.g. Keys +HIDE. If you have a
long list of presets and only want AbleSet to show a few, you can instead add
the +SHOW flag to the ones you want to see, e.g. Playback +SHOW +MAIN. AbleSet
will then hide all others.
By default, the scene toggle button toggles all shown presets between set 1 and
2, and if one or more presets is not on set 1, the indicator becomes red. If
you'd like AbleSet to only take specific presets into account while still being
able to see and manually control others, you can add the +MAIN flag to their
name.
Jump Modes
AbleSet allows you to choose between five different modes when jumping between songs and sections. You can choose your preferred jump mode in AbleSet's settings:
- Quantized: Jumps to the selected song or section while respecting your global quantization setting in Ableton Live
- End of Section: Jumps when the end of the current section is reached, giving you more time to select what section to play next
- End of Song: Jumps when the current song has ended. If the song ends with a STOP locator, playback stops. If it ends with a SONG END locator, the selected song will immediately play
- Dynamic: When jumping to a section, jumps at the end of the current section. When jumping to a song, jumps at the end of the current song
- Manual: Jumps only when playback stops, e.g. when a STOP locator is reached or when you manually press pause/stop
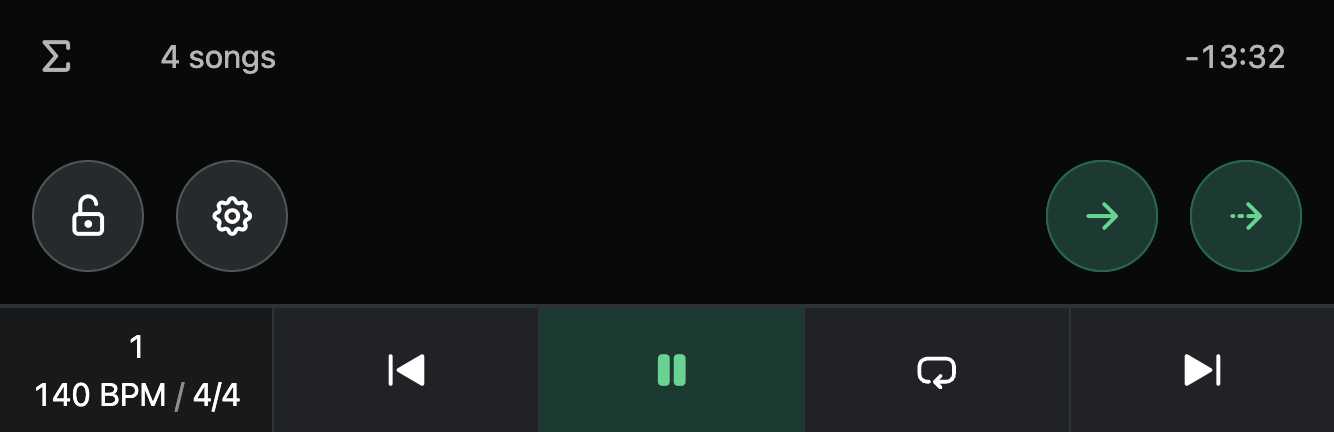
When using End of Section, End of Song, Dynamic, or Manual jump modes, jumping to a song or section first queues and highlights it. You'll see two buttons appear on the bottom right of the setlist view that allow you to jump to the queued section either in a quantized manner (left) or immediately (right):
Lyrics
AbleSet supports displaying synchronized lyrics with your songs. This requires Live 11 or higher to work properly.
Each track that contains the +LYRICS flag is recognized as a lyrics track. To
get started, create a MIDI track called Vocals +LYRICS that contains one clip
per lyrics line. AbleSet will automatically create a synchronized lyrics view
based on this.
Creating these lyrics clips manually can be a chore, so I've created a tool that allows you to paste your lyrics, synchronize them to your backing track, and download them as a Live project containing a track with your synchronized lyrics:
If you already have LRC files with synchronized lyrics, you can use this tool to convert them to Ableton project files that can be imported into your project:
Multiple Lyrics Tracks
AbleSet Standard and Pro support multiple lyrics tracks, so you could create a
Lead Vocals +LYRICS track for your lead singer, a Backing Vocals +LYRICS
track for your backing singers, and a Chords +LYRICS track for other
musicians.
AbleSet Intro only supports one lyrics track. If your project contains multiple lyrics tracks, it will display the first one.
If multiple tracks are available, each device can choose which one they'd like to see on the web app.
Styling
The lyrics view supports basic Markdown to make parts of your lyrics bold or
italic. To make a part of your lyrics italic, wrap it in single asterisks,
e.g. *italic line*. To make a part of your lyrics bold, wrap it in double
asterisks, e.g. **bold line**.
To give a line a color, you can add it in square brackets to the beginning of
the line, e.g. [blue] Why We Are. The following colors are available:
- Gray
- Red
- Orange
- Amber
- Yellow
- Lime
- Green
- Emerald
- Teal
- Cyan
- Sky
- Blue
- Indigo
- Violet
- Purple
- Fuchsia
- Pink
- Rose
If you want all lines of a lyrics track to have the same color, you can add it
to the track name in square brackets, e.g. Vocals +LYRICS [blue].
If you add either the +CLIPCOLORS or +CC flag to the lyrics track name, AbleSet will use the color of your clips for the lines. Each column of Live's color picker corresponds to one color in AbleSet:
The text size can be changed using [large], [small], or [tiny], and the
alignment can be changed using [left] or [center]. If you prefer a
monospaced font, you can add the [mono] attribute.
Other available styling options include [nofade] to disable fading inactive
lines, [nozoom] to disable zooming out inactive lines, [nosections] to hide
section headers, and [linemarker] to show a marker next to the current line.
If you'd like to align the current lyrics line to the top of the page, you can
add the [top] attribute. To show a number of lines before the current line,
you add that number to the attribute, e.g. [top+2] to show 2 previous lines
before the current line.
You can also use [progress] to display a progress bar on each line as it's
playing:
You can combine these attributes, e.g: Vocals +LYRICS [blue] [small] [left]
Chords
To add chords to your lyrics, you can use the ChordPro syntax. As soon as one line contains chords, the entire song's lyrics track is recognized as a lyrics&chords track which changes the layout of lyrics, automatically aligning all lines to the left for better readability. For example:
[F] I know you tried so many ti[Am]mes
To be [G]who you used to be
[F] I know you tried so many ti[Am]mes [G]
Gets turned into:
F                            Am
  I know you tried so many times
      G
To be who you used to be
F                            Am  G
  I know you tried so many times
These chords can be transposed on a per-song level. Just add the number of semitones you'd like to transpose to the song's locator, e.g. Follow Night [+2] or Follow Night [-3].
You can also transpose all chords on a track by adding the number of semitones
to your lyrics track's name in square brackets, e.g. Vocals +LYRICS [+2].
By default, AbleSet will use sharps in transposed chords. If you prefer flats,
you can add that to the transpose attribute as well: Vocals +LYRICS [+2b].
This also works on song locators.
If you'd like to change the color of the chords, you can add a color attribute
to the track name, like [chords:red].
You can also hide all chords on a lyrics track using [nochords], or display
only chords using the [onlychords] attribute.
Images
To insert images into your lyrics, create a "Lyrics" folder in your Ableton project folder and add some images to it. The folder could look like this:
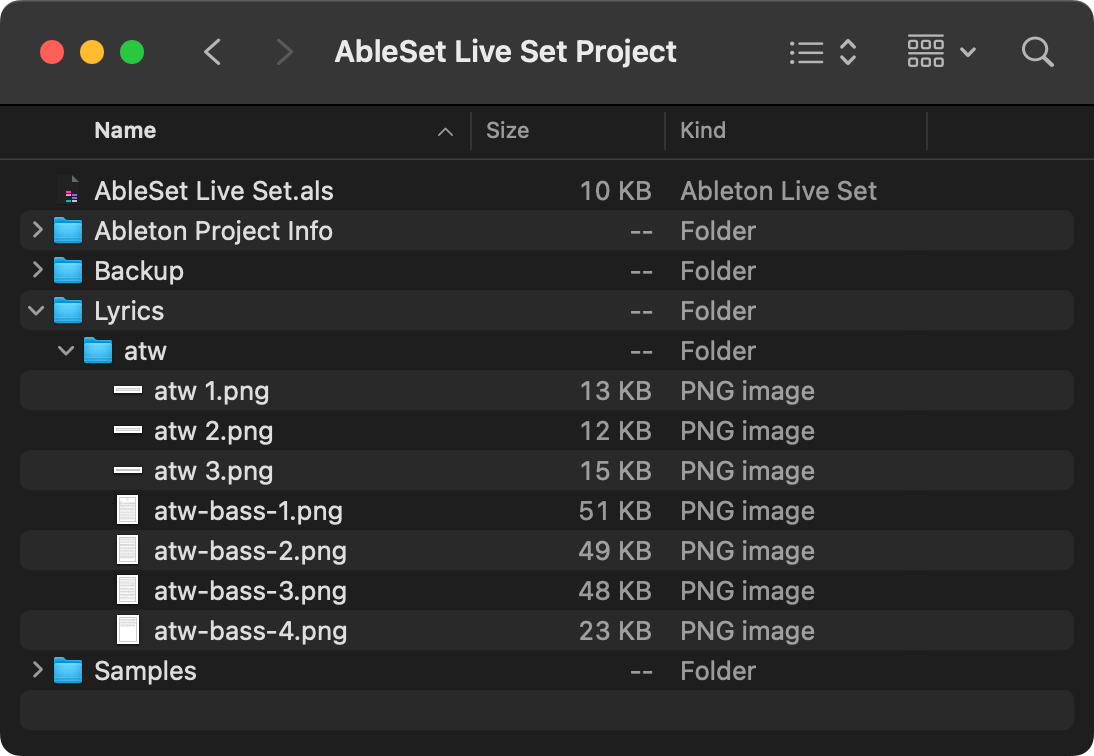
You can then reference those images in your lyrics clips using their relative
path name. For example, you could reference the image located at "atw/atw 1.png"
by creating a lyrics clip named [img:atw/atw 1.png].
By default, images always try to take up as much width as possible without
growing larger than the height of 3 lyrics lines. If you'd like images to fill
the entire screen, you can add the [full] attribute, e.g.
[img:atw/atw-bass-1.png] [full]. This is useful for displaying sheet music
pages, for example.
If you'd like all images on a lyrics track to fill the entire screen, you can also
add the [full] attribute to the lyrics track name, e.g. Vocals +LYRICS [full].
AbleSet can also scale images to fill the entire width of the browser and scroll
them continuously. To enable this, add the [scroll] attribute either to an
image clip or a lyrics track.
This feature supports PNG, JPEG, GIF, SVG, and WEBP images.
If you'd like to generate lyrics clips from a PDF, e.g. with sheet music, you can use the Lyrics Image Generator:
Line Breaks
You can insert line breaks into lyrics lines using the \ character – e.g.
Line 1 \ Line 2. This allows you to have multiple lines in the same MIDI clip
which all get highlighted at the same time.
All Songs Mode
By default, AbleSet only displays the lyrics of the current song, but you can
add the [allsongs] attribute to your lyrics track name to make it display the
lyrics of all songs on one continuous page.
This can be useful if songs are flowing into each other and you already want to read the first line of the next song before it starts.
Lines Crossing Sections
In some cases, a line might cross a section. By default, if more than half of the line is after the section start, AbleSet will display the line after the section header. The line will be displayed before the section header.
If you'd like to override this behavior for a line, you can add an attribute to
its name, e.g. [<] Line to display the line before the section header and
[>] Line to display it after the section header.
Time Delay
If you know your video or audio signal will have a certain delay, you can add that to the lyrics track to offset the lyrics display.
For example, if you know that your audio has a delay of 150ms, you can add
[+150ms] to the track name which delays lyrics by that time.
If you're streaming the lyrics window over the network and you know there will
be a 200ms video latency, you can add a negative delay, like [-200ms] instead
to offset the latency and ensure the lyrics stay in sync with your song.
You can also delay the lyrics track by a number of beats, e.g. [+1n] to delay
it by one beat, of [-2n] to show the next line two beats earlier.
Delays are only applied while Live is playing.
Guide Tracks
AbleSet supports managing your guide tracks. There are three types of supported guide tracks:
+GUIDE- Tracks containing the
+GUIDEflag are active by default and only muted when you're jumping to another section or the current section is being looped
- Tracks containing the
+LOOPGUIDE- Tracks containing the
+LOOPGUIDEflag are muted by default and only unmuted when you loop the current section. This allows you to add an audio cue announcing that the same section will be played again
- Tracks containing the
+JUMPGUIDE- Tracks containing the
+JUMPGUIDEflag are muted by default and only unmuted while a section other than the one following the current section is cued
- Tracks containing the
Please note that these flags are case-sensitive and need to be added to the track name exactly as shown here.
Both audio and MIDI tracks can be marked as guide tracks. Just add one of the guide track flags to the track's name to let AbleSet manage it.
Here's a video showing the feature in action:
Open YouTube VideoCues
AbleSet allows you to automatically announce songs and sections using computer-generated or custom pre-recorded voices. You can customize what you'd like to hear in the settings.
To get started, load the "AbleSet Cues" plugin into one of your tracks in your project. You should find it in Plug-Ins > AbleSet in Live's browser.
If it's not listed there, open Live's "Plug-Ins" preferences and make sure that "Use VST3 Plug-In System Folders" is enabled.
On Windows, enable "Use VST3 Plug-In Custom Folder" and set the folder to "%LOCALAPPDATA%\Programs\Common\VST3".
Then, click the "Rescan Plug-Ins" Button at the top of the window.
This plugin receives cues from AbleSet and plays them on the track it's placed on.
Settings
Auto-Speak Song Titles
When this is enabled, AbleSet will automatically announce songs when you jump to them while playback is stopped. Enable "Include Song Descriptions" if you'd like the song's description to be included in the announcement.
Auto-Speak Song Stop Descriptions
This announces the current song's stop description once the end of the song is reached and playback has stopped.
Auto-Speak Section Titles
When this is enabled, AbleSet will automatically announce sections when you jump to them while playback is stopped. Enable "Include Section Descriptions" if you'd like the section's description to be included in the announcement.
Count-In Sections During Playback
This enables a count-in of sections during playback, like "Chorus, 2, 3, 4". It uses either the Measure track or the song's current time signature to find out how to count the next section in.
This feature respects queued sections and automatic section transitions, so it will always announce the section that is played next.
Count-In Loops During Playback
This enables a count-in of loops during playback, e.g. "Loop, 2, 3, 4". When this is disabled, nothing will be counted in when the current section is looped.
Include Beat Numbers in Count-Ins
When this setting is disabled, only the next section name will be spoken, e.g. "Chorus" instead of "Chorus, 2, 3, 4".
Finish Speaking Section Names During Count-Ins
This makes AbleSet always speak the entire section name, even if it's longer than one beat, e.g. "Interlude, 3, 4" instead of "Interl-, 2, 3, 4".
Speak Count-Ins Backwards
This reverses the count-in numbers, e.g. "Bridge, 3, 2, 1" instead of "Bridge, 2, 3, 4".
2-Bar Count-In
This extends the count-in to two bars, e.g. "Chorus, 2, 1, 2, 3, 4". If the current section is too short for a 2-bar count-in, AbleSet will fall back to a 1-bar count-in.
Announce the Section Name on the 2nd Bar
This moves the section name in a 2-bar count-in to the 2nd bar, e.g. "1, 2, Bridge, 2, 3, 4".
Per-Section Count-In Customization
You can customize the count-in per section by adding attributes to the section locator or clip. To disable the count-in for a section, add [c:0]. To use a one-bar count-in, add [c:1] and for a two-bar count-in, add [c:2].
If you'd like to specify which beat the section name should be announced on, you can also add it to the attribute after the number of bars, separated by a dot: [c:2.3].
You can also enable or disable the count-in beat numbers per section. For example, to enable the count-in numbers for a given section, add [c:beats] or [c:b], and to disable it, add [c:nobeats] or [c:nb].
To enable loop announcements, use [c:loop] or [c:l], and to disable it, use [c:noloop] or [c:nl].
To use a half-time count-in, use [c:halftime] or [c:ht]. This
speaks only every 2nd beat, e.g. 1 _ 2 _ 3 _ 4 instead of 1 2 3 4 5 6 7 8.
If you'd prefer the count-in to be stretched to double the length,
use [c:halfspeed] or [c:hs].
Use the [c:bw] or [c:backwards] attribute if you'd like the count-in to run backwards (e.g. "4, 3, 2, 1"). To override this and force the count-in to run forwards, use [c:fw] or [c:forwards].
Use the [c:f] or [c:finish] attribute if you'd like the count-in to always finish saying the section name (e.g. "Interlude, 3, 4"), even if it's longer than one beat. Use [c:nf] or [c:nofinish] to do the opposite.
You can combine these attributes to keep them all in one pair of brackets, separated by colons, e.g. [c:1.2:nl:hs].
To apply the same customization to all sections of a song, add these attributes to the song locator. Each of the customizations can still be overridden per section.
Available Voices
You can choose from a list of different voices that can be used to generate cues. These might differ depending on the operating system you're using.
Piper TTS (macOS, Windows)
These voices are generated using the Piper engine and are focused on speed and efficiency. They might not sound as good as the others, but work offline.
The Piper engine comes with one voice (Jenny) by default to keep the app size small, but you can download additional voices from here and place them in the "speech-models" folder of your AbleSet's resources folder.
On macOS, this folder is located at "~/Library/Application Support/ableset/speech-models", on Windows it's located at "%APPDATA%\ableset\speech-models".
Each voice should consist of one .onnx and one .onnx.json file. For a good
British English male voice, I'd recommend giving
Alan a try.
Mac TTS (macOS)
This uses your Mac's default reading voice and can take a bit longer to generate phrases, but works offline as well. I'd recommend using one of the Siri voices for the best clarity. To change the voice, open your System Settings, navigate to Accessibility > Read & Speak and click the little i icon next to "System Voice":
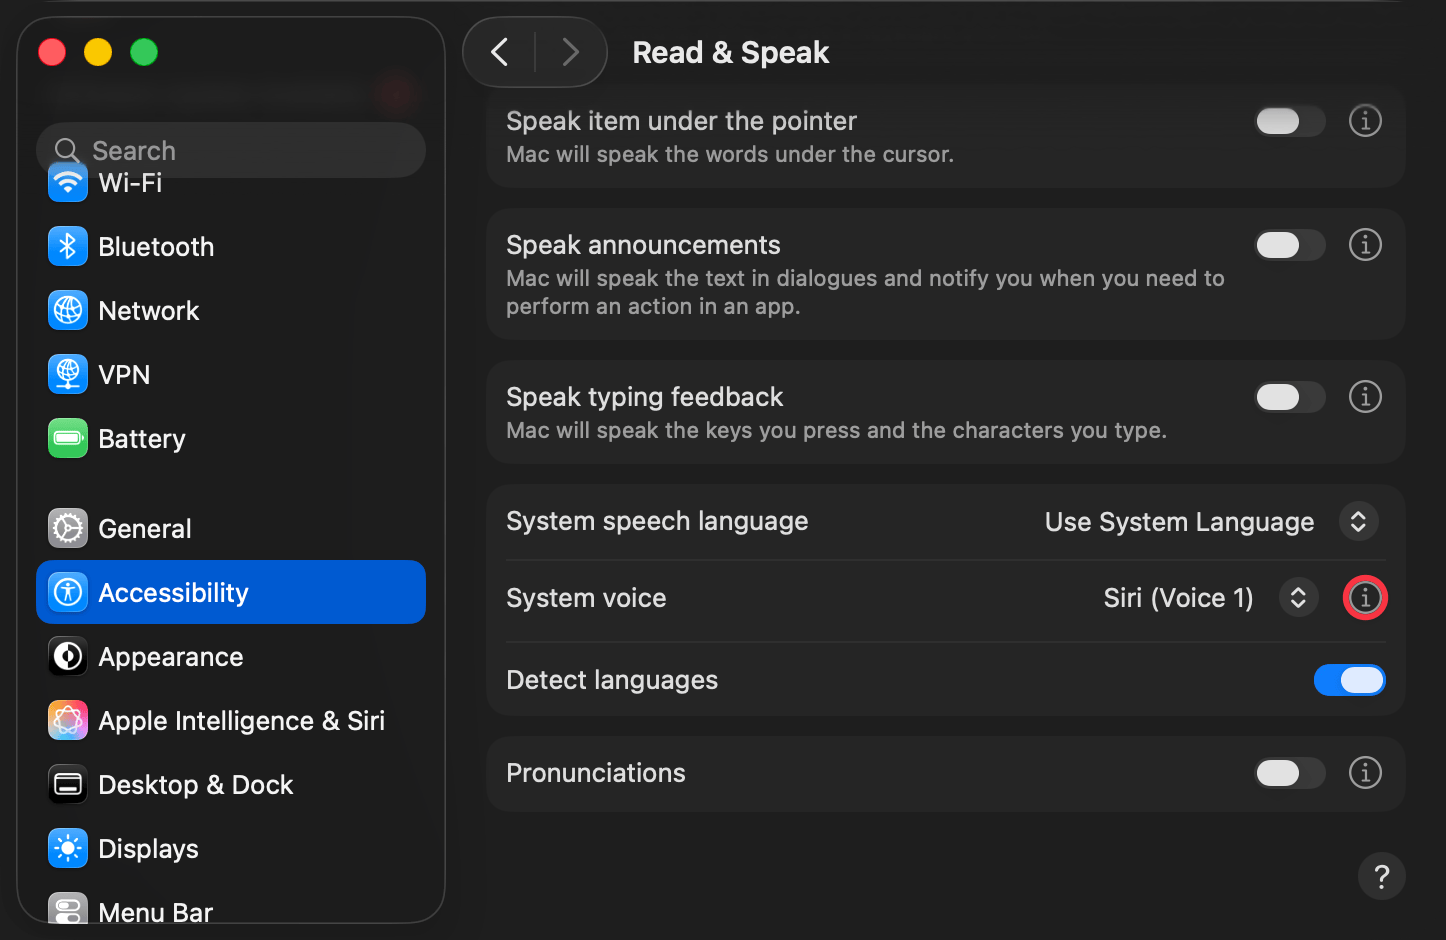
After changing the default voice, delete the "mac-default" folder located in the "Cues" folder of your project's AbleSet folder and restart AbleSet so it can generate the voices again.
Online TTS (macOS, Windows)
These voices are generated using ElevenLabs' text-to-speech service and sound the most natural, but they require an internet connection to be generated, and generating them can take a bit longer compared to the other voice services.
Custom Voices
If you'd like to supply your own audio files, you can do so by creating a "Custom" folder in the "Cues" folder of your project's AbleSet folder. Audio files need to be mono WAV files, and they should be named according to the phrase they represent.
If an audio file in this folder matches a phrase that is supposed to be spoken, AbleSet uses this file instead of the computer-generated one. It will still use the computer-generated phrase if no matching audio file could be found in the "Custom" folder.
Enable the "Fall Back to Section Titles Without a Number" setting to make AbleSet speak "Verse" instead of "Verse 1" if "Verse 1" isn't available as a custom audio file.
Multiple Custom Voices
To create multiple custom voices that you can easily switch between, create folders that start with "Custom", like "Custom Leo" and place your WAV files in them. AbleSet will then allow you to switch between these custom voices in the settings.
If a phrase isn't found in the selected custom voice folder, AbleSet will look for it in the default "Custom" folder before falling back to a generated version using the TTS voice you selected.
Timing Adjustments
Depending on the voice you're using, the timing of count-ins might be a bit off,
so the words land slightly after the beat. AbleSet automatically tries to shift
audio files so the first transient lands exactly on the beat, but if that
doesn't work, you can manually adjust individual phrases by adding the time
shift in milliseconds to the file name (e.g. One [70ms].wav).
This works for custom and generated voices.
Chords in Descriptions
When AbleSet detects a chord symbol in the description of a song or section, it spells out the chord, so "E#m" is announced as "E Sharp Minor", for example. If your description contains more than just a chord, wrap the chord in square brackets, e.g. "Guitar Start in [Em]".
Mixer: Creating and Controlling Track Groups
AbleSet supports creating and controlling track groups. These can consist of multiple tracks and can be controlled on the fly from the web app or via OSC.
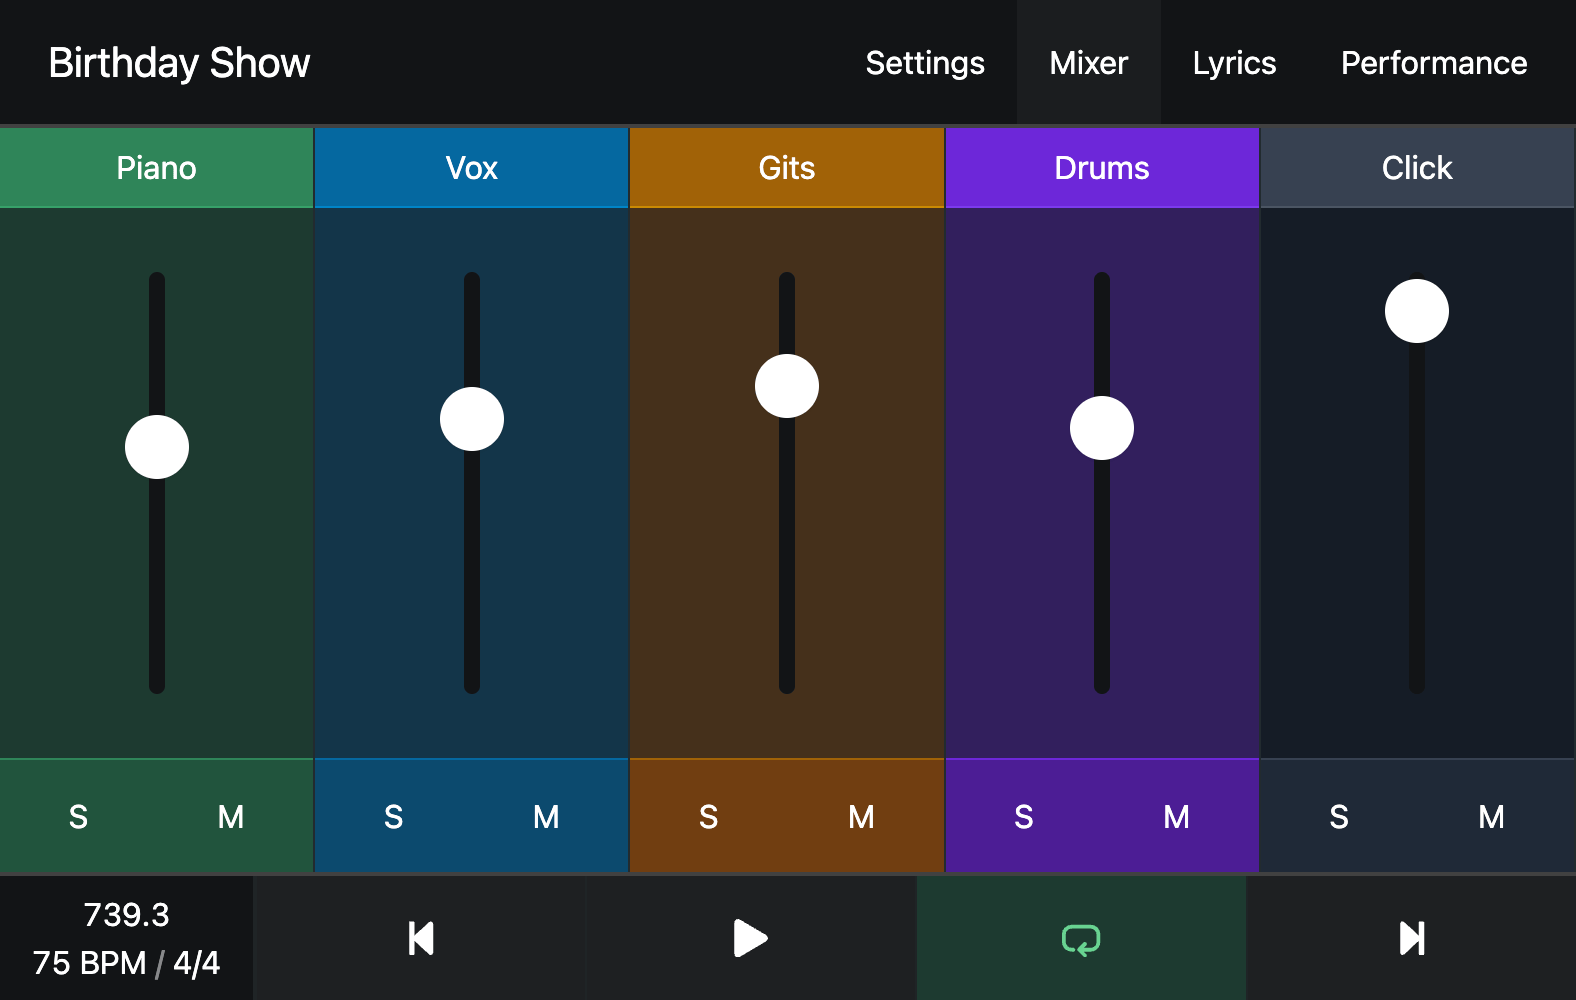
If you have tracks named Click or containing +CLICK, those are automatically
added to a "Click" group. To create other groups, add +G: or +GROUP: followed
by the name of the group you'd like the track to belong to to the track's name,
for example: +G:VOX.
Please note that the group name must be written in UPPERCASE and can only
contain letters, digits, dashes, and underscores. Underscores are displayed as
spaces, so +G:GIT_1 is displayed as "Git 1".
Tracks can belong to multiple groups, so you could assign a track both to a VOX
and to a BACKINGS group (e.g. Vox 1 +G:VOX +G:BACKINGS), while another track
is assigned to a BASS and the same BACKINGS group
(e.g. Synth Bass +G:BASS +G:BACKINGS). This allows you, for example, to mute
both tracks at once using the BACKINGS group while still being able to mute
them individually using their own groups.
The +NEVERMUTE Flag
Some tracks should never be muted – for example, if they output a control signal
to a redundant audio interface. By adding the +NEVERMUTE or +NM flag to the
name of those tracks, AbleSet ensures that they will always be audible. When you
solo a track group, all +NEVERMUTE tracks are soloed as well.
Using the Mixer With Multi-File Projects
When you're working with Multi-File Projects, you might want to keep your Mixer state when jumping between songs. To do this, enable the Sync Group Solos & Mutes Between Songs option on the Settings page.
If you'd also like to transfer the volumes of all groups, enable the Sync Group Volumes Between Songs option.
Tracks in Collapsed Groups
If some of the tracks are placed in groups in Ableton, make sure those groups are expanded. Live doesn't report meter levels for tracks in collapsed groups so you won't see meter levels in AbleSet for those.
Multi-File Projects
AbleSet's multi-file project feature allows you to split your Ableton Live project into one project file per song. This is especially useful if you have a lot of songs and handling them all in one session either gets too messy or you notice Live struggling to keep up.
To enable the multi-file project mode, go to AbleSet's settings menu and click on Multi-File Project -> Choose Project Folder...
You can then select a folder containing all songs that should be loaded into the setlist. This could be a Live project folder containing multiple project files, or a normal folder containing multiple Live projects – the folder structure doesn't really matter.
The filename of your songs can contain cue notation like
notes, colors, and the song duration – for example:
Why We Are {some notes} [blue] [3.42].als
Since file systems don't support the : character in filenames, it can be
replaced with a . for durations, as shown in the example above.
Here's an example:
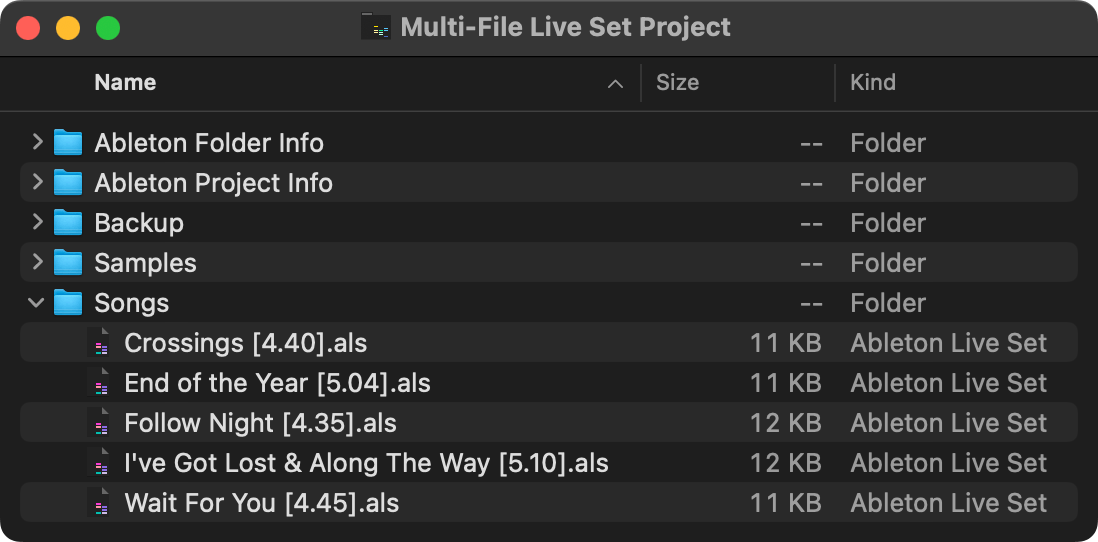
Each project file needs to contain at least one locator at the start of the song and one SONG END or STOP locator at the end of the song.
Options
The Save Changes Before Loading Project option allows you to decide whether the current project file should be saved when loading a new song. By default, this is enabled to prevent data loss, but if you're sure you don't want any changes to be saved, you can disable this to speed up switching between songs.
The ableset.json File
This file is stored in the folder you selected as the multi-file project root and contains information about the current setlist, e.g. the order of songs, the setlist name, etc.
Caveats
- One project file can currently only contain one song
The Measure Track
AbleSet allows you to add a measure track to your timeline to define the measures in your songs:

The measure track needs to be called "Measures" and can contain one MIDI clip per measure for your songs. The title of each clip represents the measure that AbleSet will display. This is usually a number, but you can give these clips any name you like.
Creating these clips for all measures in your songs is tedious, so you can use this tool to create measure clips for a number of measures in any time signature:
If AbleSet doesn't detect any measure clip at a given time, it falls back to Live's internal measure.
If a measure track is detected for a song, it is also used as a reference for the Visual Metronome.
Count-In
AbleSet has a Count-In feature which allows you to start playback of sections a few bars before the section starts. This is helpful for practice situations where you want to work on a specific section.
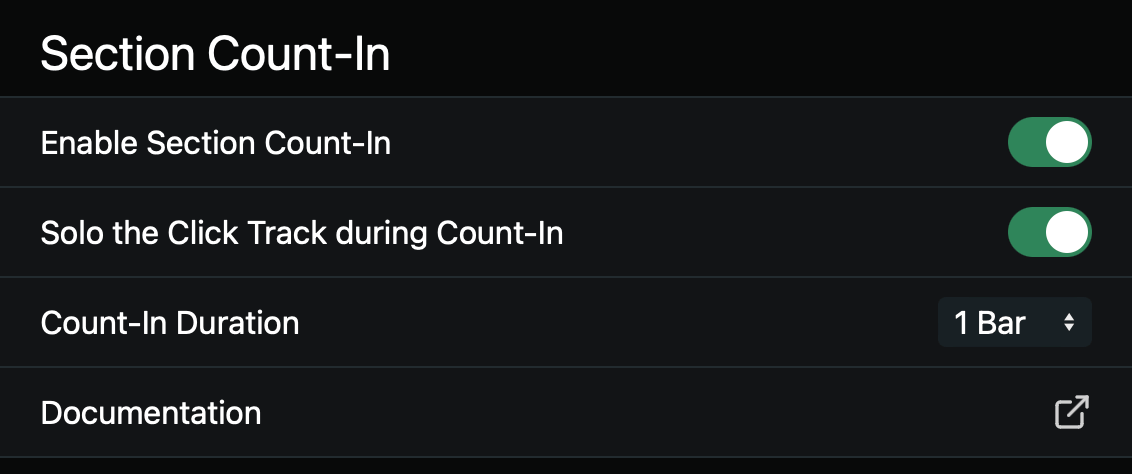
The menu allows you to choose between a 1-bar, 2-bar, or 4-bar count-in. You can also choose to solo the click track during the count-in. AbleSet will look for the first track or group that contains "click" as the click track.
Tracks named "Lifesine" will always be soloed as well so if you're using a redundant audio interface, it won't failover to your backup computer.
You can mark additional tracks as click tracks by adding the +CLICK flag to
their name. These tracks will also be soloed during count-ins.
For count-in to work reliably in versions of Live older than 11.1.5, make sure that you set Live's grid size to a fixed "1 bar" or lower. Otherwise, AbleSet will not be able to correctly position the playhead, and you'll get a warning message.
Visual Metronome
The Visual Metronome provides visual feedback on every beat. You can use it in setlist view, performance view, and canvases. It uses the following indicators in order of priority, falling back to the next one if the current one isn't available:
- The Measure Track
- The Max for Live Device
- The project file's time signature markers
If you don't use a Measure Track or the Max for Live device in your project, make sure to save your project each time you change time signatures so the Visual Metronome has access to the latest information. Otherwise, the metronome might be off-beat.
The metronome's color always matches the current section's color.
Using the Visual Metronome in Setlist View
To enable the Visual Metronome in your setlist, click the settings button at the bottom left of your setlist page and enable "Show Visual Metronome". The metronome will appear at the bottom left, in the information area:
Using the Visual Metronome in Performance View
To enable the Visual Metronome in Performance View, click the settings button at the top left of the screen and enable the "Visual Metronome" option. The metronome will appear full-screen behind all other elements:
Keyboard Shortcuts
If you're using AbleSet with a keyboard, you can use these shortcuts to control it:
Global:
- ␣: Play/pause
- ⇧ ␣: Play
- ⇧ R: Toggle recording
- ←: Jump to previous song
- →: Jump to next song / escape current loop
- ↑: Previous Section
- ↓: Next Section
- ⇧ ←: Jump to previous measure or bar
- ⇧ →: Jump to next measure or bar
- L: Toggle Loop
- ⇧ L: Toggle device lock
- J: Jump to the queued song or section
- ⇧ J: Instantly jump to the queued song or section
- C: Cancel queued jump
In Setlist View:
- ⌘ P: Print the setlist
- ⇧ O: Load a setlist
In the Setlist Editor:
- ⇧ H: Toggle the visibility of skipped songs
- ⇧ S: Save the current setlist
- ⌘ ⏎: Save changes and exit the editor
In Setlist and Performance Views:
- ⌘ K: Open the dialog for adding songs
When Lyrics Are Shown:
- .: Next lyrics line
- ,: Previous lyrics line
- B: Scroll back to the current line
- M: Jump to next lyrics line and pin it
- N: Jump to previous lyrics line and pin it
- ⇧ M: Toggle lyrics pinning
In the Canvas Editor:
- ⌘ K: Open the element search dialog
- ⌘ Z: Undo
- ⌘ ⇧ Z: Redo
- ⌘ D: Duplicate selected elements
- ⌫: Delete selected elements
Third-Party Controllers
AbleSet offers support for third-party controllers like Elgato's Stream Deck and Oaktone's Oakboard Floor Vista. Learn more about how to integrate them with AbleSet.
Stream Deck
AbleSet Standard and Pro offers support for Elgato's Stream Deck using the free Companion app by BitFocus.
This allows you to create a control surface that's completely customized to your needs. Buttons can display a variety of information about your set.
Here's a tutorial on how to set it up:
Open YouTube VideoOakboard Floor Vista
AbleSet officially supports Oaktone's Oakboard Floor Vista, a MIDI controller with an integrated display that allows you to see and control your setlist on stage.
By default, when you connect your Floor Vista to your computer via USB, AbleSet will automatically detect it, set up default MIDI mappings, and show the current setlist on its display. You can change the MIDI mappings in AbleSet's settings if you like.
Oaktone and iConnectivity
You can also use the Floor Vista to control AbleSet in a redundant setup. For AbleSet to recognize the controller, the names of its MIDI input and output ports need to include "Oakboard". You can rename the MIDI ports of your PlayAUDIO12, PlayAUDIO1U, mioXM, or mioXL by opening Auracle, clicking "MIDI Mapping", and then clicking the pencil icon next to the MIDI port your Floor Vista is connected to.
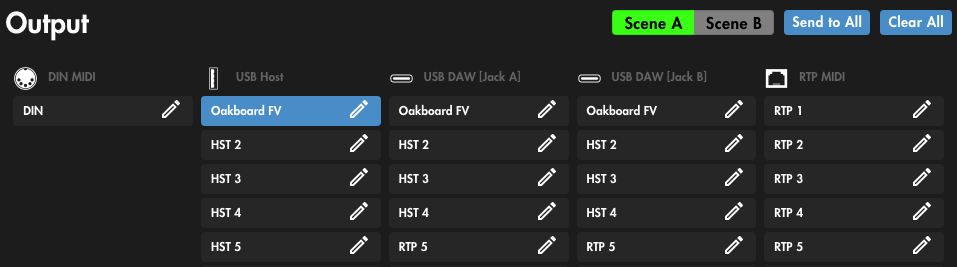
In some cases, macOS might not recognize the changed name right away. To fix this, unplug your MIDI interface, remove it from Audio MIDI Setup, and then plug it back in.
Canvas
Canvas expands on what you can do with Performance View and allows you to create completely custom views using a range of elements that you can freely place on your screen. Canvases can either be stored in your project or globally.
When you first create a canvas, you're presented with an empty area and a sidebar which contains settings for the canvas and selected elements.
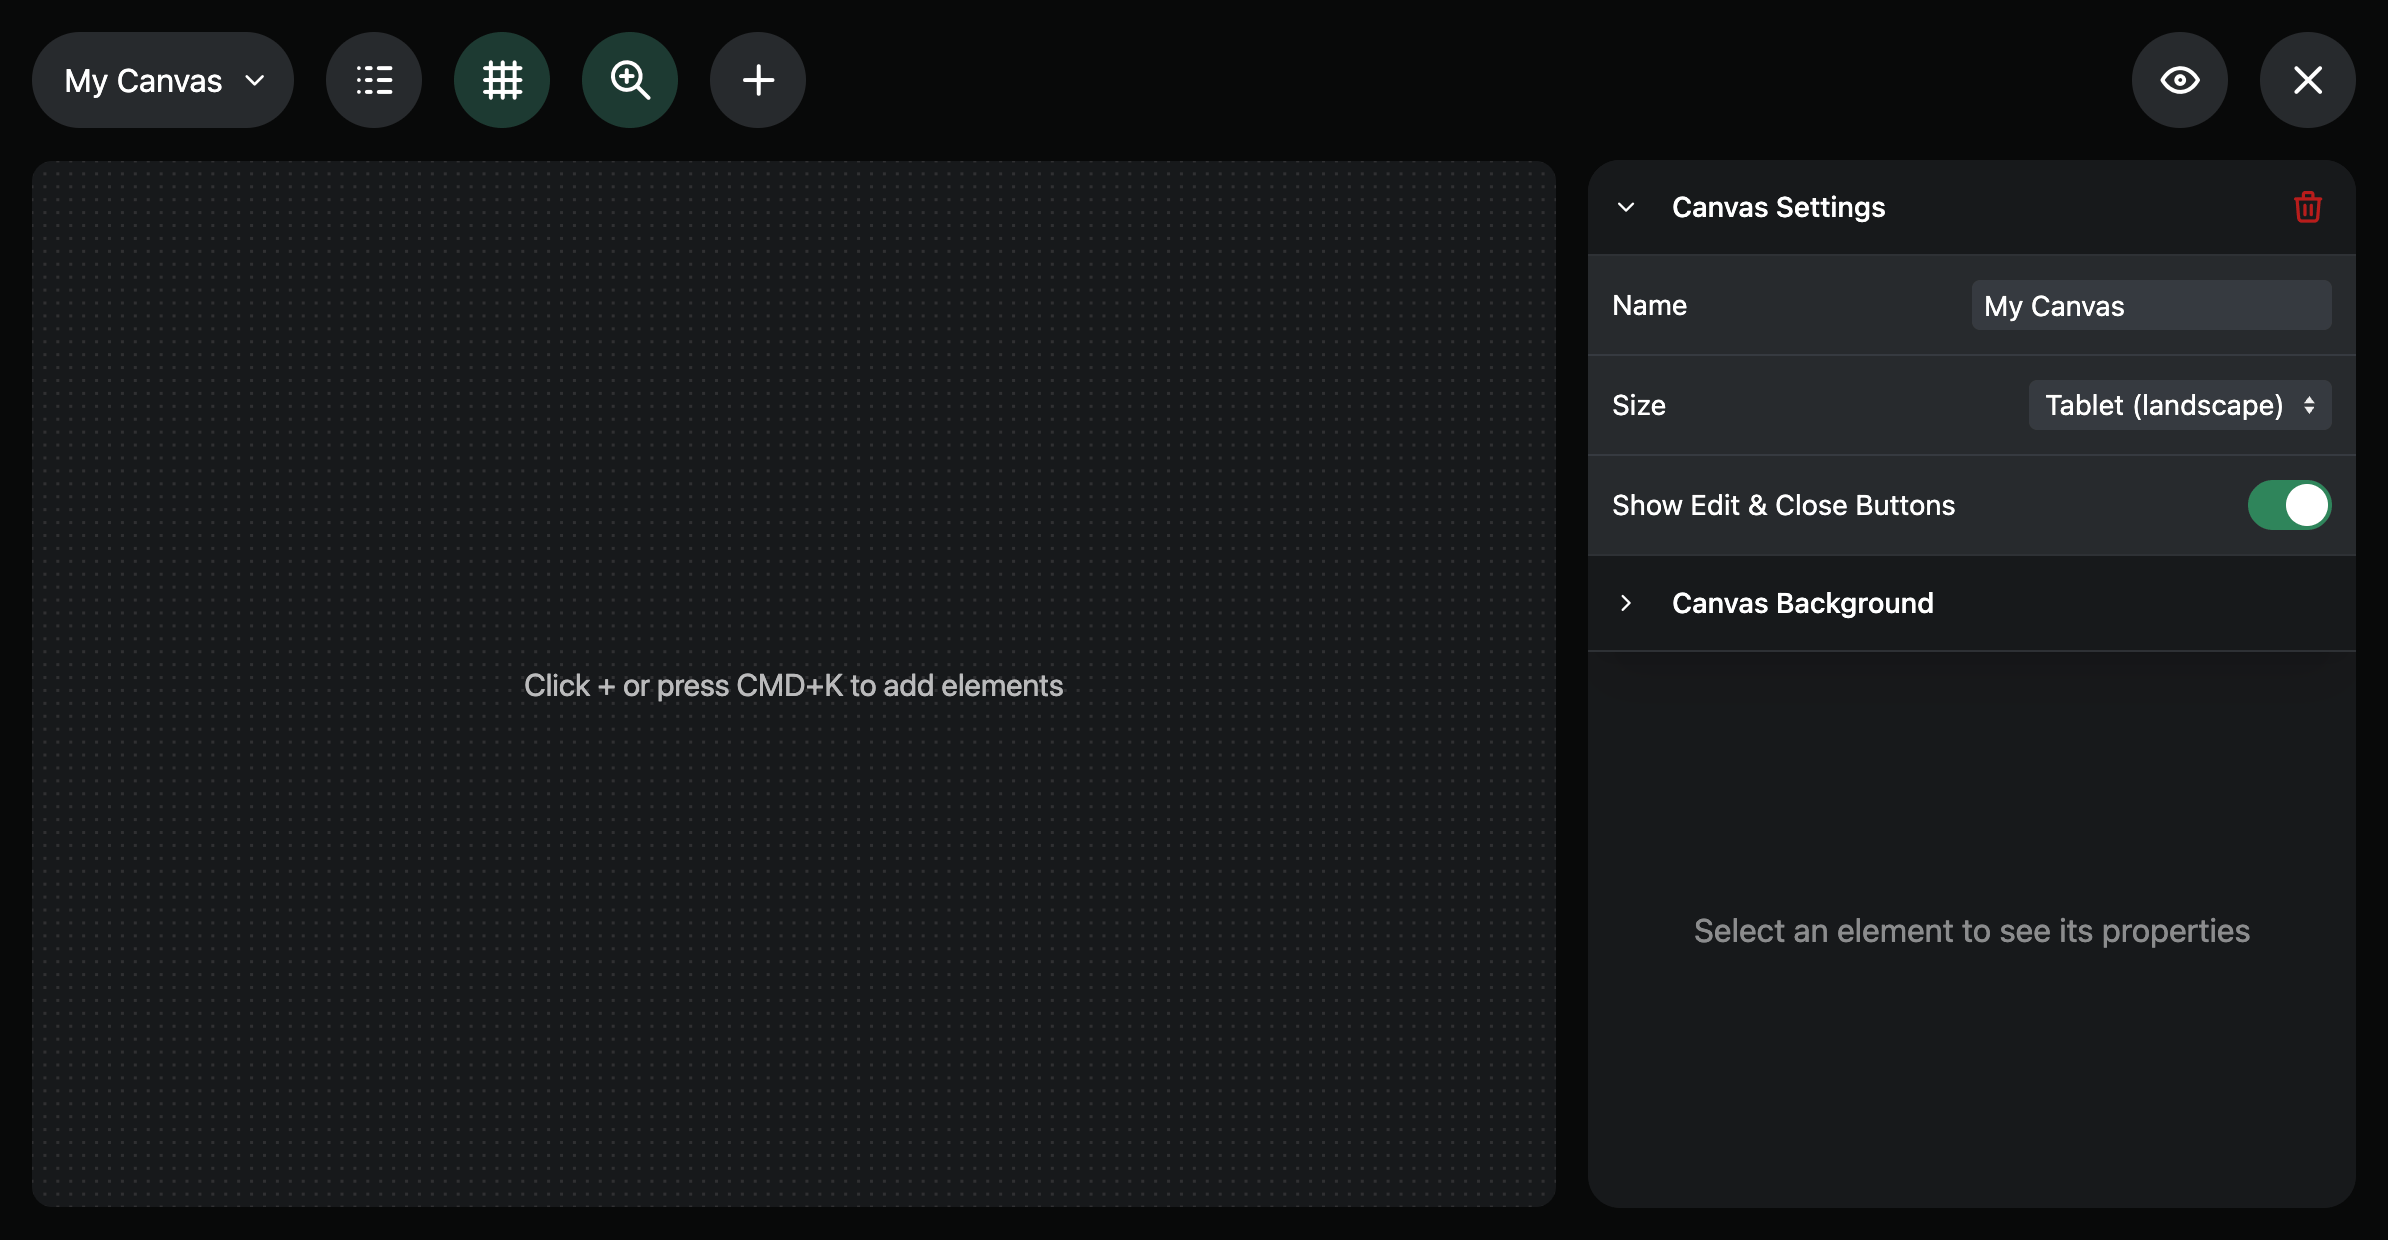
To get started, click the + button or press ⌘ K to open a list of
available elements. Below these, you'll see a list of presets which are
pre-configured elements you can add to your canvas.
If you're using Canvas for the first time, I'd recommend starting with some elements and presets and modifying them to your liking. You can find a list of all available elements and presets below.
Available Elements
Audio Interfaces
This element displays the status of connected audio interfaces. You can configure which audio interfaces you'd like to see.
Button
Buttons are one of the most flexible elements on the canvas. They can either send OSC commands or run scripts when pressed and released, or they can act as links to other pages, either internally or externally.
You can add a label and an icon, and choose a text and background color.
Clock
This element shows the current time. You can choose whether you want it to display the time in 12 or 24 hour format and whether it should show seconds. You can also change its color.
Current Measure
This element shows the current measure, either from a Measure Track or from other sources.
If AbleSet doesn't have access to the current measure, it will only display the current beat instead.
You can choose whether you want to show the current beat next to the measure and change its color.
Divider
Dividers allow you to separate elements from each other or act as headings for groups of elements. You can specify an optional title and change its color.
Embed
This element allows you to display an external website within the canvas. This might be a timer from Ontime or the status page of an audio interface in your network.
You can choose whether you want to allow interaction with the embedded page and add a background color if you like.
Image
The image element allows you to upload and display any image. You can choose whether the image should fit into the element or scale to fill it completely.
Uploaded images are stored in the Canvas/Resources folder in your project's
AbleSet Folder, and you can also add images to your
canvas by moving them there. Subfolders are supported.
You can also add images to the canvas by dragging them into your browser. This adds the image to your resources folder and creates an image element with it.
Input Field
Input fields can be used for text input. You can choose between four types – Text, Number, Email Address, and Multiline, depending on your needs, and add a placeholder text that is visible when the Input Field is empty.
If you specify a linked variable, the value of the input is always kept in-sync with that variable. Alternatively, you can use the Value field to specify a value, with support for templating.
When the Value changes, e.g. because one of the variables referenced in the templating changes, the Input's value is overridden with the new value.
You can run scripts on change and when pressing ⏎. These scripts can
access the Input's current value using the value variable.
Label
This element displays text with support for templating. You can choose text and background colors based on your needs.
Lyrics
The Lyrics element displays synchronized lyrics from a lyrics track of your choice. You can select the track and choose whether you want to see the name of the next song after the last lyrics line.
Panel
This element automatically moves into the background and offers another way to visually group other elements. You can choose a background color.
Setlist
The Setlist element shows your setlist. View settings are currently the same as on the Setlist page, so make any adjustments there.
Slider
This element allows you to set a number by dragging a Slider. You can choose its orientation (vertical/horizontal) and its style (Thumb & Bar, Thumb, or Bar) and add a label and background as you like.
By default, when you drag the Slider, it moves relative to your cursor or finger from where you started. This allows you more granular control on touch screens, but if you prefer the Slider to snap to your cursor or finger, enable the Snap to Pointer setting.
As with Input Fields, if you specify a linked variable, the value of the Slider is always kept in-sync with that variable. Alternatively, you can use the Value field to specify a value, with support for templating.
When the Value changes, e.g. because one of the variables referenced in the templating changes, the Slider's value is overridden with the new value.
The Minimum Value, Maximum Value, and Value Step options allow you to
specify a range and granularity for the Slider. If you want an on/off switch
style, set the Minimum Value to 0, the Maximum Value to 1, and the
Value Step to 1 as well.
You can run scripts when the value changes and when you release the Slider after
moving it. You can access the Slider's value using the value variable.
Additionally, you can access the Slider's Minimum Value, Maximum Value,
and Value Step using the min, max, and step variables.
For an example on how you can use a Slider, check out the Click Track Volume Slider.
Song Progress
This is a progress bar that shows the song's current progress and allows you to jump to sections by clicking the respective part of the progress bar.
You can choose between a pill-shaped or box-shaped style and enable section colors and section names depending on your preferences.
Section Progress
This element shows the progress of the current section. You can choose between a pill-shaped or box-shaped style. By default, it uses the color of the current section, but you can override it by setting a Background Color.
Timecode
The Timecode element displays the decoded timecode from the LTC Display Max for Live device. If you don't have the device in your project yet, you can download it from the Settings page.
You can choose whether to display the frame rate and set a Background Color and Text Color.
Visual Metronome
This element displays a Visual Metronome. By default, it uses the color of the current section, but you can override it by setting a Text Color. You can also choose a Background Color if you like.
Available Presets
Play/Pause Button
This is a Button that allows you to start or pause playback and reflects the current playback state in its color and icon.
Play/Stop Button
This is a Button that allows you to start or stop playback and reflects the current playback state in its color and icon.
Play Button
This is a Button that allows you to start playback if it's currently stopped and reflects the current playback state in its color.
Pause Button
This is a Button that allows you to pause playback if it's currently playing and reflects the current playback state in its color.
Stop Button
This is a Button that allows you to stop playback if it's currently playing and reflects the current playback state in its color.
Record Button
This is a Button that allows you to start recording and reflects the current recording state in its color and icon.
Loop Button
This Button allows you to enable and escape loops and reflects the current state in its color.
Next Song Button
This Button allows you to jump to the next song and fades when the last song is reached.
Previous Song Button
This Button allows you to jump to the previous song and fades when the first song is reached.
GO Button
This Button behaves the same as the Go Button in MIDI Mapping and reflects the current playback state in its color.
Current Song Title
This Label displays the current song's title. Its color changes based on the color of the current song and the playback state.
Next Song Title
This Label displays the next song's title. Its color changes based on the color of the next song and the playback state.
Current Section Title
This Label displays the title of the current section. Its color changes based on the color of the current section and the playback state.
Next Section Title
This Label displays the title of the next section. Its color changes based on the color of the next section and the playback state.
Time Signature
This Label displays the current time signature.
Remaining Time in Song
This Label displays the remaining time in the current song, in minutes and seconds.
Remaining Time in Set
This Label displays the remaining time in the setlist, in minutes and seconds.
Click Track Volume Slider
This Slider allows you to see and control the volume of the click track. You can modify it to control other track groups as well.
Click Track Solo Toggle
This button allows you to solo and unsolo the click track and reflects the solo state in its color.
Click Track Mute Toggle
This button allows you to mute and unmute the click track and reflects the mute state in its color.
Estimated Set End Time
This label displays the time when the set will likely end, based on the current time and the remaining set time.
Templating
Many of the elements' settings can be set dynamically using templating. The simplest example is a Label which can display a templated value.
Templates are basically text with dynamically populated parts. These parts start
with ${ and end with }. The content of these parts is written in JavaScript,
similar to other scripting in AbleSet.
The result of any JavaScript expression is inserted into the template, for example:
The Sum: ${10 + 15}
This expression would evaluate to "The Sum: 25". To display the name of the next song, you could use this template:
Next: ${osc("/setlist/nextSongName")}
When accessing OSC variables, you get autocomplete as soon as you type ${osc("
in the template field. You can see a list of all available functions
here.
Templated (Dynamic) Colors
Every color setting can make use of the same templating syntax by
enabling the Dynamic toggle. These templates should either evaluate to a
color name (e.g. green, red, etc.), a color name and shade (e.g. green-900,
red-800, indigo-500), or a hex color (e.g. #2f855a).
For example, to make a text use the color of the current song, use this template:
${osc("/setlist/activeSongColor")}
You can also combine template expressions to add color shades. For example, if you want the song color to be brighter during playback:
${osc("/setlist/activeSongColor")}-${osc("/global/isPlaying") ? 600 : 700}
Or if you want the a color to blink along with the metronome:
green-${
  osc("/global/isPlaying")
    ? osc("/global/beatsPosition") % 2 === 0 ? 600 : 700
    : 900
}
The shade needs to be either 50, 100, 200, 300, 400, 500, 600,
700, 800, 900, or 950, with 50 being the brightest and 950 being the
darkest color.
Visibility Condition
This setting is available for all elements and allows you to specify a template that can dynamically show or hide them.
When one or more elements are hidden, the editor will show a Ghost button that allows you to either hide hidden elements completely or display them slightly transparently. This setting only applies to the editor, hidden elements are always completely hidden in the Canvas viewer.
Local & Linked Variables
Local Variables are only stored in your browser but shared between all Canvases, and can optionally be persisted between reloads and browser restarts. You can use them for any values you only need temporarily and that don't need to be shared between different devices.
If you want to share values between devices, take a look at Shared Variables.
Local Variables can be accessed in scripts and bound to elements like Input Fields and Sliders by adding them to the Linked Variable field.
When a Local Variable is bound to an element, AbleSet automatically synchronizes it with the value of that element, so any changes to the element update the variable and any changes to the variable update the element.
When Local Variables are used, you can inspect their current values using the Local Variables element at the bottom of the editor's sidebar:
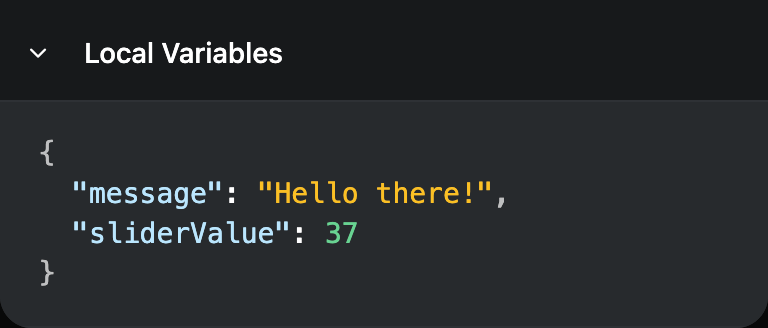
Examples
The possibilities are endless, but here are a few examples of things you can add to your Canvas. You can find more examples and shared Canvases on the AbleSet Forum.
Buttons to Switch Between Canvases
Buttons can act as links which allows you to build a kind of pager for switching between Canvases. To create a Button that links to another Canvas, first switch to the target canvas and make a note of its URL in your browser.
The URL should end in something like /canvas/canvas-name or
/canvas/canvas-name/edit. In the latter case, remove the /edit part.
Now, go back to the previous Canvas and create a new Button, set its
type to "Link", and enter the path of the other Canvas, e.g.
/canvas/canvas-name. Clicking this Button now opens the linked Canvas.
Broadcasting a Message
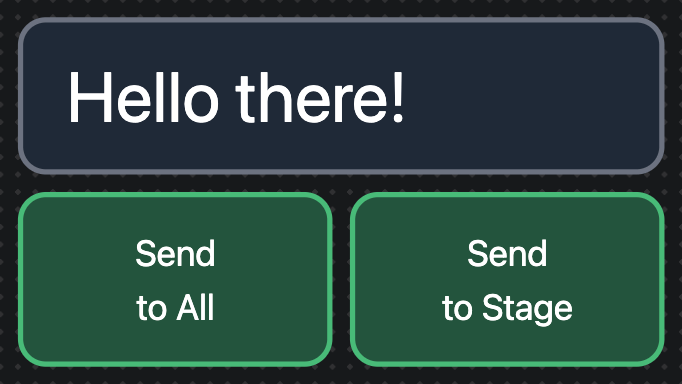
To broadcast a message to different devices, create an
Input Field element and set its Linked Variable to message.
Then, add Buttons for each group of devices you want to broadcast messages to. Set the Button Type to "Script" and enter the following Script on Press:
sendOsc("/notify/big", "all", local("message"));
You can replace "all" with other device identifiers, e.g. "stage" or "singer". To learn more about available device-specific OSC commands, check out the Device Control docs.
Now, when you press the button, the targeted devices will display the message you entered in full-screen.
If you'd like to clear the Input Field after the message has been sent, add the following line to the script:
setLocal("message", "");
You can add the same script to the Input Field's Script on Enter script as well to send the message each time you press ⏎.
Displaying a Countdown
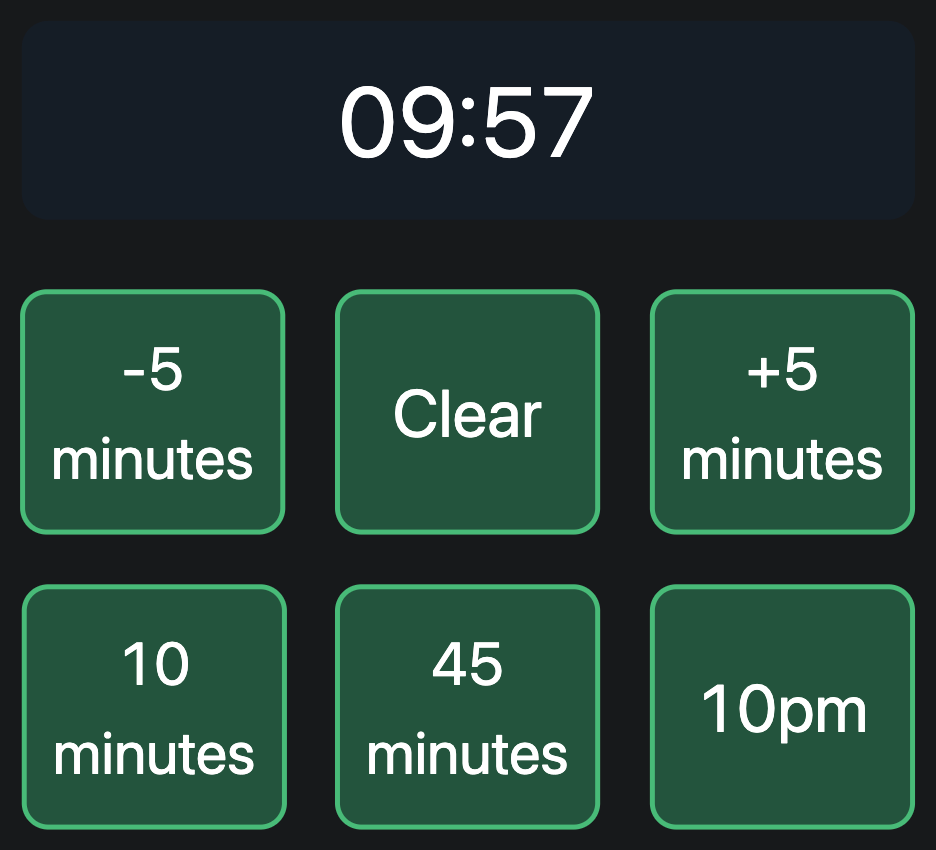
This could be nice to keep track of remaining time on stage. First, create a Label, give it a background color and increase the font size to your liking.
We'll use a Shared Variable to store the
timestamp of when the countdown should end. In this example, I'll call it
timerEnd. The timestamp is a number which is stored in milliseconds.
We could use a Local Variable for this as well, but using a Shared Variable allows us to display the same countdown on other devices as well.
To display the remaining time, set the Label to the following template:
${formatDuration((shared("timerEnd") - now()) / 1000)}
This takes the difference between the current time and the timerEnd timestamp
and divides it by 1000 to get the remaining time in seconds, then passes it into
formatDuration to generate a nicer looking duration like 10:35 or 01:23:45.
We haven't stored a timestamp in timerEnd yet, so this Label will be empty for
now. To set timerEnd, let's create a Button, set its Label to
10 minutes and its Button Type to "Script".
Then, we'll set the Script on Press to the following:
setShared("timerEnd", now() + 10 * 60 * 1000);
This calculates the timestamp 10 minutes from now and stores it in the Shared Variable. Since timestamps are stored in milliseconds, we convert the 10 minutes to milliseconds as well by multiplying it by 60 and 1000.
Pressing this button now starts a 10-minute countdown, or resets it to 10 minutes if one is already running.
To add time to the countdown, let's add another button called "+5 minutes", set the Button Type to "Script" as well and enter the following Script on Press:
if (shared("timerEnd")) {
  setShared("timerEnd", shared("timerEnd") + 5 * 60 * 1000);
}
This checks if a timer is active and then adds 5 minutes to the timerEnd
timestamp. To subtract time instead, just change the + to a -.
We can also set timerEnd to a specific time like 10pm. To do this, let's
create another Button called 10pm, set its Button Type to "Script" as well and
enter the following Script on Press:
const date = new Date();
date.setHours(22, 0, 0, 0);
setShared("timerEnd", date.getTime());
This creates a new Date object,
which is set to the current timestamp by default. To change the time of that
timestamp, we call date.setHours with 22 hours (10pm), 0 minutes, 0 seconds,
and 0 milliseconds. We then store that timestamp in timerEnd.
And to clear the countdown, let's create an additional script Button and set its Script on Press to the following:
resetShared("timerEnd");
Additionally, we can style the countdown conditionally. For example, we could change its background color to yellow when only 5 minutes or less remain. To do that, switch the Label's Background Color to "Dynamic" and set it to the following value:
${shared("timerEnd") - now() < 5 * 60 * 1000 ? "yellow" : "gray"}
Displaying the Expected End of Set Time
To display the time your set will end, we can use a Label. Give it a nice background if you like and set its value to the following:
${new Date(now() + osc("/setlist/remainingTimeInSet") * 1000).toLocaleTimeString()}
This calculates the timestamp your set will end by getting the current timestamp
in milliseconds and adding the remaining time, which needs to be converted from
seconds to milliseconds. It then converts that Date to a human-readable time
using toLocaleTimeString.
Controlling AbleSet via OSC
AbleSet Standard and Pro listens to OSC commands on port 39051, so you can
remote-control it from any other app that supports OSC.
AbleSet announces its OSC server on the network using Bonjour. Apps like TouchOSC can find it automatically using the "Browse" function so you don't have to enter the IP address and port manually.
If you're writing your own OSC client, you can use any Bonjour library to look
for _osc._udp. on the network. AbleSet's OSC server has a TXT value of
server=ableset, so in case there are other applications announcing their OSC
servers on the network as well, you can look for that value to find AbleSet.
Available Commands
Global
/global/playstarts playback/global/pausepauses playback/global/stopstops playback/global/startPlayingstarts playback from the last cursor position/global/continuePlayingcontinues playing from the current playhead position/global/playPausetoggles playback between play and pause/global/playStoptoggles playback between play and stop/global/startRecordingstarts recording, and starts playback when Live isn't already playing/global/stopRecordingstops recording, but doesn't stop playback/global/toggleRecordingstarts recording and playing, or stops recording/global/reEnableAutomationre-enables all disabled automation in Live/global/backToArrangementre-enables all arrangement clips in Live/global/quantization [quantization]sets the global quantization of your project- Allowed values:
8,4,2,1,1/2,1/2T,1/4,1/4T,1/8,1/8T,1/16,1/16T,1/32,none
- Allowed values:
/global/tempo [tempo]sets the tempo of your project, overriding any automation/global/tempo/adjust [delta]adjusts the tempo by the given number of BPM- The delta can be positive to increase the tempo or negative to decrease it
/global/tempo/resetresets the tempo to the automation of your project
Loop
/loop/enableenables Live's loop bracket/loop/escapedisables Live's loop bracket- if the current loop was enabled using the
+LOOPflag, this will also jump to the next section
- if the current loop was enabled using the
/loop/toggletoggles Live's loop bracket
Setlist
/setlist/jumpToTime [time]jumps to the given time, in beats/setlist/jumpToSong [number, name, or RANDOM]jumps to the song at the given position in the setlist/setlist/jumpToSong 2jumps to the 2nd song/setlist/jumpToSong -2jumps to the 2nd-last song/setlist/jumpToSong SongTitlejumps to the first song named "SongTitle"/setlist/jumpToSong RANDOMjumps to a random song
/setlist/jumpBySongs [steps]jumps by given number of songs/setlist/jumpBySongs 1jumps to the next song,/setlist/jumpBySongs -1jumps to the previous one or to the beginning of the current song when the playhead isn't at the start of the song- Adding a
force=trueparameter when jumping back a song (e.g./setlist/jumpBySongs -1 force=true) ignores the playhead's current position inside the song and always jumps to the previous song
/setlist/jumpToSection [number or name]jumps to the section at the given position in the current song/setlist/jumpToSection 2jumps to the 2nd section/setlist/jumpToSection -2jumps to the 2nd-last section/setlist/jumpToSection Chorusjumps to the first section named "Chorus"/setlist/jumpToSection Chorus truejumps to the first section whose name includes the word "Chorus"
/setlist/jumpToQuickPlaySection [number]jumps to the nth quick play section of the current song/setlist/jumpToQuickPlaySection 2jumps to the 2nd quick play section/setlist/jumpToQuickPlaySection -2jumps to the 2nd-last quick play section
/setlist/jumpBySections [number] [boolean]jumps by a given number of sections/setlist/jumpBySections 1jumps to the next section in the current song- By default, AbleSet prevents you from jumping beyond the bounds of the
current song. To override this, set the 2nd argument to
true. For example,/setlist/jumpBySections 1 truewill jump to the first section of the next song when the playhead is positioned in the last section of the current song - Adding a
force=trueparameter when jumping back a section (e.g./setlist/jumpBySongs -1 force=true) ignores the playhead's current position inside the section and always jumps to the previous one
/setlist/jumpByBeats [number] [boolean]jumps forward or backward by a given number of beats- By default, AbleSet prevents you from jumping beyond the bounds of the
current song. To override this, set the 2nd argument to
true.
- By default, AbleSet prevents you from jumping beyond the bounds of the
current song. To override this, set the 2nd argument to
/setlist/jumpByBars [number] [boolean]jumps forward or backward by a given number of bars- By default, AbleSet prevents you from jumping beyond the bounds of the
current song. To override this, set the 2nd argument to
true.
- By default, AbleSet prevents you from jumping beyond the bounds of the
current song. To override this, set the 2nd argument to
/setlist/jumpByMeasures [number] [boolean]jumps forward or backward by a given number of measures, always snapping to the beginning of the measure- This requires a Measure track in your project, and
only works while playback is stopped. For jumping while playing,
use
/setlist/jumpByBarsinstead. - By default, AbleSet prevents you from jumping beyond the bounds of the
current song. To override this, set the 2nd argument to
true. - When jumping back one measure while the playhead isn't at the beginning of a
measure, AbleSet jumps to the beginning of the current measure first. To
override this, add a
force=trueargument.
- This requires a Measure track in your project, and
only works while playback is stopped. For jumping while playing,
use
/setlist/jumpToQueued [boolean]jumps to the queued song or section- if the first argument is
true, AbleSet jumps instantly, without respecting Live's global quantization
- if the first argument is
/setlist/clearQueuedJumpclears the currently queued jump/setlist/playCuedSongplays the next song after the current song has finished- if autoplay is disabled, this will jump to the next song first, and start playback when it's called again
/setlist/gois a command that does different things based on the current state of your set:- When stopped at the end of a song, jumps to the next song
- When stopped at the beginning of a song, starts playback
- When playing in a loop, escapes the loop
- When playing while a song or section is queued, instantly jumps to it
/setlist/setLocatorsFromClipsplaces a locator at each section clip/setlist/removeClipLocatorsremoves automatically placed locators at section clips/setlist/load [string]loads a saved setlist by its name/setlist/removeSong [string]removes a song from the setlist by its name/setlist/toggleStoptoggles whether AbleSet should stop at the end of the current song- This only works for songs that end with a SONG END locator
Lyrics
/lyrics/jumpByLines [string] [integer]jumps by the given number of lines- The first parameter is the slug of the lyrics track, the second defines the number of lines AbleSet should jump by.
/lyrics/jumpByLines leo 2jumps ahead two lyrics lines in the lyrics track called "Leo +LYRICS"/lyrics/jumpByLines backing-vox -2jumps back two lyrics lines in the lyrics track called "Backing Vox +LYRICS"
Mixer
For more information about track groups, see the mixer documentation.
/click/mute [boolean or toggle]mutes or unmutes all click tracks/click/solo [boolean or toggle]soloes or unsoloes all click tracks/mixer/[group name]/mute [boolean or toggle]mutes or unmutes all tracks in the given track group/mixer/[group name]/solo [boolean or toggle]soloes or unsoloes all tracks in the given track group/mixer/[group name]/volume [number]sets the track group's volume- The volume can be between 0 and 1, with 0 being all group tracks at -Inf dB and 1 being all tracks at their maximum of 6dB
/mixer/[group name]/fadeTo [volume] [speed]fades the given track group out- The volume can either be a number between 0 and 1, or "previous" if you want to undo the previous fade
- The speed is an optional multiplier. By default (1), it takes 5 seconds to fade from -Inf to +6dB. Higher values are faster, lower values are slower.
Cues
/cues/say [message] [voice]generates the given message if needed and plays it through the AbleSet Cues plugin.
Audio Interfaces
For more information about audio interfaces, see the audio interfaces documentation.
/audioInterfaces/setScene [1, 2, A, or B]sets the active scene on the connected audio interfaces/audioInterfaces/setScene 1sets the active scene to scene A/audioInterfaces/setScene Bsets the active scene to scene B
/audioInterfaces/toggleScenetoggles the active scene between A and B on the connected audio interfaces/audioInterfaces/armarms the failover system of all audio interfaces- For iConnectivity devices, this enables the "Arm" mode
- For DirectOut devices, this sets the port priority to Auto and resets all force settings
Commands for iConnectivity PlayAUDIO Devices
/audioInterfaces/playaudio/setScene [serial] [scene]sets active scene of the devicescenecan be either 1 or 2
/audioInterfaces/playaudio/setArmed [serial] [armed]sets whether the failover system is armedarmedcan be either 0 or 1
You can find the serial number of your PlayAUDIO devices in Auracle.
Commands for DirectOut EXBOX.MD Devices
/audioInterfaces/exbox/setPriority [host] [port] [priority]sets the priority of a port on the given hostprioritycan be eitherInactive,Main,Backup, orAuto
/audioInterfaces/exbox/setForce [host] [port] [force]sets the priority of a port on the given hostforcecan be eitherNone,Main, orBackup
For both commands, host is the hostname of your EXBOX.MD, and port can be
either SFP, BNC, SC, or NET. All values are case-sensitive.
Commands for DirectOut PRODIGY/ANDIAMO Devices
/audioInterfaces/prodigy/setPriority [host] [port] [priority]sets the priority of a port on the given hostprioritycan be either Inactive, Main, Backup, or Auto
/audioInterfaces/prodigy/setForce [host] [port] [force]sets the priority of a port on the given hostforcecan be eitherNone,Main,Backup, orDisaster Recovery
For both commands, host is the hostname of your EXBOX.MD, and port can be
either MADI 1, MADI 2, NET 1 A, NET 1 B, NET 2 A, or NET 2 B.
All values are case-sensitive.
Commands for DAD Devices
/audioInterfaces/dad/setOverride [serial] [preset ID] [override ID]overrides the active source set for a given preset- The override ID can be 1-4 for a source set or 0 to disable the override
Floating Setlist Window
/floatingWindow [show|hide|toggle]shows, hides, or toggles the floating setlist window
Settings
You can find a list of all settings here. Boolean values can
be an actual boolean or 0 / 1. You can also set them to toggle to toggle
the setting.
AbleNet
To enable or disable AbleNet or the automatic drift correction, see settings OSC commands.
/ableNet/syncToRemotebrings this machine back in sync with others on the network if it's paused, see AbleNet docs
Device Control
You can use these OSC commands to control the AbleSet web app in the browser.
If you'd like a command to run on all devices, pass all as the first parameter.
Otherwise, set the first parameter to either the IP address or name of the
device you'd like to control. The device name is case-insensitive. Multiple
devices can be passed separated by commas.
Each device can have multiple names, separated by commas, which allows you to tag devices. For example, my iPad on stage could be called "ipad-1, stage", and my other iPad on stage could be called "ipad-2, stage". When I target "stage", both iPads will receive the command.
/devices/showPage [devices] [page]navigates to the given page- The page parameter corresponds to the path you see in the browser's URL bar
/devices/showPage all performancenavigates to the performance page on all connected devices/devices/showPage leos-ipad lyrics/leoopens the lyrics page for the lyrics track called Leo on the device called leos-ipad/devices/showPage 192.168.1.10 setlistopens the setlist page on the device with the IP address 192.168.1.10
/devices/reload [devices]reloads the current page on the browser/devices/setSetting [devices] [setting] [value]sets a device-specific setting- Settings can be viewed by going to Settings -> Debug -> Device Settings
/devices/setSetting all performance.showSectionProgress trueenables the section progress bar on all devices- For boolean settings, you can send
toggleinstead of the value to toggle the setting
/devices/lock [devices]locks the given device/devices/unlock [devices]unlocks the given device/devices/toggleLock [devices]toggles the lock on the given device/devices/pressKey [devices] [key]simulates a keypress on the given devices- This is experimental and doesn't cover all cases yet
- Use this website to get the code of any pressed key
- To add Shift or CMD/CTRL modifiers, prepend them to the key code
/devices/pressKey all Shift+Mpresses Shift + M, which toggles pinning in the lyrics view on all devices
/devices/showSections [devices] [boolean or toggle]shows or hides the sections of the current song in the setlist/devices/showAllSections [devices]shows the sections of all songs in the setlist/devices/hideAllSections [devices]hides the sections of all songs in the setlist/devices/setLineOverride [devices] [boolean or toggle]enables or disables the line override function in lyrics/devices/showSongAddDialog [devices]shows the "Add a Song" dialog/devices/showSongJumpDialog [devices]shows the "Jump to Song" dialog/devices/hideSongDialog [devices]hides the current song dialog
Notifications
These OSC commands display a notification on one or more devices. If you'd like
the notification to be displayed on all devices, pass all as the first parameter.
Otherwise, set the first parameter to either the IP address or host name of the
device you'd like to control. The host name is case-insensitive. Multiple devices
can be passed separated by commas.
/notify/toast [devices] [title] [description] [duration]displays a toast notification on all browsers- Description and duration are both optional parameters
- The toast duration is specified in milliseconds
/notify/big [devices] [message] [duration] [color]displays a message that fills the entire screen on all browsers- Duration can be omitted and will default to 5000 ms
- The message duration is specified in milliseconds, but users can also hide it by tapping on it
- The color can be any of the supported colors in AbleSet
- The message can contain simple markdown for bold, italic, and underlined text
/notify/cue [devices] [duration] [color]displays a colored cue light along the edge of the screen- The cue duration is specified in milliseconds
- The color can be any of the supported colors in AbleSet
You can also clear notifications:
/notify/big/clear [devices]clears a big notification/notify/cue/clear [devices]clears a cue light
Sending MIDI
AbleSet can send MIDI data to any output port using OSC. You can use these commands to send notes:
/midi/send/note [output] [channel] [note] [velocity] [duration]sends a note on followed by a note off to the specified output- Velocity is optional, the default value is 127
- Duration is specified in milliseconds, the default value is 100
/midi/send/noteOn [output] [channel] [note] [velocity]sends a note on with the given velocity to the specified output- Velocity is optional, the default value is 127
/midi/send/noteOff [output] [channel] [note] [velocity]sends a note off with the given velocity to the specified output- Velocity is optional, the default value is 0
The note can either be a number between 0 and 127, or a string like E#0 or Cb-1.
To send CC and PC, you can use these commands:
/midi/send/cc [output] [channel] [controller] [value]sends a CC to the given output- Controller and value must both be numbers between 0 and 127
/midi/send/pc [output] [channel] [program]sends a PC to the given output- Program must be between 0 and 127
You can also send raw MIDI data to any output, for example for SysEx:
/midi/send/raw [output] [data]- Data can either be a list of numbers, or a string like
F0 03 A3 F7
- Data can either be a list of numbers, or a string like
Shared Variables
AbleSet allows you to set shared variables which are accessible from all devices and optionally persisted across restarts. This is especially useful for setting state via MIDI mapping or in canvases.
To set a shared variable, send an OSC command to /shared/[variable name] with
its value or values. For example:
/shared/controlsEnabled truesets thecontrolsEnabledvariable totrue/shared/items 1 2sets the shareditemsvariable to an array of[1, 2]
Variable names can contain slashes as well:
/shared/canvas/color bluesets thecanvas/colorvariable toblue
Control Flow Statements
When writing OSC commands in AbleSet's MIDI mapping and Canvas, you can use control flow statements to delay or skip the next commands. Here's a list of all available control flow statements:
//sleep [duration]sleeps for the given duration in milliseconds before running the next commands//awaitJumpwaits for Live to jump to the queued section before running the next commands//awaitFileLoadwaits for Live to load the project file before running the next commands//if [condition]only runs the next commands if the condition is met- Currently, the condition can be either
playing,recording, orlooping - You can negate a condition by adding a
!at the beginning, e.g.!playing - If the condition isn't met, all following commands are skipped until an
//endifor another//ifstatement - You can't combine multiple conditions at this time
- To make the command a bit easier to read, you can use a colon (
//if playing:) instead of a semicolon (//if playing;) to delimit it from the next command - Example:
//if !playing: /setlist/jumpBySections 1only jumps to the next section if Live isn't currently playing
- Currently, the condition can be either
AbleNet Parameters
If you're using OSC commands in a setup with multiple computers connected via AbleNet, AbleSet automatically forwards commands to all other connected computers. For additional redundancy, you should send the same command to all computers.
For this to work well, each command you send to AbleSet via OSC should have its own
UUID. You can append it as a string parameter to any OSC command, for example
uuid=1234abcd where "1234abcd" is a random string for each command.
When AbleSet receives multiple commands with the same UUID, it will only execute the first one and discard all others.
If you don't want AbleSet to forward OSC commands, you can add the string ableNet=false
to any OSC command that you send to AbleSet. In that case, the UUID parameter isn't necessary.
Receiving Updates from AbleSet
AbleSet can send updates on its current state to other OSC clients. This can be used to update the state of your control surfaces in real time.
To register your OSC clients with AbleSet, send the /subscribe command with
the IP address and port, and optionally a name – e.g.:
/subscribe 127.0.0.1 8000 TouchOSC
If you set the IP address to auto or omit the parameter, AbleSet will use the
IP address the request came from to register the OSC client, e.g.:
/subscribe 8000 TouchOSC
or
/subscribe auto 8000 TouchOSC
This is useful for setups where you don't always know your IP address, like using TouchOSC on a machine that gets a new IP every time it connects to the network.
To receive fine value updates, e.g. for the playhead position or song/section progress, add an additional argument to the call:
/subscribe 8000 TouchOSC true
Please note that these fine updates are sent up to 100 times per second and might be taxing on low-end devices receiving them. If you'd like to throttle the frequency of fine updates, you can send a number instead of a boolean that specifies the frequency in milliseconds:
/subscribe 8000 TouchOSC 250
You can update this frequency by subscribing again with a different value.
After subscribing, you'll see a notification that the device has been connected,
and from this point on, AbleSet will send updates for all events to your client.
You can register multiple clients with AbleSet if you want to connect multiple
control surfaces. To unsubscribe from events, send /unsubscribe to AbleSet.
If you'd only like to receive updates for specific values, you can add those to
the /subscribe command as well:
/subscribe 8000 TouchOSC true /global/isPlaying /setlist/activeSongName
This reduces the network traffic and is especially useful for OSC clients that can't handle a lot of messages at once.
The value filter supports excludes and wildcards using the glob syntax. For
example, /mixer/*/volume would include /mixer/click/volume,
/mixer/bass/volume, etc. while /mixer/** would include all values starting
with /mixer.
To exclude values from updates, prepend an exclamation mark to the filter, e.g.
!/setlist/** to exclude all updates from values starting with /setlist.
These filters can be combined so you can tune the updates to your liking.
In addition to value events, AbleSet will send a /heartbeat every 2 seconds.
You can use this to check if the connection is still up. If you'd like to
trigger a heartbeat yourself, you can send a /getHeartbeat command to AbleSet.
Requesting Values
To get the current state of all values, send /getValues to AbleSet. If you've
already subscribed to value updates, this sends results to the same port as
these updates.
/getValues 8000
You can override this by providing a port or a host and a port:
/getValues 127.0.0.1 8000
If you've set up a filter when subscribing, you only get the values that are included in this filter. You can override this by adding the addresses of values you'd like to receive to the command:
/getValues /global/* /setlist/activeSongName
You can find a list of all values that get sent to registered clients below.
Customizing the OSC Client in AbleSet
AbleSet lists all connected OSC clients on its Devices page. You can modify the way your client is displayed using these two OSC commands:
/setStatus "My custom status"
/setWebLink "http://example.local/link"
If you'd like to override the host or port of these commands, you can do so
by adding them to the beginning of the arguments, just like you would with
/getValues:
/setStatus 8000 "My status"
/setStatus 127.0.0.1 8000 "My status"
Available OSC Values
These values are available via OSC, in scripts, and in Canvas. To see a live list of all values, go to Settings -> OSC Settings -> View All OSC Values.
Global
/global/isConnected [0|1]whether AbleSet is connected to Live/global/isLoadingFile [0|1]whether Live is loading a new song file/global/projectName [string]the name of the current project file/global/loadingProjectName [string]the name of the project file that is currently being loaded/global/beatsPosition [float]the current position in beats, floored to whole numbers while Live is playing/global/finePosition [float]the current position- Requires the
fineflag to be set when subscribing to updates
- Requires the
/global/humanPosition [float] [float]the current position in bars and beats/global/currentMeasure [string] [float] [float]the current measure from a measure track, if available, along with the current beat and the total number of beats in the current measure- This requires a Measure track in your project
/global/tempo [float]the current tempo/global/isPlaying [0|1]whether Live is currently playing/global/isRecording [0|1]whether Live is currently recording/global/isPaused [0|1]whether Live is currently paused/global/isAtPauseLocator [0|1]whether Live is currently paused at a +PAUSE locator/global/timeSignature [integer] [integer]the time signature/global/quantization [quantization]the global quantization of your project- Possible values:
8,4,2,1,1/2,1/2T,1/4,1/4T,1/8,1/8T,1/16,1/16T,1/32,none
- Possible values:
/global/canReEnableAutomationwhether any automation in Live is currently disabled/global/canGoBackToArrangementwhether any arrangement clips are currently overridden by session clips/global/metronome [integer] [integer]the current metronome pattern, either from a Measure track, or from the project file/global/measureOrPosition [string] [integer]the current measure and beat/global/cpuAverageLive's average CPU usage/global/cpuPeakLive's peak CPU usage/global/isSyncingToRemoteTickwhether AbleSet is currently syncing to another computer on the network via AbleNet
Setlist
/setlist/name [string]the setlist name/setlist/songs [...string]a list of all song names in the setlist/setlist/songCount [float]the number of songs in the setlist/setlist/songColors [...string]a list of all songs' colors in the setlist/setlist/songDurations [...float]a list of all songs' durations in the setlist in seconds/setlist/songDescriptions [...string]a list of all songs' descriptions in the setlist/setlist/songTempos [...float]a list of all songs' tempos in the setlist/setlist/files [...string]a list of all saved setlist file names/setlist/sections [...string]a list of all sections of the current song/setlist/sectionCount [float]the number of sections in the current song/setlist/quickPlaySections [...string]a list of all quick play sections of the current song/setlist/quickPlaySectionCount [float]the number of quick play sections in the current song/setlist/sectionDescriptions [...string]a list of all section descriptions of the current song/setlist/sectionColors [...string]a list of all sections' colors of the current song/setlist/activeSongName [string]the name of the current song/setlist/activeSongDescription [string]the description of the current song/setlist/activeSongStopDescription [string]the stop description of the current song/setlist/activeSongTags [...string]the tags of the current song/setlist/activeSongIndex [float]the index of the current song in the setlist/setlist/activeSongStart [float]the song's start position in beats/setlist/activeSongEnd [float]the song's end position in beats/setlist/activeSongDuration [float]the song's duration in seconds/setlist/activeSongColor [string] [string]the color of the song, as a color name and as a hex string/setlist/activeSongProgress [float]the song's progress from 0 to 1- Requires the
fineflag to be set when subscribing to updates
- Requires the
/setlist/activeSongStopDescription [string]the song's stop description/setlist/activeSectionName [string]the name of the current section/setlist/activeSectionDescription [string]the description of the current section/setlist/activeSectionIndex [float]the index of the current section in the current song/setlist/activeSectionStart [float]the section's start position in beats/setlist/activeSectionEnd [float]the section's end position in beats/setlist/activeSectionColor [string] [string]the color of the section, as a color name and as a hex string/setlist/activeSectionLoopMode [loop|loopfull]the section's loop mode/setlist/activeSectionLoopCount [integer]the pre-defined number of loops/setlist/activeSectionDuration [float]the section's duration in seconds/setlist/activeSectionProgress [float]the section's progress from 0 to 1- Requires the
fineflag to be set when subscribing to updates
- Requires the
/setlist/nextSectionName [string]the name of the next section/setlist/nextSectionDescription [string]the description of the next section/setlist/nextSectionIndex [float]the index of the next section in the current song/setlist/nextSectionStart [float]the next section's start position in beats/setlist/nextSectionEnd [float]the next section's end position in beats/setlist/nextSectionColor [string] [string]the color of the next section, as a color name and as a hex string/setlist/nextSectionDuration [float]the next section's duration in seconds/setlist/queuedName [string] [string]the name of the queued song and section/setlist/queuedIndex [float] [float]the index of the queued song and section/setlist/queuedType [string]the type of the queued jump –songorsection/setlist/isJumpingToQueued [0|1]whether AbleSet is currently jumping to the queued song or section/setlist/songCountdownMs [float]the remaining song countdown in milliseconds, if a countdown is active/setlist/nextSongName [string]the next song's name/setlist/nextSongDescription [string]the next song's description/setlist/nextSongStopDescription [string]the next song's stop description/setlist/nextSongTags [...string]the next song's tags/setlist/nextSongIndex [float]the next song's index/setlist/nextSongDuration [float]the next song's duration in seconds/setlist/nextSongColor [string] [string]the color of the next song, as a color name and as a hex string/setlist/loopEnabled [0|1]whether the loop bracket is enabled/setlist/loopStart [float]the loop's start position in beats/setlist/loopEnd [float]the loop's end position in beats/setlist/loopCounter [integer]the current number of repetitions in the loop/setlist/isInActiveSectionLoop [0|1]whether the playhead is currently in an active section loop/setlist/isCountingIn [0|1]whether AbleSet is currently counting in/setlist/remainingTimeInSong [float]remaining time in the current song, in seconds/setlist/remainingTimeInSet [float]remaining time in the set, in seconds
Lyrics
/lyrics/[slug]/previousthe previous lyrics line's text/lyrics/[slug]/currentthe current lyrics line's text/lyrics/[slug]/nextthe next lyrics line's text
Mixer
/mixer/names [...string]a list of all track group names in the mixer/mixer/[group name]/mutedwhether the track group is currently muted/mixer/[group name]/soloedwhether the track group is currently soloed/mixer/[group name]/volumethe track group's current volume between 0 and 1/mixer/[group name]/isFadingwhether the track group is currently fading in or out/mixer/[group name]/meterthe current level of the group's meter, between 0 and 1 with 0.125 precision
Cues
/cues/generating [integer]the number of cues that are currently being generated/cues/[slug]/name [string]the name of the AbleSet Cues output with the given slug/cues/[slug]/id [string]the ID of the AbleSet Cues output/cues/[slug]/phrase [string]the phrase currently being spoken
Shared Variables
When you set a shared variable via OSC or scripting, that variable is forwarded
to all subscribed OSC clients with a /shared prefix.
Audio Interfaces
/audioInterfaces/connected [0|1]whether an audio interface is connected/audioInterfaces/count [integer]the number of connected audio interfaces/audioInterfaces/all/scene [1|2]the current scene –1for the main and2for the backup computer/audioInterfaces/names [...string]the names of all connected audio interfaces/audioInterfaces/scenes [...1|2]the interfaces' current scenes –1for the main and2for the backup computer/audioInterfaces/status [...string]the status of each connected audio interface- Can be
armed,sceneA,sceneB, oralarm
- Can be
Updates for iConnectivity PlayAUDIO Devices
/audioInterfaces/playaudio/[serial]/scenethe active scene –1for the main and2for the backup computer/audioInterfaces/playaudio/[serial]/armedwhether the failover system is armed to automatically switch – can be0or1/audioInterfaces/playaudio/[serial]/alarmwhether the failover system is currently in alarm mode/audioInterfaces/playaudio/serial/main/signalthe signal state of the main input/audioInterfaces/playaudio/serial/backup/signalthe signal state of the backup input
Signal values are as follows:
0: Not connected1: Connected2: Sending audio3: Sending audio & sine
Updates for DirectOut EXBOX.MD Devices
/audioInterfaces/exbox/[host]/[port]/backupPortthe selected backup port/audioInterfaces/exbox/[host]/[port]/prioritythe selected port priority- Can be either
Inactive,Main,Backup, orAuto. If the priority isInactive, EARS for this port is disabled
- Can be either
/audioInterfaces/exbox/[host]/[port]/forcethe forced port- Can be either
None,Main, orBackup
- Can be either
/audioInterfaces/exbox/[host]/[port]/activethe port that is currently active- Can be either
MainorBackup
- Can be either
/audioInterfaces/exbox/[host]/[port]/signalthe kind of signal received on the port- Can be either
BLDS,Pilot, orNone
- Can be either
The host is your EXBOX's hostname on the network. The port can be SFP, BNC,
SC, or NET. For signal, the NET port is split into NET1 and NET2.
Updates for DirectOut PRODIGY/ANDIAMO Devices
/audioInterfaces/prodigy/[host]/[port]/backupPortthe selected backup port/audioInterfaces/prodigy/[host]/[port]/prioritythe selected port priority- Can be either
Inactive,Main,Backup, orAuto. If the priority isInactive, EARS for this port is disabled
- Can be either
/audioInterfaces/prodigy/[host]/[port]/forcethe forced port- Can be either
None,Main,Backup, orDisaster Recovery
- Can be either
/audioInterfaces/prodigy/[host]/[port]/activethe port that is currently active- Can be either
Main,Backup, orDisaster Recovery
- Can be either
/audioInterfaces/prodigy/[host]/[port]/signalthe kind of signal received on the port- Can be either
BLDS,Pilot, orNone
- Can be either
For all updates, host is the hostname of your PRODIGY or ANDIAMO, and port
can be either MADI 1, MADI 2, NET 1 A, NET 1 B, NET 2 A, or NET 2 B.
All values are case-sensitive.
Updates for DAD Devices
/audioInterfaces/dad/[serial]/[preset ID]/namethe name of the preset/audioInterfaces/dad/[serial]/[preset ID]/activeSourceSetthe currently active source set- If this is 0, no source set is selected
/audioInterfaces/dad/[serial]/[preset ID]/sourceSetOverridethe source set override- If this is 0, the source set override is disabled
/audioInterfaces/dad/[serial]/[preset ID]/sourceSets/[set ID]/namethe source set's name/audioInterfaces/dad/[serial]/[preset ID]/sourceSets/[set ID]/triggers/[trigger ID]/signalthe signal state of a trigger's input
Devices
/devices/names [...string]a list of all available device names
These per-device values are only sent for devices that have a unique name. If two or more devices share the same name, their statuses won't be available under that shared name.
/devices/[name]/connectedwhether this browser is currently connected/devices/[name]/namesa list of all names for this browser/devices/[name]/cueLightthe color of the current cue light/devices/[name]/bigNotificationthe current big notification/devices/[name]/isLockedwhether the browser is currently locked/devices/[name]/isLockButtonHiddenwhether the lock button is currently hidden/devices/[name]/isNavigationLockedwhether navigation is locked on the browser/devices/[name]/page/paththe path of the current page for this browser/devices/[name]/page/titlethe title of the current page for this browser/devices/[name]/battery/percentage [float]the device's battery level from 0 to 100, requires AbleSet Connect/devices/[name]/battery/isOnCharger [0|1]whether the device is currently charging, requires AbleSet Connect/devices/[name]/screenBrightness [float]the device's screen brightness from 0 to 1, requires AbleSet Connect/devices/[name]/latencyMsthe latency to this browser in milliseconds/devices/[name]/lastPingthe timestamp of the last ping in milliseconds
MIDI
/midi/outputsa list of all available MIDI outputs
Computer
/computer/onBattery [0|1]whether the computer running AbleSet is currently running on battery power
Oaktone Controllers
/oaktoneControllers/isConnected [0|1]whether an Oaktone controller is connected/oaktoneControllers/count [integer]the number of connected Oaktone controllers
Settings Values
These values reflect the current app settings. You can change many of them by
sending OSC commands – see the Settings section in the command list above.
Boolean values are sent as 0 or 1.
AbleNet
/settings/ableNet [0|1]whether AbleNet is enabled/settings/ableNetDriftCorrection [0|1]whether automatic drift correction is enabled/settings/ableNetCustomAddresses [...string]a list of custom AbleNet peer addresses/settings/connectedInterfaceScene [A|B]the scene of the connected audio interface/settings/preferredNetwork [string]the preferred network interface for AbleNet, e.g.en0
Playback & Setlist
/settings/autoplay [0|1]whether autoplay is enabled/settings/autoJumpToNextSong [0|1]whether AbleSet automatically jumps to the next song at the end of a song/settings/alwaysStopOnSongEnd [0|1]whether AbleSet stops playback at the end of all songs/settings/alwaysPlayQueuedSongs [0|1]whether queued songs are played automatically/settings/allowJumpBackToBeginning [0|1]whether AbleSet jumps to the beginning of the current song before jumping to the previous song/settings/autoReEnableAutomationOnSongJump [0|1]whether automation is re-enabled when jumping to a new song/settings/autoBackToArrangementOnSongJump [0|1]whether arrangement view is restored when jumping to a new song/settings/disableLoopWhenJumping [0|1]whether the loop bracket is disabled when jumping to another song or section/settings/removePlayedSongs [0|1]whether played songs are removed from the setlist automatically/settings/jumpMode [string]the jump mode –quantized,end-of-section,end-of-song,dynamic, ormanual/settings/songJumpDelay [string]the delay before jumping to a new song, in milliseconds/settings/safeMode [0|1]whether Safe Mode is enabled/settings/projectsFolder [string]the folder used for multi-file project files/settings/saveProjectOnSwitch [0|1]whether the project is saved when loading a new project file in multi-file projects/settings/countIn [0|1]whether count-in is enabled/settings/countInSoloClick [0|1]whether the click track is soloed during count-in/settings/countInDuration [1|2|4]the count-in duration in bars/settings/displayLtc [0|1]whether LTC is displayed
Speech & Cues
/settings/autoSpeakSongs [0|1]whether song names are spoken automatically/settings/autoSpeakSongDescriptions [0|1]whether song descriptions are spoken automatically/settings/autoSpeakStopDescriptions [0|1]whether stop descriptions are spoken automatically/settings/autoSpeakSections [0|1]whether section names are spoken automatically/settings/autoSpeakSectionDescriptions [0|1]whether section descriptions are spoken automatically/settings/autoSpeakSectionCountIns [0|1]whether section count-ins are spoken automatically/settings/autoSpeakLoopCountIns [0|1]whether loop count-ins are spoken automatically/settings/speakLongSectionCountIn [0|1]whether section count-ins should be two bars long/settings/speakSectionOnSecondBar [0|1]whether the section name is spoken on the second bar of a two-bar count-in/settings/speakCountInNumbers [0|1]whether count-in numbers are spoken/settings/cuesDefaultVoiceModel [string]the default voice model for generated cues
Mixer
/settings/mixerIncludeMainTrack [0|1]whether the main track is included in the mixer/settings/mixerTransferGroupStates [0|1]whether mute and solo states are transferred between track groups when switching songs/settings/mixerTransferGroupVolumes [0|1]whether volumes are transferred between track groups when switching songs
UI & Windows
/settings/showStopButton [0|1]whether AbleSet stops by default instead of pausing/settings/show24HourClock [0|1]whether the clock uses 24-hour format/settings/defaultView [string]the default view path, e.g./lyrics/settings/showInDock [0|1]whether AbleSet is shown in the Dock/settings/openAbleSetInFloatingWindow [0|1]whether AbleSet opens in a floating window/settings/openAbleSetOnStart [0|1]whether AbleSet opens automatically on start/settings/autoOpenLastProjectFile [0|1]whether the last project file is opened automatically
App & Hardware
/settings/warnOnBattery [0|1]whether AbleSet warns when running on battery power/settings/disarmAudioInterfacesWhileLoadingProject [0|1]whether audio interfaces are disarmed while loading a project/settings/persistSharedVariables [0|1]whether shared variables are persisted across restarts
Network
/network/ipthe IP of the computer running AbleSet/network/hostthe hostname of the computer running AbleSet
Versions
/version/appthe version of AbleSet/version/livethe version of Ableton Live/version/pluginthe version of the AbleSet plugin
OSC Connections
AbleSet allows you to create OSC connections that enable you to send commands to external devices and applications, and receive values from them.
To add a new connection, open the "OSC Settings" page under "MIDI Mapping, OSC & Scripting", then click "Add New Connection".
Give the connection a recognizable name without spaces, e.g., "TouchOSC" or "X32". Then, set the Send Address to the IP address and port of the device or application that you want to send OSC commands to. Separate the IP address and port with a colon, e.g., "10.0.0.3:8000".
You can now send OSC commands to the connection by referencing its name. For
example, if your connection is called "X32", you could send a command from
OSC tracks, MIDI mapping, or
scripting. Use a colon followed by the connection name and
the command, e.g., :X32/ch/1/mix/on 1.
To listen for incoming values, enter a port number in the Listen Port field that isn't already in use on your computer. AbleSet will then listen for values on that port and store them for use in Canvases and scripts. You'll see a list of received values at the bottom of the page.
You must specify at least one of the following: a Send Address (to send commands) or a Listen Port (to receive values).
Sending OSC on Create and Destroy
Some OSC servers require specific commands to send values to AbleSet. You can add those to the OSC on Create and OSC on Destroy fields. These commands are automatically sent to the specified Send Address when the connection is created or destroyed, and you don't have to prefix them with the name of the connection.
Using AbleSet with AbletonOSC
AbletonOSC is a powerful Control Surface Script that allows you to access almost any part of your Ableton Live project via OSC.
To set it up, download the script from AbletonOSC's GitHub page and follow their installation guide to add it to Live. Then, in AbleSet, create a new connection, name it "AbletonOSC", set the Send Address to "127.0.0.1:11000" and the Listen Port to "11001":
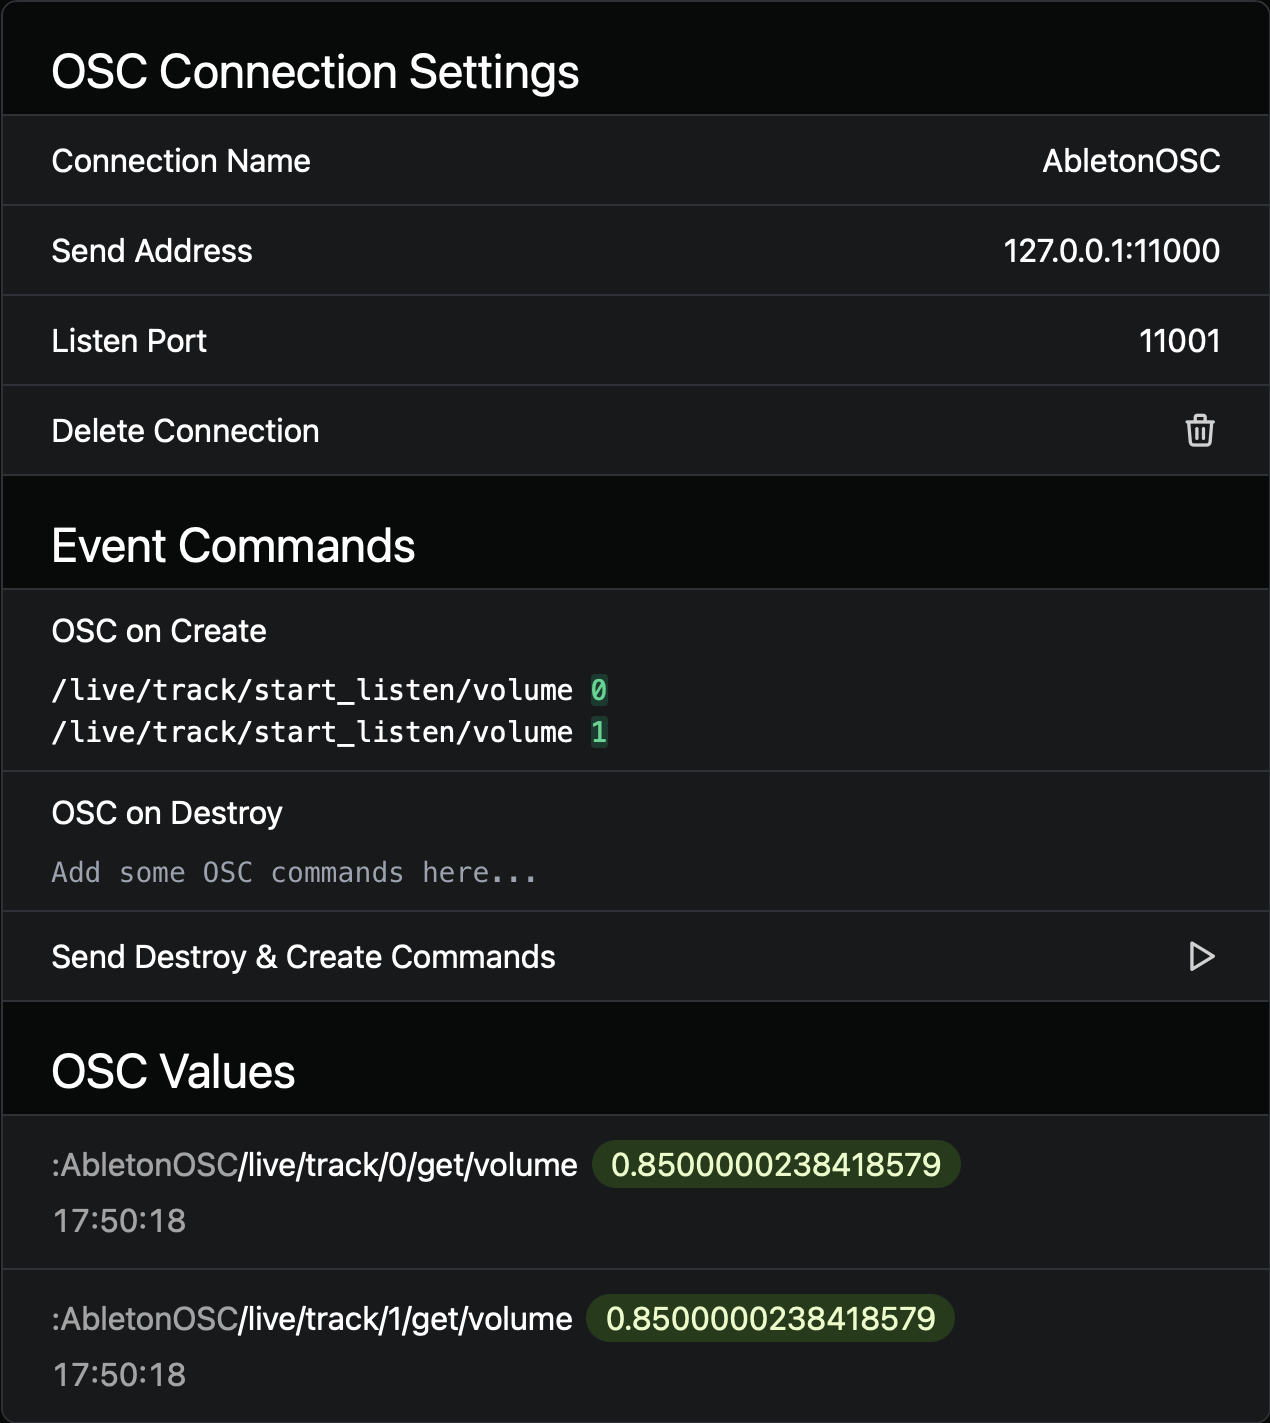
You can now send OSC commands to :AbletonOSC.
To receive updates from AbletonOSC, add start_listen commands to the OSC on
Create field. These commands tell AbletonOSC to send value updates whenever
they change. In the example above, I want to receive the volume of the first
and second track whenever it changes, so I added /live/track/start_listen/volume 0
and /live/track/start_listen/volume 1.
Incoming Values from AbletonOSC
When requesting track, clip, or device values from AbletonOSC, the script replies
with a value that contains both the index of the track, clip, or device, and the
requested value. For example, when sending /live/track/get/volume 0, the script
replies with /live/track/get/volume 0 0.85.
Since AbleSet only stores one value for a given address at a time, that would mean that you can't access more than one track volume at a time, for example.
To work around this, AbleSet transforms incoming OSC from AbletonOSC so the index
is included in the OSC path instead of the list of values, so
/live/track/get/volume 0 0.85 becomes /live/track/0/get/volume 0.85.
OSC Tracks
AbleSet allows you to send timed OSC commands from a MIDI track. These commands can either be sent to AbleSet or external apps or devices that support OSC – for example TouchOSC, audio consoles, light desks or video players.
To get started, create a new MIDI track and make sure that its name contains
+OSC, e.g. AbleSet +OSC. All clips placed on this track will now trigger
OSC commands that you add to their name as soon as Live's playhead reaches them.
By default, OSC commands are sent to AbleSet. You can find a list of all available OSC commands here. For example, to trigger a big notification on all connected devices, you can create a clip with the following command:
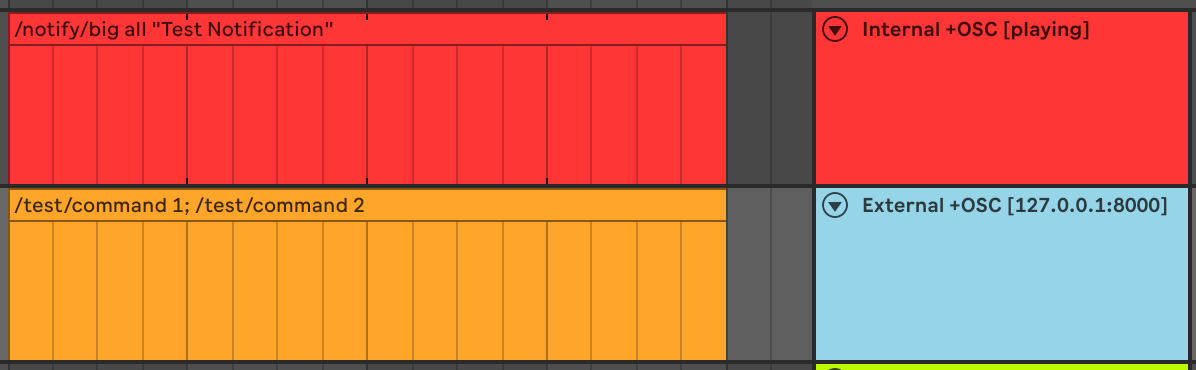
To send OSC commands to external apps or devices, you can add their
IP or hostname and port to the OSC command, e.g. 192.168.1.5:3000/scene 2.
Multiple commands can be separated by semicolons. If you'd like to add a delay
between two commands, you can use the //sleep command. For example, to wait
2.5 seconds between stopping and jumping to the next song:
/global/stop; //sleep 2500; /setlist/jumpBySongs 1
You can find a list of all control flow statements here.
Available Attributes
The behavior of OSC tracks can be altered using attributes on the track name.
If you'd like all OSC commands to be sent to a specific target, you can add it
to the track name in square brackets, e.g. External +OSC [192.168.1.25:3000].
You can also set a prefix which is added to each OSC command. For example, if
you'd like to create an OSC track that triggers notifications in AbleSet, you
can add a prefix in square brackets, e.g. Notify +OSC [/notify/big all].
This prefix can contain multiple arguments and you can specify multiple
arguments in the MIDI clips on this track. So, for example, if a clip on this
track was named Test 1000, the command sent to AbleSet would be
/notify/big all Test 1000 which would make the text "Test" appear on screen
for 1000 ms.
If you'd like AbleSet to interpret the name of clips as a single argument
instead, add the [single] attribute to the track name in addition to the
prefix. With this in place, if a clip on the track was named Test 1000,
the command sent to AbleSet would be /notify/big all "Test 1000".
To specify where arguments from clips should be placed, you can use a ?
placeholder. For example, if you use the attribute [/notify/big all ? 1000],
a clip called Test would trigger the command /notify/big all Test 1000. If a
clip contains multiple arguments, these will all be placed at the position of
the placeholder.
You can use the placeholder in multiple places, even in multiple commands:
[/notify/big stage ?; /notify/toast foh ?]
To access the color of the current clip as a placeholder, use ?cc. If your
track uses the attribute [/notify/big all ? 1000 ?cc] and the playhead reaches
a green clip named Test, AbleSet will send /notify/big all Test 1000 green,
leading to a green "Test" notification being displayed on all devices.
If you'd like AbleSet to treat ? or ?cc as a string instead of a placeholder,
wrap it in quotes: [/notify/big all "?" 1000] sends the question mark as a
string instead of replacing it with the arguments from the current clip.
You can also combine the prefix attribute with the target attribute, e.g.
External +OSC [192.168.1.25:3000/fxsend/mix].
To send OSC commands only while Live is playing, add the [playing] attribute
to the track name.
To send a default OSC command when the playhead reaches an empty space between
clips, you can use the following attribute: [?? default], where default is
the name of the default clip. This value can be an OSC address or a value used
for the placeholder.
OSC Syntax
Each OSC command starts with an address followed by an optional list of
arguments, which is separated by spaces, e.g. /notify/big all Test.
AbleSet automatically detects integer, float, and boolean arguments, so
/test 10 1.5 true would send a /test OSC command with an integer, a float,
and a boolean argument. All other arguments are interpreted as strings, so
/test hello would send a /test OSC command with a string argument.
If you'd like AbleSet to interpret an argument as a string, or if a string
argument needs to contain spaces, you can wrap it in quotes. For example,
/test "true" "Test Message" would send a /test OSC command with two string
arguments – "true" and "Test Message".
You can use either ", ', or ` as quotes. If you'd like to
use the quote character you used to define the string inside the string as well,
you can escape it using a backslash, e.g. "Some \"quotes\" in a string".
Scripting in AbleSet
AbleSet offers scripting in Canvases, in MIDI Mapping, and in the Project Script.
These scripts are written in JavaScript and support all features of ES2023. If you're already familiar with writing JavaScript, you can skip the next section and go straight to the list of available functions.
The script editor provides autocompletion for available functions and variables and automatically highlights incorrect code.
JavaScript Basics
Your First Script
The following script prints "Hello World!" to the console. The log function is
a handy tool to debug your scripts by showing values while your script runs.
log("Hello World!");
This is a function call. Each function call consists of the function name and
parentheses containing arguments. These arguments depend on which function you
call. In this case, we're passing the text "Hello World!" to the log function.
You can end each function call with a semicolon (recommended) or write one function call per line without semicolons.
Comments
If you'd like to add comments to your code, you can do so like this:
// This is a single-line comment

/*
  This is a multi-line comment
*/
Variables
To store and reuse values in your scripts, you can define variables. There are two
variable declaration keywords: const and let. Use const when the value won't
change (recommended), and let when you need to modify it later:
// This variable can be re-assigned
let name = "Léo";
name = "The other Léo";

// This one can't be re-assigned - use this when possible
const answer = 42;
answer = 41; // <- this would result in an error

// Variables can't be defined twice
const app = "AbleSet 2";
const app = "AbleSet 3"; // <- this would fail
Variables only exist while your script runs and will be cleared afterwards.
If you need to store values between script runs, use the setLocal and local
functions described here.
Primitive Data Types
JavaScript supports a range of primitive data types: number, string,
boolean, undefined, and null:
// A number:
const num = 1234.56;

// Strings can use double or single quotes:
const hello = "Hello";
const world = "World";

// Booleans are either true or false:
const yes = true;
const no = false;
The values undefined and null are special values representing no data.
Template Strings
Template strings are a special string type that use backticks (`) as quotes
and allow you to include variables:
const name = "Léo";
const message = `Hello, ${name}!`;
Operators
Operators allow you to manipulate and check data and variables:
// You can use +, -, *, /, and % (modulo) on numbers
const result = (3 + 5) / 2; // <- result will be 4

// To modify number variables, you can use ++, --, +=, -=, *=, and /=
let num = 3;
num++; // num is increased by 1
num--; // num is decreased by 1
num += 3; // 3 is added to num, same as num = num + 3
num -= 2; // 2 is subtracted from num, same as num = num - 2

// Use + to concatenate a string with other variables
const message = "The result is " + result;
To compare two or more values with each other, you can use these operators:
const name = "Léo";
const answer = 42;

// Use === (equal) and !== (not equal) to compare two values
const equal = answer === 42; // <- will be true
const unequal = name !== "Tom"; // <- will also be true

// Use && (AND), || (OR), and ! (NOT) to combine comparisons
const and = equal && name === "Léo"; // <- will be true
const or = equal || name === "Tom"; // <- will also be true
const not = !equal; // <- will be false
Conditional Statements
Conditional (if) statements allow you to decide which code to run based on given conditions:
const song = "Roads";
const artist = "Small Strides";

if (song === "Follow Night") {
  log("The song is Follow Night");
} else if (artist === "Small Strides") {
  // This code will run since the song condition wasn't satisfied,
  // but this one (artist) was
  log("The song is not Follow Night, but the artist is Small Strides");
} else {
  log("Neither song nor artist match");
}
Ternary Operator
The ternary operator allows you to get a value based on a condition:
const number = 9001;

// This message variable will be "It's over 9000!".
const message = number > 9000 ? "It's over 9000!" : "Value is too small";

// Ternary operators can be used anywhere, e.g. in arguments:
const answer = 42;
log(answer === 42 ? "Correct" : "Wrong");
Loops
To run a block of code multiple times, you can use loops:
// This runs the loop 10 times, starting with 1
// and increasing the variable i by 1 each time
for (let i = 1; i <= 10; i++) {
  log(`Hello, number ${i}`); // Logs "Hello, number 1", "Hello, number 2", etc.
}
Note that we have to use let i = 1 instead of const i = 1 here because the
variable needs to be modified on each run.
Alternatively, you can use while and do...while loops, but we'll skip them
here for brevity.
Arrays
Arrays allow you to store a list of values in a variable. They can contain all primitive data types and other arrays.
// This is how you define an array:
const songs = ["Roads", "Follow Night", "Why We Are"];

// Accessing array items can be done like this. Note that the index starts at 0:
const firstSong = songs[0]; // <- "Roads"
const lastSong = songs[2]; // <- "Why We Are"

// You can also access the length of the array:
const songCount = songs.length; // <- 3
Further Information
To learn more about JavaScript, you might find the Mozilla Docs helpful.
The Project Script
This script is run every time you open AbleSet or your Ableton Live project. It allows you to react to changes in OSC values and send information to other devices and applications via MIDI and OSC.
You can find this script by opening the settings page and clicking "Project Script" in the "MIDI Mapping, OSC & Scripting" section.
Available Functions
When writing scripts in AbleSet, you can access all objects and functions available in JavaScript, including Math, Date, and JSON. You can find an overview here.
Additionally, AbleSet offers a number of built-in functions to interact with the app and other devices.
Here's a list of them. Arguments marked with a ? are optional, a ... before
arguments means you can add as many arguments of this type as you like.
Basics
log(...values)logs all values to the consoleawait sleep(time)waits for the given number of millisecondsnow()returns the current timestamp in milliseconds- This uses the time of the computer running AbleSet, and when used in a template, it updates every second
Local Variables
To store values between script runs and access them from other scripts and components, you can use these functions:
setLocal(key, value, persist?)stores the given value under the given key- If
persistis true, the value is stored in your browser's storage and persists between page refreshes
- If
local(key, fallback?)returns the value at the given key- If no value is stored at
keyyet,fallbackis returned
- If no value is stored at
resetLocal(key?)deletes the variable stored atkey- If no
keyis defined, all local variables are deleted
- If no
Example:
// Gets a counter and increases it by 1
const counter = local("counter", 0);
setLocal("counter", counter + 1);
Shared Variables
Shared variables are available across all scripts on all devices and work similarly to local variables:
setShared(key, value)stores the given value under the given keyshared(key, fallback?)returns the value at the given key- If no value is stored at
keyyet,fallbackis returned
- If no value is stored at
resetShared(key)deletes the variable stored atkey
Example:
// Gets a counter and increases it by 1
const counter = shared("counter", 0);
setShared("counter", counter + 1);
OSC
osc(key, index?)returns the OSC value for the given key- By default, it returns the first argument of the OSC value, but you can
specify the index using the
indexargument - To get an array all arguments, set
indexto "all"
- By default, it returns the first argument of the OSC value, but you can
specify the index using the
sendOsc(command, ...args)sends an OSC command with the given arguments- This can either be an internal (e.g. "/global/play") or an external (e.g. "127.0.0.1:3000/test") command
int(number)treats a given number as an integer instead of a float when sending it via OSCawait waitForOscChange(key)waits until the value for the given key changesawait waitForOscValue(key, value)waits for the given key to have the given valueonOscChange(key, callback, sendFirst)calls the callback function every time the value for the given key changes
Example:
// Jumps to the next song if AbleSet isn't playing, waits
// for the name to change, and logs the value of the new song
if (!osc("/global/isPlaying")) {
  sendOsc("/setlist/jumpBySongs", 1);
  await waitForOscChange("/setlist/activeSongName");
  log("New song:", osc("/setlist/activeSongName"));
}
A list of all available OSC values and commands is available here.
MIDI
These functions are aliases for the /midi/send OSC commands.
You can use these commands to send notes:
sendMidiNote(output, channel, note, velocity?, duration?)sends a MIDI note on followed by a note off to the given output- Velocity is optional, the default value is 127
- Duration is specified in milliseconds, the default value is 100
sendMidiNoteOn(output, channel, note, velocity?)sends a note on with the given velocity to the specified output- Velocity is optional, the default value is 127
sendMidiNoteOff(output, channel, note, velocity?)sends a note off with the given velocity to the specified output- Velocity is optional, the default value is 0
The note can either be a number between 0 and 127, or a string like E#0 or Cb-1.
To send CC and PC, you can use these commands:
sendMidiCc(output, channel, controller, value)sends a CC to the given output- Controller and value must both be numbers between 0 and 127
sendMidiPc(output, channel, program)sends a PC to the given output- Program must be between 0 and 127
You can also send raw MIDI data to an output, for example for SysEx:
sendMidiRaw(output, ...data)- Data can either be a list of numbers, or a string like "F0 03 A3 F7"
Browser Control
These are only available in Canvas scripts.
navigate(path)navigates the browser to the given path- The path can either be relative (e.g. "/lyrics") or absolute (e.g. "https://ableset.app")
pathnamecontains the current pathname (e.g. "/canvas/main")
Utility Functions
formatDuration(seconds)formats a given number of seconds into a more readable string- For example,
formatDuration(135)returns "02:15"
- For example,
makeAscii(text)converts a given string into an array of MIDI-friendly ASCII bytes, converting incompatible characters to compatible ones when possible- This is useful for sending text via SysEx
Timing
These are only available in project scripts.
debounce(function, timeMs)returns a debounced version of the given function that only runs it after the given timeout, with no further calls in between- Each call within that window resets the timer
setTimeout(function, timeMs)runs the given function once after the given timeout. Returns an ID forclearTimeoutclearTimeout(id)cancels the given timeoutsetInterval(function, timeMs)runs the given function repeatedly at the given interval until stopped. Returns an ID forclearIntervalclearInterval(id)stops the given interval
Custom Styles
If you're familiar with CSS, AbleSet allows you to easily add Custom Styles to the web app. You can find the custom CSS file by clicking on "Show Global Custom Styles" in AbleSet's settings menu.
You can also add project-specific Custom Styles using the Custom Styles folder in your Ableton Live project's AbleSet Folder.
AbleSet will automatically apply your styles when you save changes to this file.
I've tried to give most elements and states in the web app meaningful class names, but if you find yourself trying to add a style to an element that doesn't have a good class name, feel free to reach out to me!
This is an experimental feature and your styles could break the layout of the web app, so basic CSS knowledge is recommended. If you want to reset your custom styles, just delete all lines from the file and save it.
User Styles
Check out the User Styles category on the AbleSet forum for a collection of styles you can use to customize AbleSet.
Examples
Custom Fonts
This simple example changes the font of all elements on the performance page:
.performance {
  font-family: Georgia, "Times New Roman", Times, serif;
}
Your browser will use the first font in the list that is available. The snippet above would look like this on macOS:
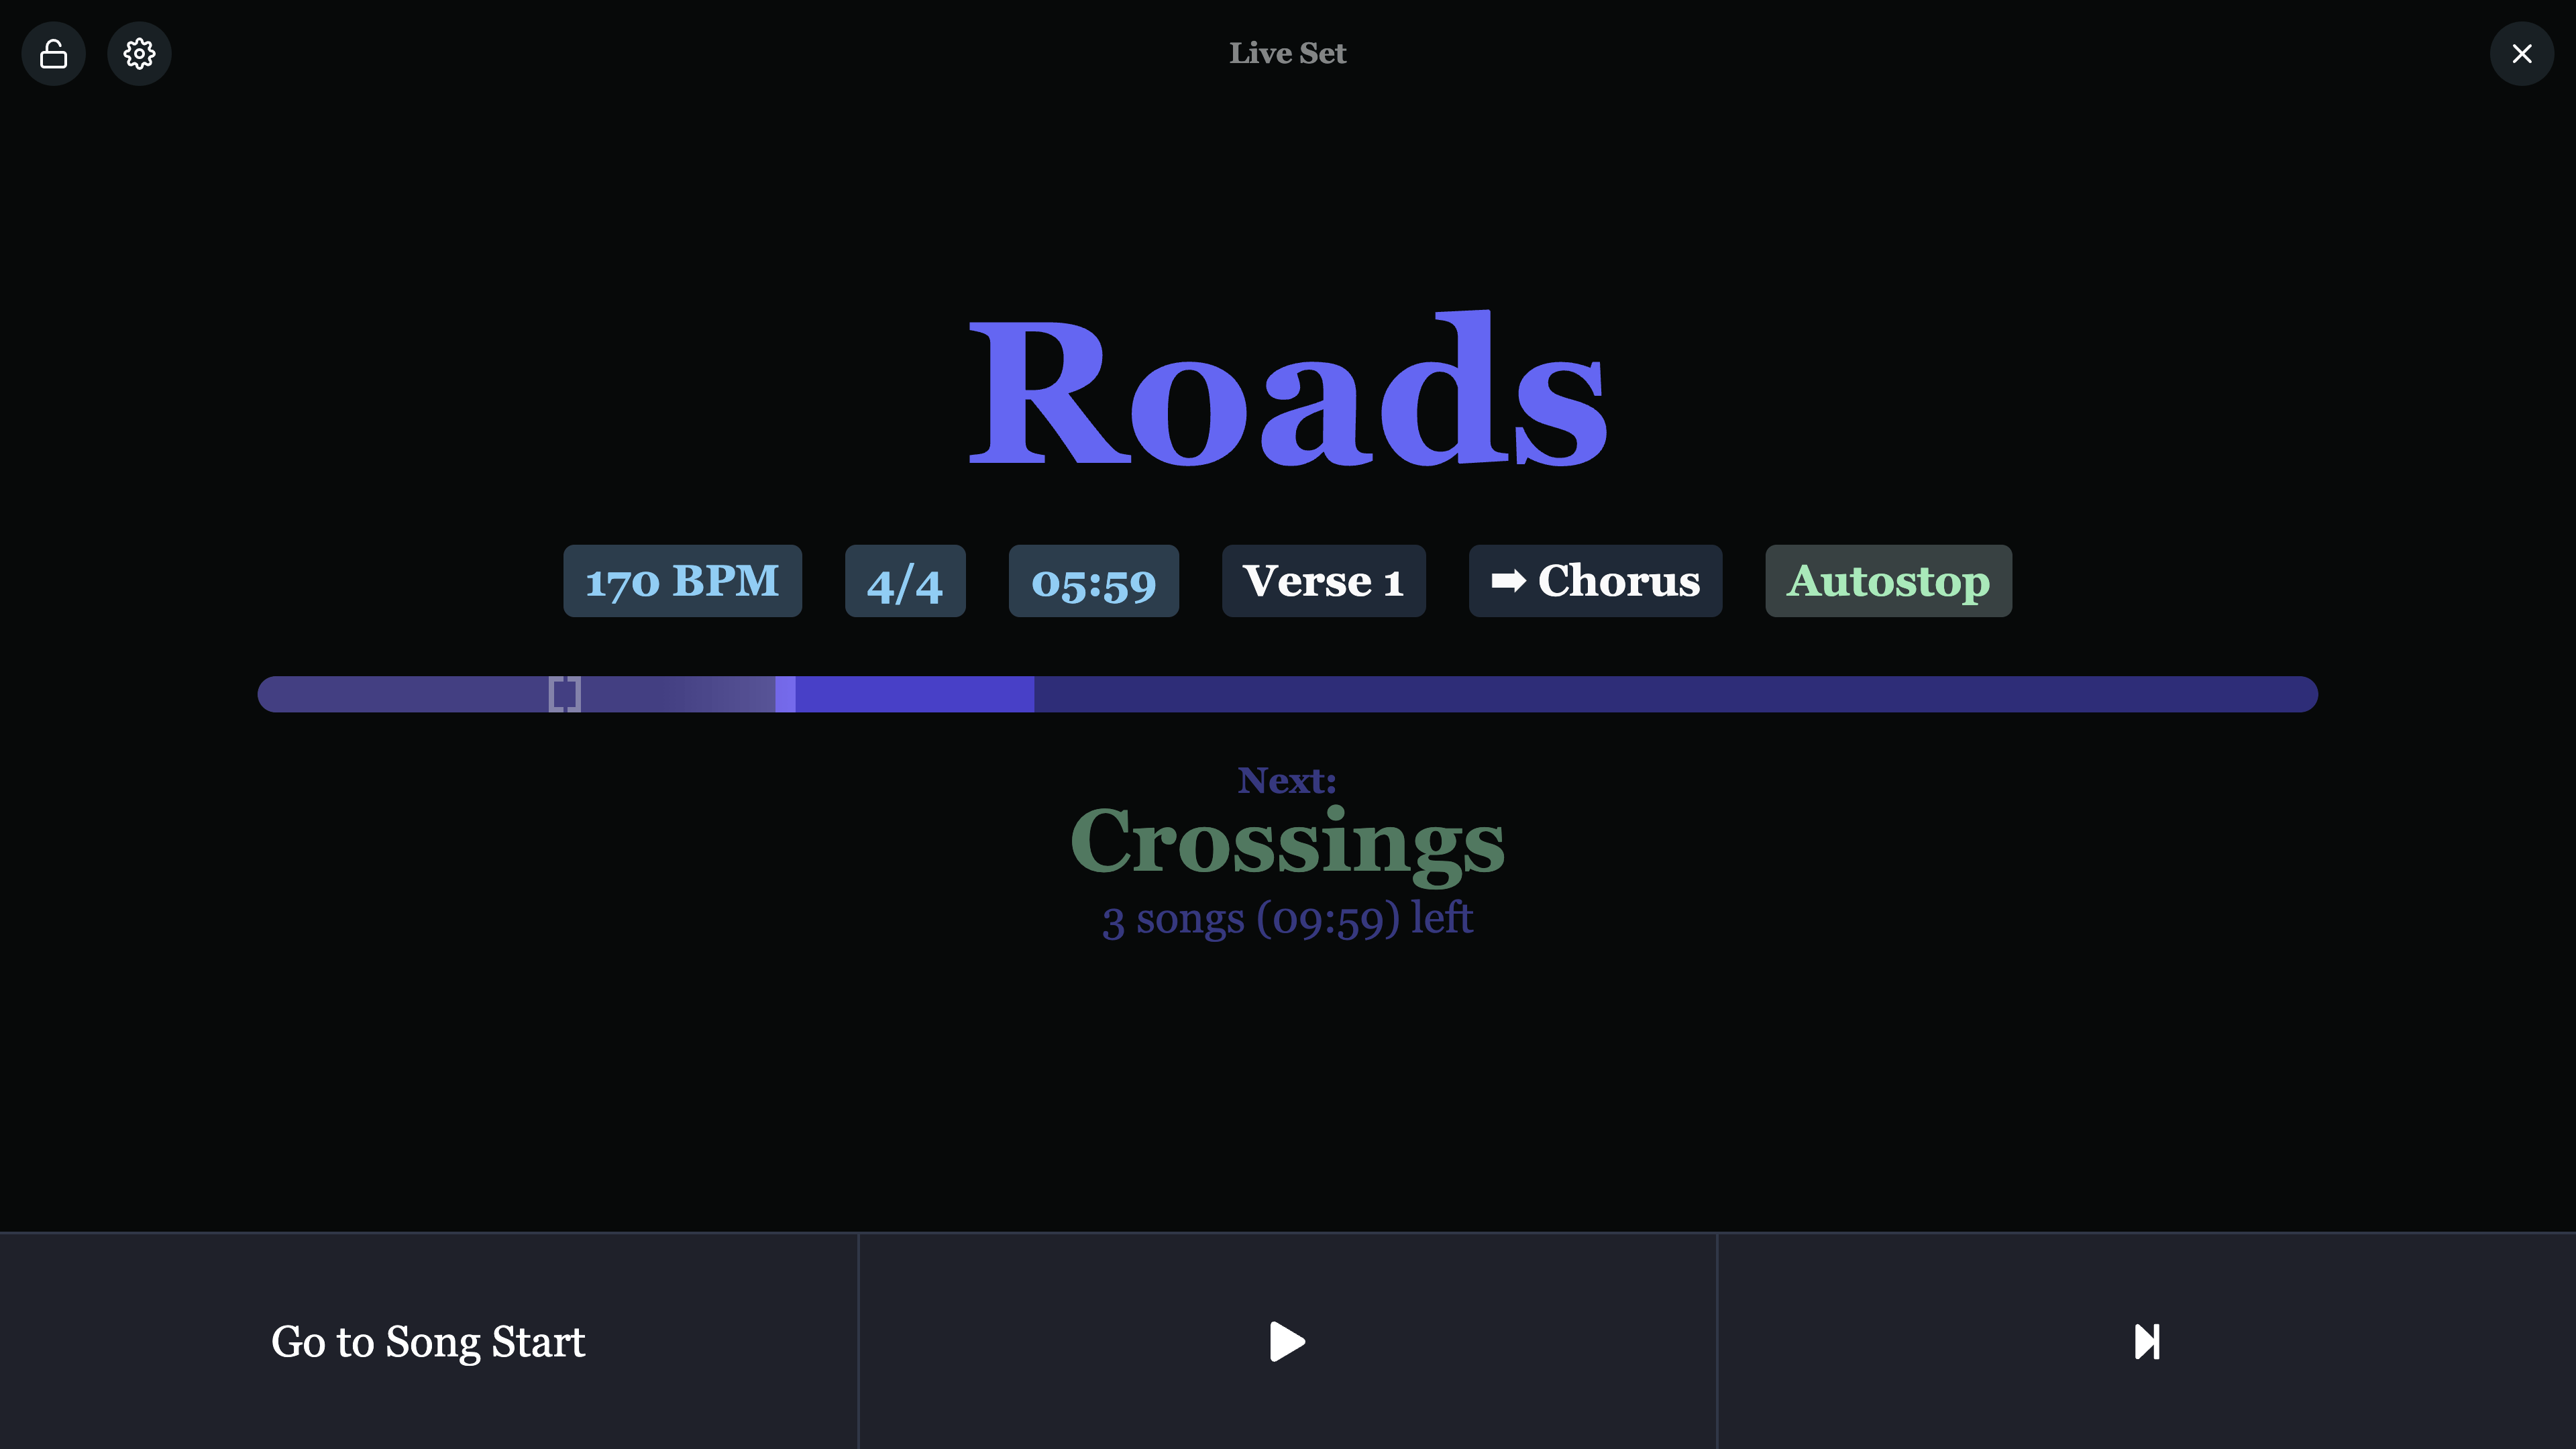
Custom Backgrounds
All files in the global "custom-styles" folder are served under the "/custom-styles"
path, so you could add a background image called bg.jpg to the that folder
and reference it like this to show it behind the lyrics, for example:
.lyrics-page {
  background-image: url("/custom-styles/bg.jpg");
  background-size: cover;
}
This results in the lyrics page look like this:
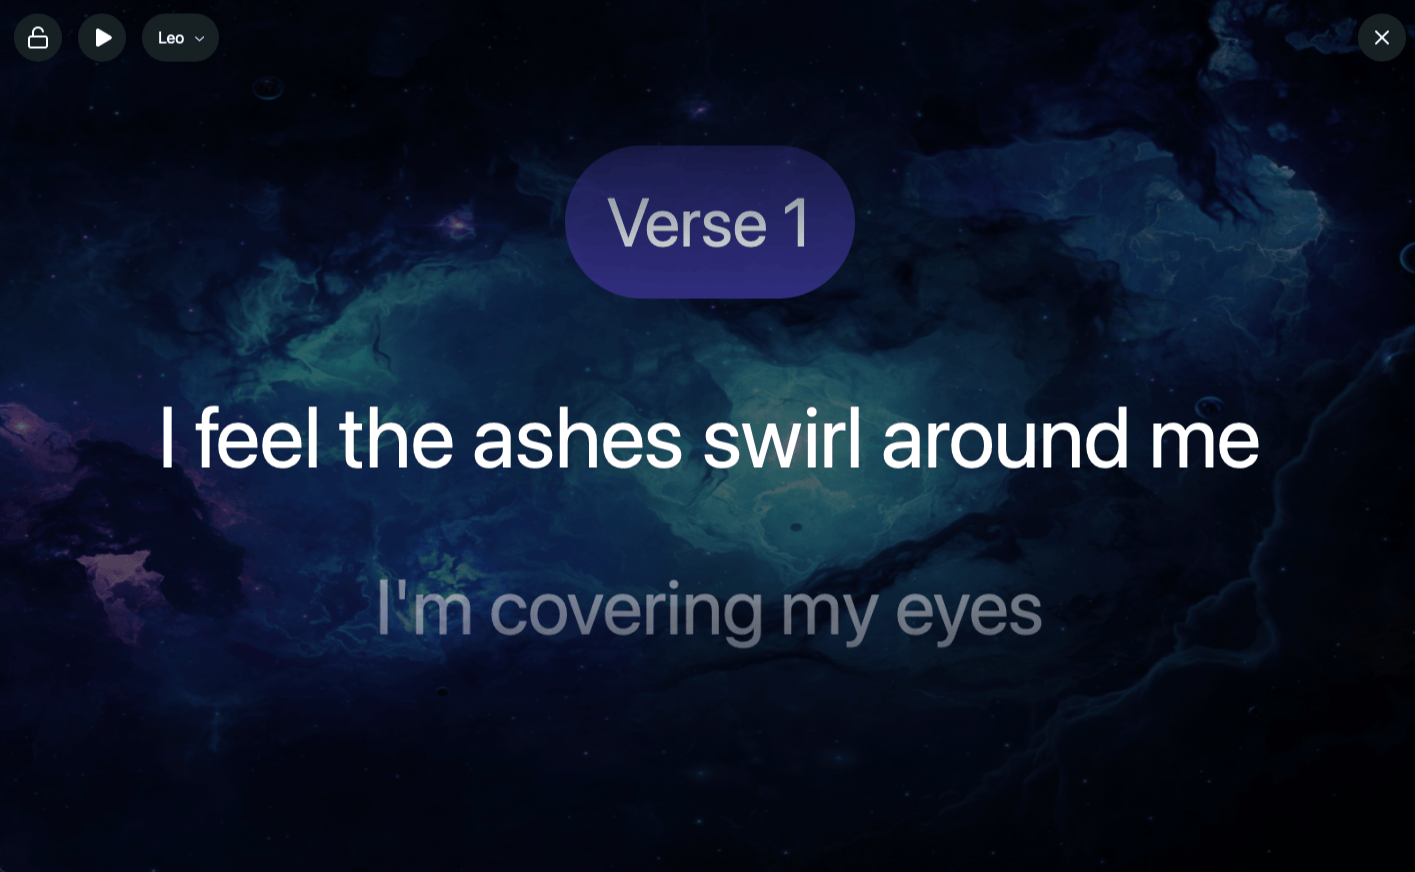
Files stored in your project's "Custom Styles" folder are served under the
"/custom-styles/project" path, so an image file called bg.jpg that is stored
there could be used as a background like this:
.lyrics-page {
  background-image: url("/custom-styles/project/bg.jpg");
  background-size: cover;
}
Custom Scripts
AbleSet lets you add custom JavaScript using the scripts.js file in the styles
folder. This file is loaded after all other scripts on the web app have been
loaded.
AbleSet also exposes an ableset object on the window that you can access.
This gives you access to the current state, sockets, and more.
For example, to get the current setlist state, you can call:
ableset.queryClient.getQueryData(["setlist"]);

// Use this to get a list of all queries:
console.log(ableset.queryClient.queryCache.queriesMap);
To observe changes in the state, you can use the QueryObserver object:
const observer = new ableset.QueryObserver(ableset.queryClient, {
  queryKey: ["setlist"],
});

observer.subscribe((result) => console.log(result.data));
To get access to sockets, e.g. to listen to changes in real-time, you can call:
// Listen to all events
ableset.getSocket("setlist").onAny((event, data) => console.log(event, data));

// Listen to specific event
ableset.getSocket("global").on("songTime", (time) => console.log(time));
The following sockets are available:
globalsetlistlyricscanvasmixerablenetaudioInterfacestimecodesettingsmidiMapping
Feel free to experiment with the events each of these sockets receives.
The AbleSet Folder
When you open a project in Ableton Live, AbleSet automatically creates a folder called "AbleSet" in your project directory. This folder contains settings and resources that can be shared between computers if you ever copy or move your project over.
The folder contains a number of sub-folders:

Below, I'll explain each folder and their contents.
Canvases
This folder contains your Canvases. If you'd like to share a Canvas, just copy its file and paste it into the Canvases folder of another project.
If you upload images to a Canvas, AbleSet creates a Resources folder inside this folder and places them there. You can also manually add images to that folder to use them in your Canvases.
Cues
This folder contains generated audio cues for your songs and sections, grouped by the voice model used to generate them.
Custom Styles
This folder contains project-specific Custom Styles. These get applied to the AbleSet web app in addition to the global Custom Styles.
Any files you place in this folder (e.g. images) can be accessed under
/custom-styles/project from the web app.
Project File Cache
When you open a project file in Live, AbleSet parses that file in the background to get information about locators, clips, tempo, time signatures, etc. which it can't access using Live's Control Surface API.
These parsed results are stored in the Project File Cache folder so they can be loaded instantly the next time you open the project.
For Multi-File Projects, AbleSet parses all project files in advance to give you information about sections, durations, etc. before they're opened in Live.
If the folder becomes too large or you're experiencing issues with outdated information, feel free to delete it and restart AbleSet.
Scripting
This folder contains the Project Script and a shared-variables.json file containing all persisted Shared Variables.
You can edit the Project Script from here, but I'd recommend using the script editor on the Settings page, as it offers autocomplete and highlights errors.
Deleting the shared-variables.json file resets all shared variables.
Setlists
The Setlists folder contains all saved setlists. When you overwrite a saved setlist, the previous version is stored in a Backup folder with a timestamp so you can restore it if needed.
Files in subfolders are ignored, so you could create an "Archive" folder and move old, unused setlists there to hide them from the setlist load dialog.
Settings
This folder contains all of AbleSet's settings. When you create a new Ableton Live project, AbleSet will copy the settings of the previous project into the new project's Settings folder.
Computer-specific settings, like AbleNet settings and the path
to the Multi-File Projects folder are stored in a
specific-[hostname].json file. This avoids issues with apps that automatically
synchronize your project folder between two computers.
AbleSet Settings Reference
AbleSet's settings are split across two places. Here's an overview of them:
Settings Page
General
Show AbleSet in the Dock (macOS only)
Shows the AbleSet app icon in your macOS dock when enabled.
Default View
The view that will be shown by default when AbleSet is opened. Can be Setlist, Performance, Lyrics, Canvas, Mixer, or a specific Lyrics or Canvas page.
Open AbleSet on Start
Automatically opens AbleSet's default view when a connection to Ableton Live has been established.
Always Open AbleSet in a Floating Window
Opens AbleSet in a floating window instead of the browser.
Auto-Launch the Last Live Project
If Live isn't running when you start AbleSet, it will automatically be launched with the last loaded project file.
Playback
Autoplay
Starts playback when you jump to a song or section.
Auto-Jump to the Next Song
Automatically jumps to the next song after reaching the end of a song.
Always Stop at the End of Songs
Always stops playback at the end of songs, even if they don't have a stop locator.
Restart Song Before Jumping Back
When this is enabled, jumping back one song will first jump back to the beginning of the current song.
Stop by Default Instead of Pausing
This also means that pressing space in the web app stops playback instead of pausing.
Disable Loop When Jumping
When this is disabled, you can cue another section or song without disabling the loop.
Re-Enable Automation on Song Jump
When this is enabled, AbleSet automatically re-enables all automation when jumping to a song.
Reset Tracks Back to Arrangement on Song Jump
When this is enabled, AbleSet automatically resets all clips that were temporarily overridden from Session View back to the Arrangement when jumping to a song.
Safe Mode
Prevents jumping to another song and shows a confirmation before pausing while Live is playing. This does not apply to MIDI mapping and received OSC commands.
Jump Mode
Defines when AbleSet will jump to the queued song or section (see Jump Modes).
Can be Quantized, End of Section, End of Song, Dynamic, or Manual
Always Keep Playing When Jumping to Queued Songs
Shown when Jump Mode is End of Song or Dynamic.When this is enabled, AbleSet won't stop playback after a song when another song is queued, even if the song ends with a STOP locator or Always Stop at the End of Songs is enabled.
Delay Before Jumping to Song File
Shown when using a Multi-File Project.This delays jumping to a new song when using the jump forward/backwards buttons. This is especially useful for jumping to a song in multi-file projects where loading a new song can take a while. Can be None, 500ms, 1s, 2s, or 3s.
Section Count-In
See the Count-In documentation for more details.
Enable Section Count-In
This starts playback a few bars before the selected section.
Solo the Click Track during Count-In
Solo the click track during the count-in.
Count-In Duration
Can be 1 bar, 2 bars, or 4 bars.
MIDI Mapping, OSC & Scripting
Edit MIDI Mapping
Opens the MIDI mapping settings.
OSC Settings Standard Pro
Opens the OSC settings.
Project Script Pro
Opens the Project Script editor.
Persist Shared Variables Pro
Persists shared variables between AbleSet restarts.
Audio Interfaces Standard Pro
This shows a list of all connected Audio Interfaces, with the ability to disable specific ones that you don't want to see in AbleSet.
LTC Timecode Standard Pro
Display LTC Timecode
Shows the current timecode in AbleSet. This requires the LTC Display to be loaded in your project.
A link to download or purchase the LTC Display Plugin is shown in this section.
Setlist
Remove Played Songs Automatically
Automatically removes a song from the setlist after it has been played and jumps to the next song.
Mixer Pro
Include the Main Track as a Group
When this option is enabled, the Main track will be included on the mixer page.
Sync Group Solos & Mutes Between Songs
Only shown when using a Multi-File Project.
When this option is enabled, the solo and mute states of groups are transferred between songs in a multi-file project.
Sync Group Volumes Between Songs
Only shown when using a Multi-File Project and when Sync Group Solos & Mutes Between Songs is enabled.
When this option is enabled, the volumes of groups are transferred between songs in a multi-file project.
Tools
These are action buttons rather than toggleable settings:
Set Clip Colors from Names
Sets the color of all clips in tracks with the +CLIPCOLORS or +CC flag to
the color in their name and removes the color from the name.
Place Locators on Section Clips
Creates locators for each section clip, allowing you to jump to them while playback is running. Please reopen your project in Live after running this tool to avoid audio dropouts and other issues.
Remove Automatically Placed Locators
Removes all automatically placed locators from the setlist.
Debug
Connected Devices
Displays a list of all browsers that are connected to AbleSet.
Device Settings
Displays all device-specific settings on one page.
Debug Logs
Shows AbleSet's internal logs for debugging.
Redundancy & AbleNet Standard Pro
See the AbleNet documentation for more information.
Enable AbleNet
Allows AbleSet to run in a redundant setup with other computers.
Follow Current Audio Interface Scene
Automatically switches the browser to the computer that's currently active on the connected audio interface.
Host-Specific AbleNet Settings Standard Pro
The following settings appear for each connected host. The first host is always the local computer, followed by any remote hosts.
IP Address
Displays this computer's current IP address.
Connect to Custom IPs
Connects directly to the given IP addresses of other computers. Don't enter the computer's own IP. Can be comma-separated if you want to supply multiple addresses (e.g. 192.168.1.100).
Connected Scene
This defines whether this computer is your main or backup computer, or if it's connected to port A or B of your redundant audio interface.
Automatic Drift Correction
Automatically nudge this computer into sync if it has noticeable drift from others. Don't enable this if you don't need it, and make sure that all audio clips are warped if you do. Learn more here.
Sync Playback Now
Brings this machine back in sync with others on the network if it's paused. The button is disabled and shows "Live is Playing" when Live is already playing. Learn more here.
Settings Menu
The Settings Menu appears when you click the AbleSet icon in your menu bar.
Open AbleSet in Browser
Opens the AbleSet web app in your default browser
Open AbleSet in a Floating Window
Opens AbleSet in a floating window instead of the browser
Licensed to
Displays the license holder when activated. When AbleSet starts, this might say "Fetching..." while the license is being checked. If no license is active, this displays an Activate or Buy a License option.
Manage Licenses
Opens the your AbleSet account in your browser. If your license is locked, this option isn't shown.
Deactivate Machine
Deactivates the current machine from your license, freeing up an activation slot so you can activate it on another computer. If your license is locked, this option isn't shown.
Open Settings
Opens the AbleSet web app at the Settings page.
Web App Password... Standard Pro
If this is activated, you'll have to enter your password to edit the setlist and control playback using the web app
Multi-File Project
This menu contains settings for using a Multi-File Project.
Choose Project Folder... / Change Project Folder...
Select the folder containing your project files.
Open Project Folder
When a folder is selected, opens it.
Save Changes Before Loading Project
If there are unsaved changes in the current Live project, AbleSet saves the project instead of discarding them when jumping to another song.
Disable Multi-File Project
Clears the project folder.
Documentation
Opens the Multi-File Projects documentation.
Open the Documentation
Opens the AbleSet documentation in your browser.
Add AbleSet Plugin to Ableton
Opens the plugin installer to add the AbleSet plugin to Ableton Live
Get AbleSet Controller Standard Pro
Shows the AbleSet Controller Max for Live device in Finder
Show Global Custom Styles Standard Pro
Opens the folder containing your global Custom Styles file in Finder
Open AbleSet Folder
Opens the AbleSet folder in your current project directory
Change Hostname
Opens the the operating system's settings to where you can change your computer's hostname.
Preferred Network
Submenu to choose which network interface AbleSet uses. Each interface is listed with its IP address.
Version
Displays the installed AbleSet version.
Check for Updates / Update to [version]
Checks for updates or installs the available update.
Submit Feedback
Opens your email app with a new message to AbleSet support.
Create Log Package
Creates a ZIP file of log files and debug information. Prompts whether to include project files. You might be asked by support to create a log package for troubleshooting.
Quit
Quits AbleSet.
Flags Used in AbleSet
AbleSet uses flags to identify what locators and tracks do. All flags need to be written in all-caps to be recognized. Here's a list of all available flags:
Locators
- +PAUSE pauses playback when the playhead reaches this locator. This is mostly useful on section locators.
- +LOOP and +LOOPFULL make AbleSet automatically activate a loop from the current to the next section.
- +SKIP skips the section. The next section must have a locator.
- +END treats the section and all following sections as skipped for the song, useful for defining sections that aren't usually part of the song but might need to be played spontaneously. See the docs for more information.
- +JUMP and +STAY are only valid on a STOP locator (docs) and override AbleSet's default behavior after stopping playback.
Tracks
+SECTIONSmarks a track as a Sections Track- A track named "Sections" is also interpreted as a Sections Track
- There can only be one Sections Track per project. If multiple tracks are marked as Sections Tracks, AbleSet uses the first one.
+LYRICSmarks a track as a Lyrics Track.+CLIPCOLORSor+CCcan be used on Sections and Lyrics tracks and makes AbleSet use the color of the clips on that track to color sections or lyrics.+OSCmarks a track as an OSC Track.+GUIDE,+LOOPGUIDE, and+JUMPGUIDEmark a track as a Guide Track, so AbleSet automatically mutes and unmutes it depending on the state of your set.+GROUPor+Gadds a track to a Track Group+CLICKmarks a track as a click track and adds it to the "Click" Track Group+NEVERMUTEor+NMensures that a track is never muted, even if other tracks are soloed (docs).+FOLLOWSCENEor+FSmakes AbleSet automatically mute the track if the computer isn't currently selected on the connected redundant audio interface.